Using BCMS
The BCMS Manager is the front-end for managing Browsium software in your organization. The Manager also provides basic administrative tools for managing Browsium clients’ behavior.
Dashboard
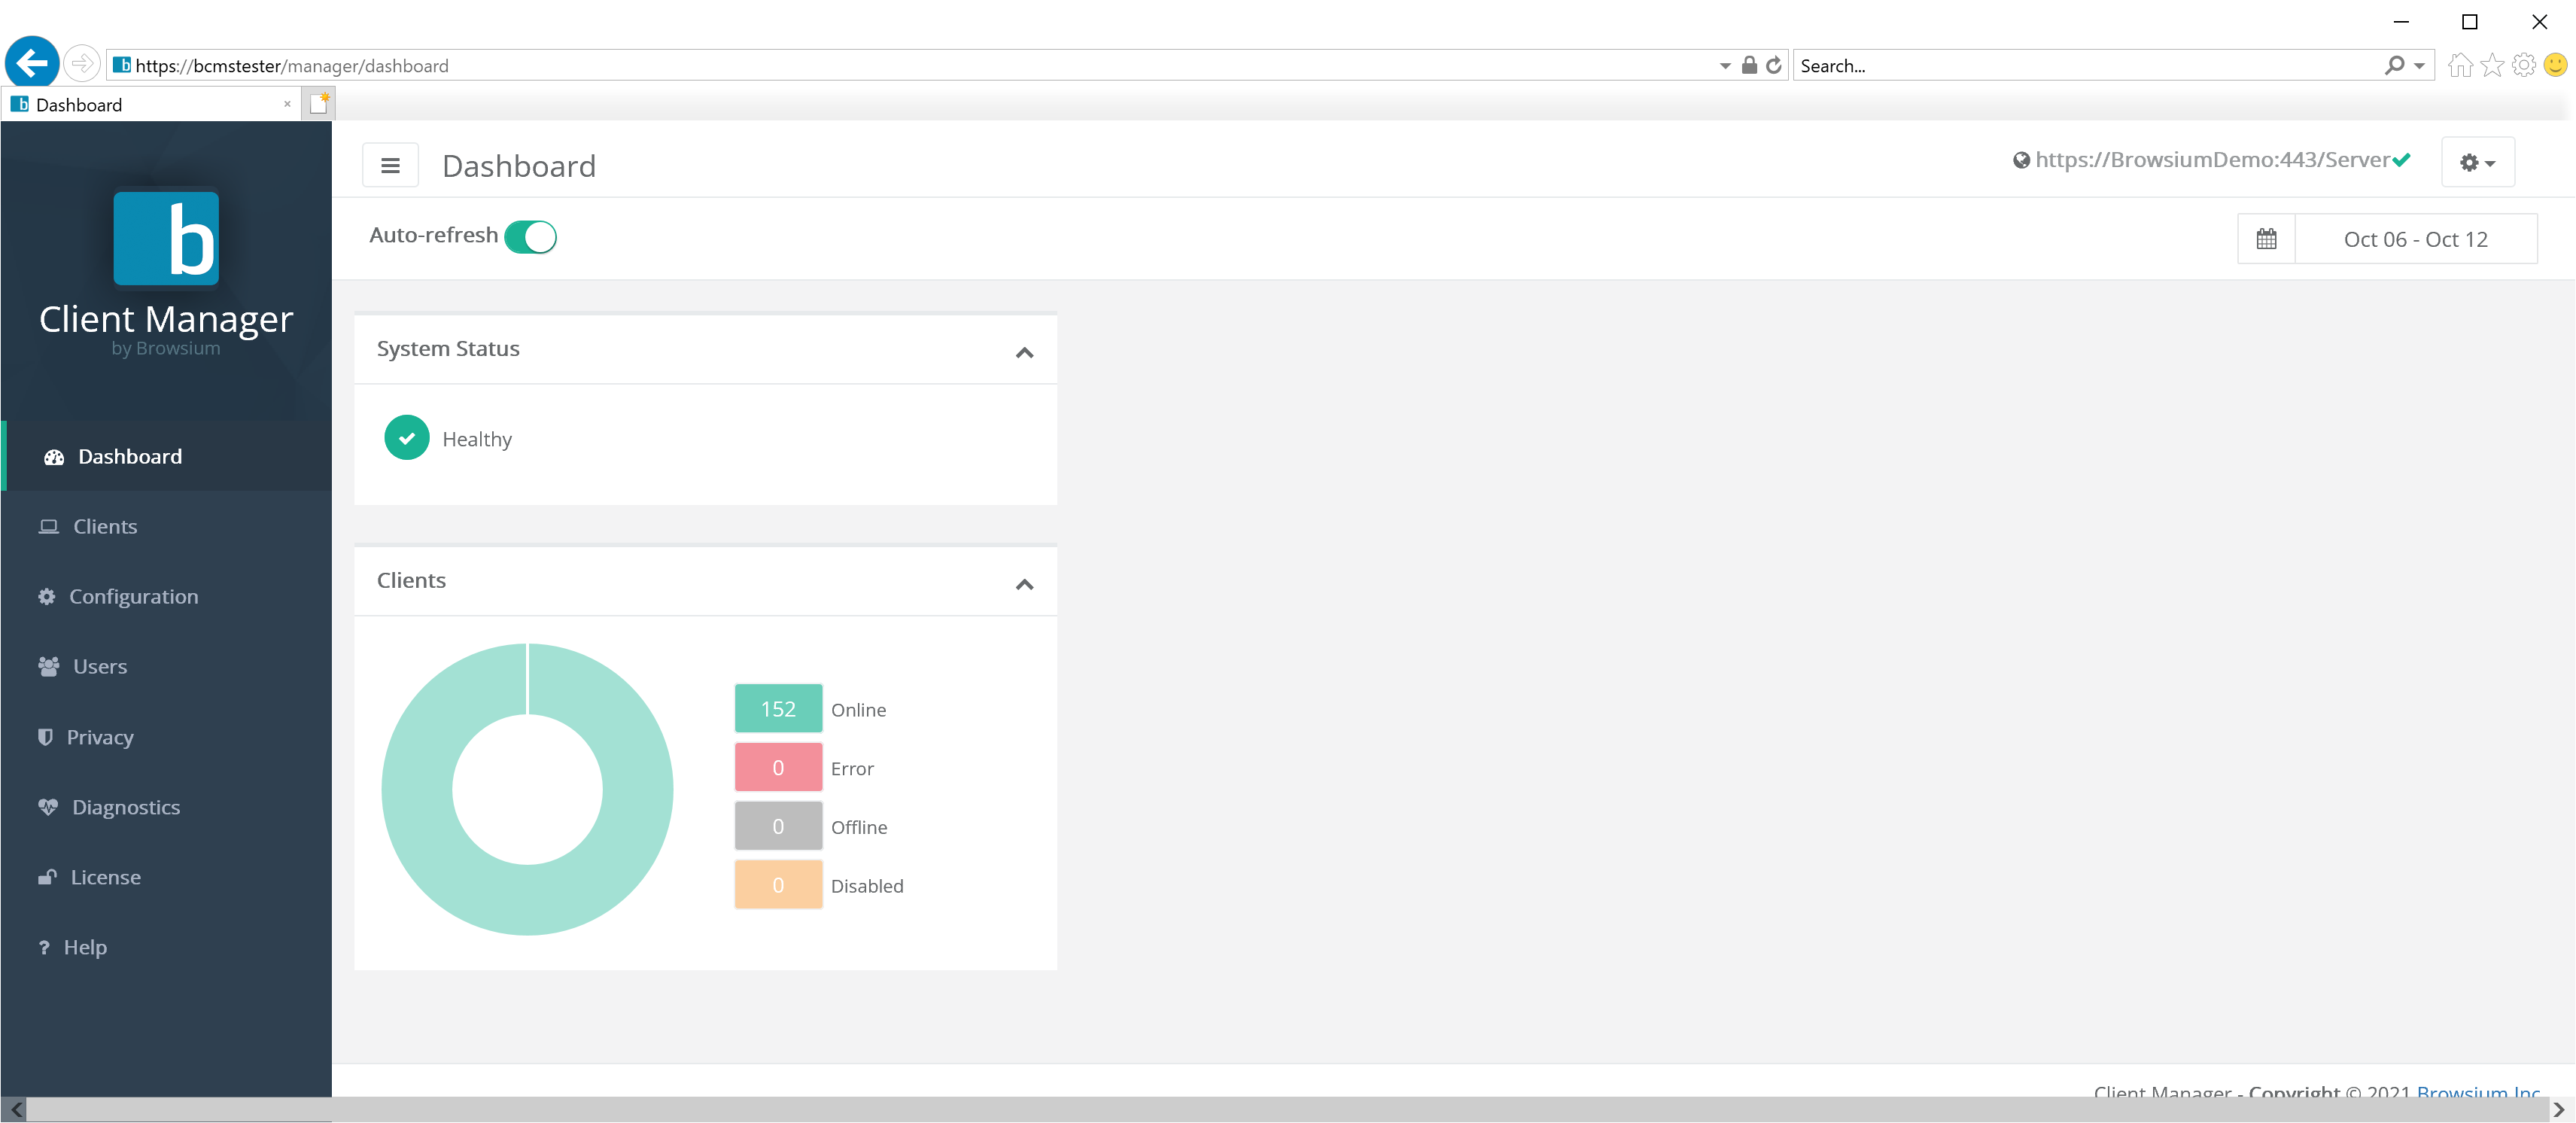
Section titled “Dashboard”The BCMS Manager’s default view is the dashboard, which provides a quick access view for any system issues (under System Status) and information of registered and active systems in the organization (under Clients). By default, the charts will update in real time so long as the ‘auto refresh’ option remains selected.
There are 3 main elements to the default Dashboard view: the navigation ribbon on the left side, the controls bar along the top, and the chart view in the middle. This image depicts an unlicensed and inactive BCMS installation:
{width=“6.122424540682415in” height=“3.230625546806649in”}
A properly configured system would look more like:
 {width=“6.5in” height=“2.2134700349956256in”}
Dashboard Navigation
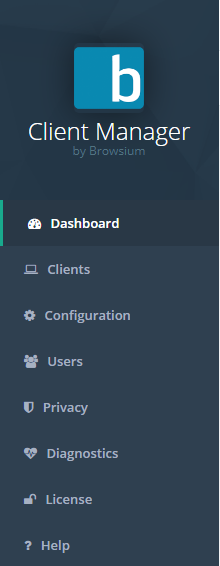
Section titled “Dashboard Navigation”Users and administrators can navigate through the Manager via this navigation ribbon. Click on any line to change the Chart View to the desired view. The navigation ribbon can be collapsed or expanded by clicking on the ‘hamburger’ button in the control bar:
{width=“1.7291666666666667in” height=“0.4375in”}
The following screenshots show the nagivation ribbon’s default view and collapsed view for Proton for each user type.
Administrator Power User *User*
 {width=“1.2362587489063868in” height=“3.1805555555555554in”}
  {width=“0.46274496937882764in” height=“3.1805555555555554in”}
 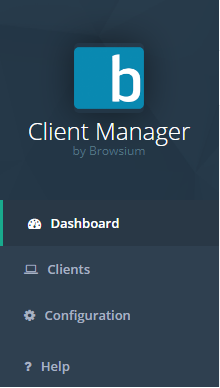 {width=“1.3978379265091863in” height=“2.4652777777777777in”}
  {width=“0.4791666666666667in” height=“2.0069444444444446in”} {width=“1.4293383639545056in” height=“2.5208333333333335in”} {width=“0.4791666666666667in” height=“2.0069444444444446in”}
Each of the options available in the navigation panel are reviewed in the sections below. BCMS Administrator accounts have access to view and modify three pages — Users, Privacy, and Diagnostics — which non-administrative users will not see.
For BCMS administration purposes the only account type required is the Administrator account. Power and Standard user accounts should only be used by customers with Proton enabled.
Controls Bar
Section titled “Controls Bar”The Controls Bar contains a variety of links and controls for BCMS Manager.

The ‘hamburger’ control ( {width=“0.4158202099737533in” height=“0.3261679790026247in”}) will collapse or expand the left-most Navigation bar.
The server URL (https://BrowsiumDemo/Server in the screenshot above) shows which BCMS server the Manager is currently connected to.
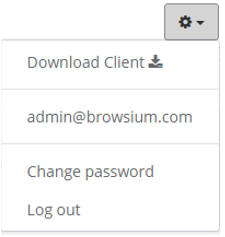
The settings control ( {width=“0.39291447944006996in” height=“0.272911198600175in”}) provides access to advanced features including downloading the Browsium Client, changing the password for the user currently logged into the Manager, and logging out of the Manager. Use Log out to connect to a different Proton server.
 {width=“1.8576870078740157in” height=“1.9567639982502187in”}
User accounts and passwords are stored in the BCMS server (in the database), not in the Manager. The Manager application can be used to log into various BCMS servers, but only one at a time for each browser instance.
Starting with 4.9.1, BCMS supports Single Sign On (SSO) using either Okta or Azure AD identify provider solutions. More information on configuring SSO with BCMS can be found in section 2.4
If the ‘Auto-refresh’ button is enabled, then any data updates made by active Browsium clients will be automatically reflected in the current view.
The date picker control allows you to select a date range, in UTC time, to filter BCMS data in the current view. The date picker will automatically compute {Today} and {Yesterday} and replace them with month and day. Note that any given date in UTC time may be different than the date in your local time zone.
{width=“1.3121325459317585in” height=“2.373254593175853in”}
{width=“4.024459755030621in” height=“2.3230949256342956in”}
The following table provides the details on what you will see for each date picker selection.
Selection Description
{Today} Only data collected since 12:00 midnight UTC will be shown
{Yesterday} Only data collected between 12:00 midnight and 11:59pm UTC the day before will be shown
Last 7 Days All data collected in the previous 7 days (including today) will be shown. This is the default data filter for Proton
Last 30 Days All data collected in the previous 30 days (including today) will be shown
This Month Only data collected since the 1^st^ of the current month will be shown
Last Month Only data collected during the previous month will be shown
Custom Range Allows the administrator to designate custom start and end dates for the view
Section titled “Custom Range Allows the administrator to designate custom start and end dates for the view”Once a date range is selected, the Chart View will update automatically to display only data from the user’s selection.
Chart View
Section titled “Chart View”The Chart View area (main page body) displays the data currently selected by the navigation ribbon. This section is where all interaction is done with the BCMS settings (per the date range selected in the date picker).
{width=“5.816291557305337in” height=“2.451418416447944in”}
Clicking on any graph, column or header item will navigate the user to the appropriate area to drill into further details.
Clients Section
Section titled “Clients Section”The Clients section of the navigation bar provides access to detailed client data for the Browsium client machines connected to your BCMS server.
 {width=“1.8060017497812773in” height=“2.9333628608923883in”}
Status
Section titled “Status”The Status page will display all Browsium clients that are, or have, connected to the server. The Status graph shows a high-level view of machines that are in Error state, those Offline and those Online. This information is critical for a general view of client and system health across the organization. The Client table detail view provides information on the specifics of each installed, licensed client in the organization. The information displayed provides details on the user and machine as well as available Active Directory. The table also shows when the client last connected and the status of each unique Browsium client installation.
{width=“5.836124234470691in” height=“3.351332020997375in”}
You can narrow the list of clients by typing search criteria into the search bar
To disable data collection from a specific client, check the box next to it in the list and click the ‘Disable’ button. This will prevent that client from uploading any data in the future. Note that existing data already uploaded by that client will remain and will not be removed or filtered. Client data upload can be re-enabled by selecting the appropriate clients and selecting ‘Enable’.
For a full report on a specific client, click the entry in the list to see a basic view of client inventory. The standard view includes client status, OS and TPM version as well as any installed Browsium software.
For more detailed client inventory and full view of web application, browser add-ons, ActiveX, Java and Web activity, customers should purchase and install Browsium Proton. Once deployed, Proton will enhance this view with the additional information.
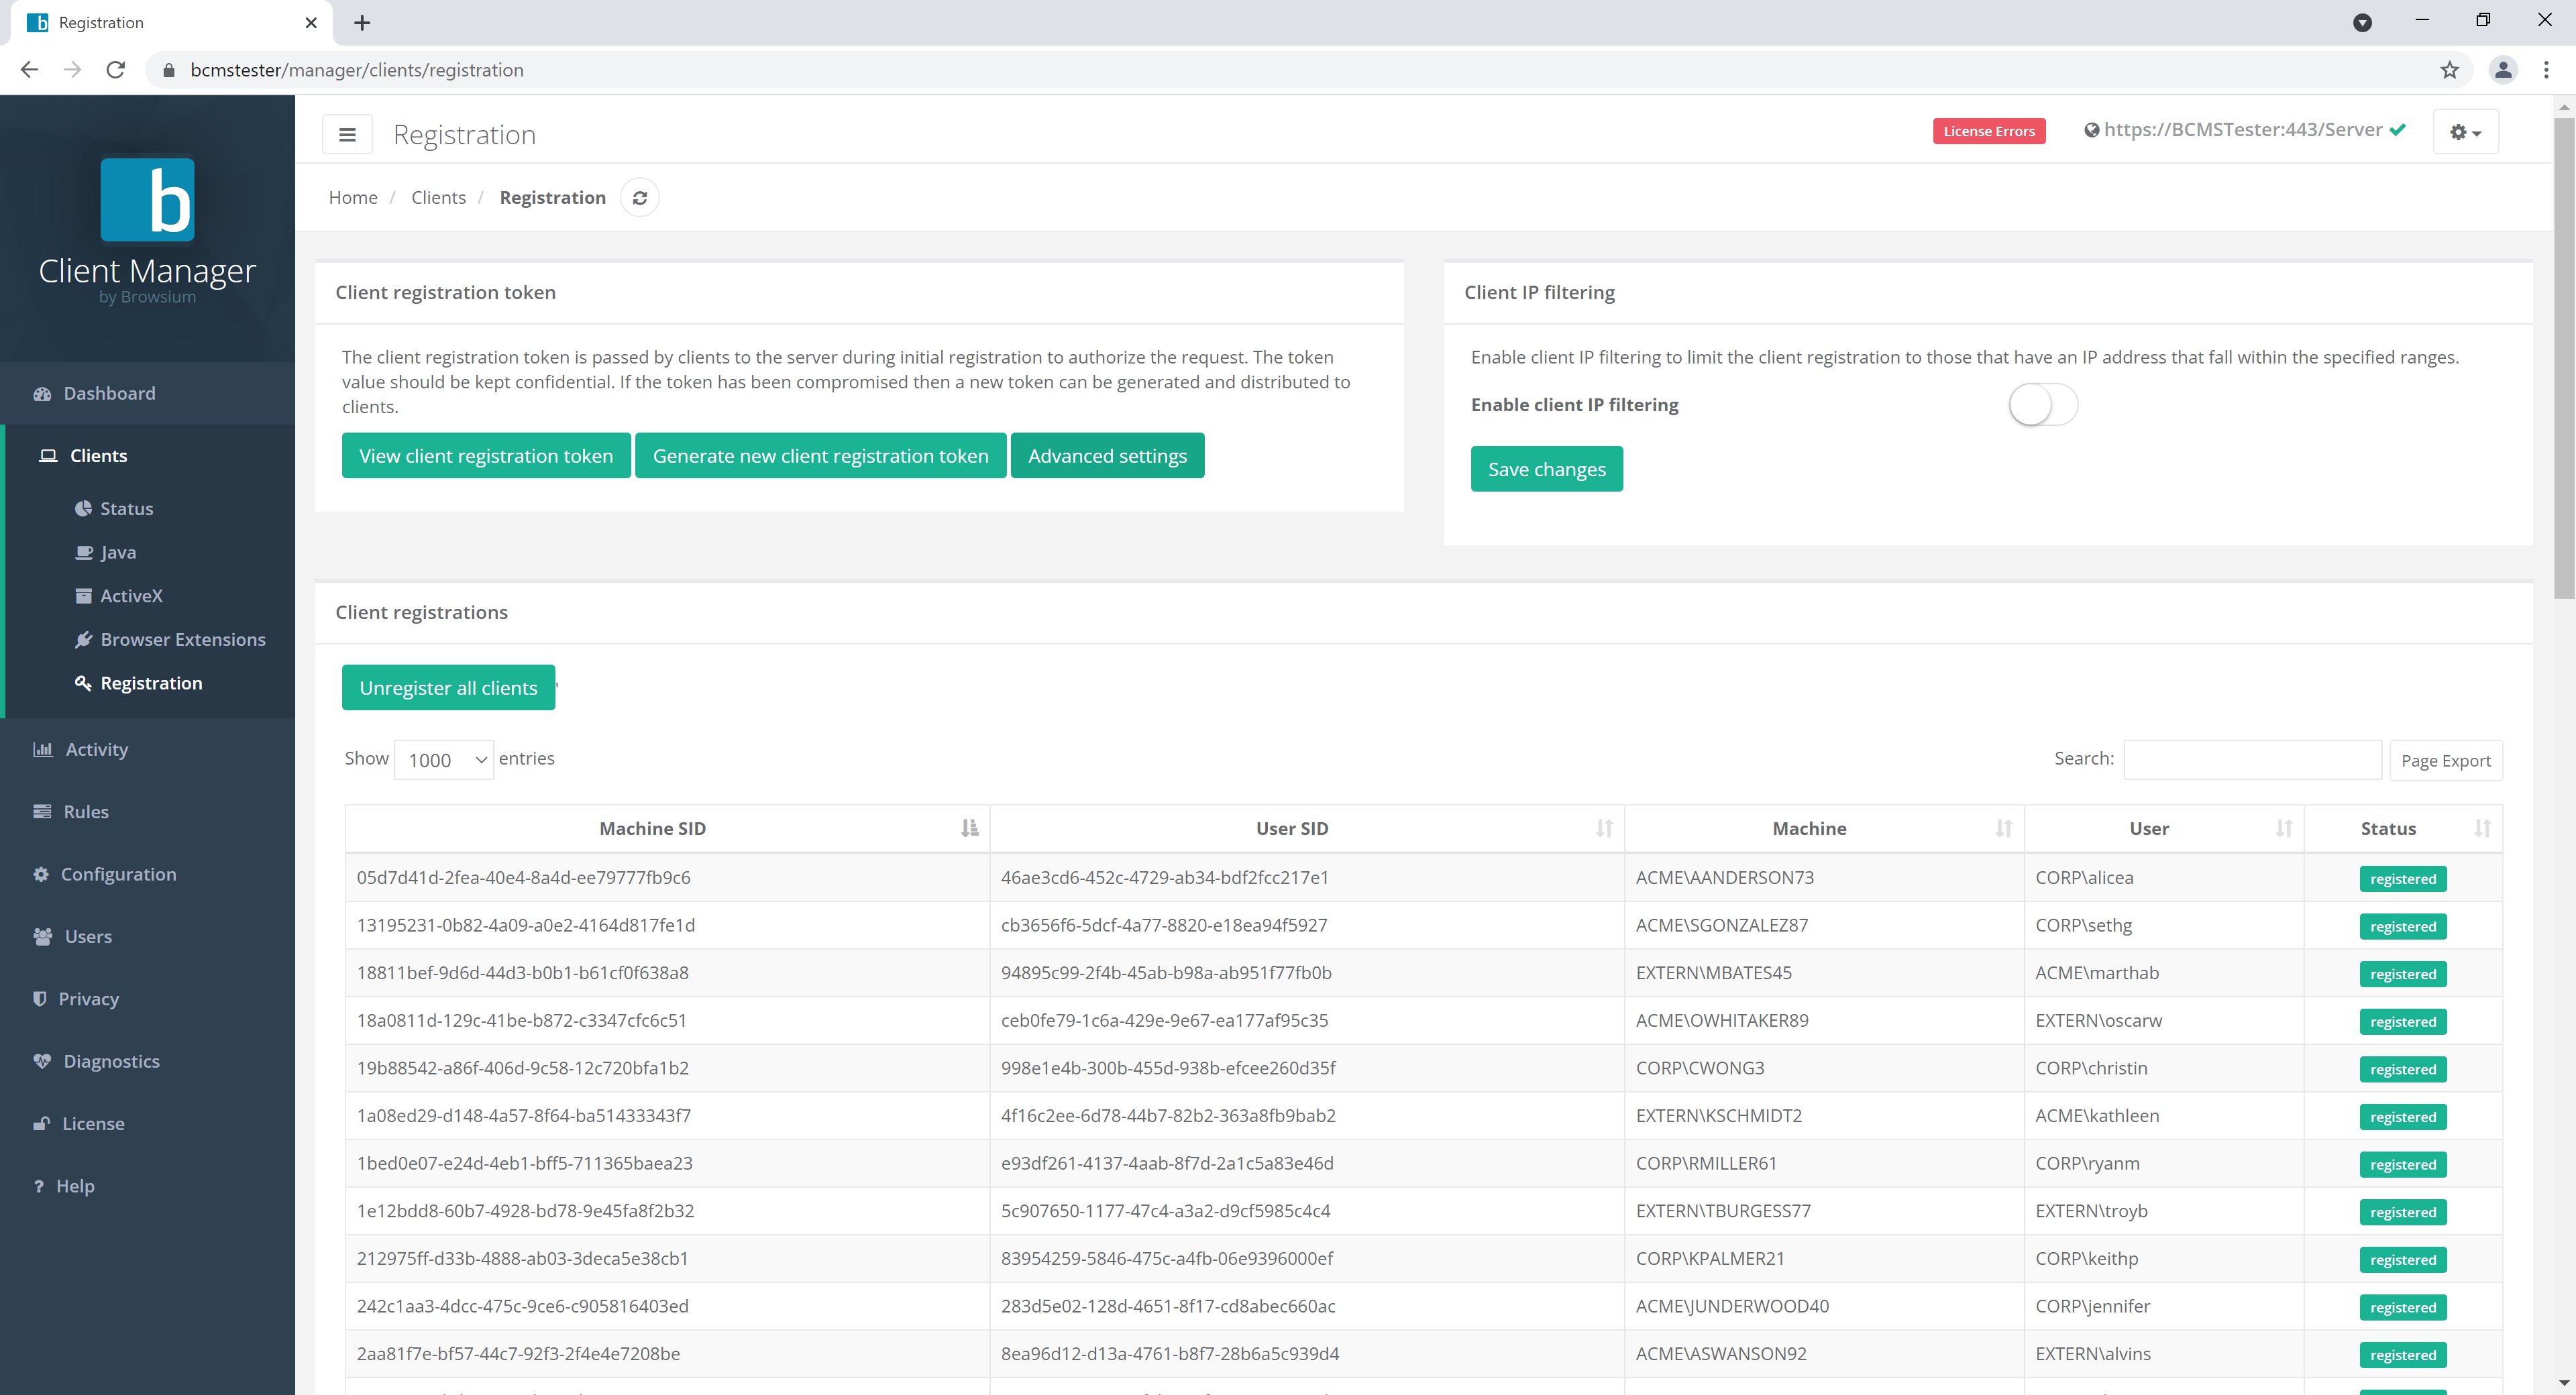
Registration
Section titled “Registration”The Client Registration page provides features and information to ensure the BCMS system and clients properly communicate. The upper left portion of the page is used to manage the unique registration token used by the organization for this Browsium client installation. Client token validation ensures only authorized clients are communicating with the BCMS server and consuming licenses. To provide additional protections against unauthorized connectivity, clients can further be limited from connecting by limiting to a defined IP range. The lower portion of the screen provides information on the unique Machine and User SIDs generated with each user and client machine.
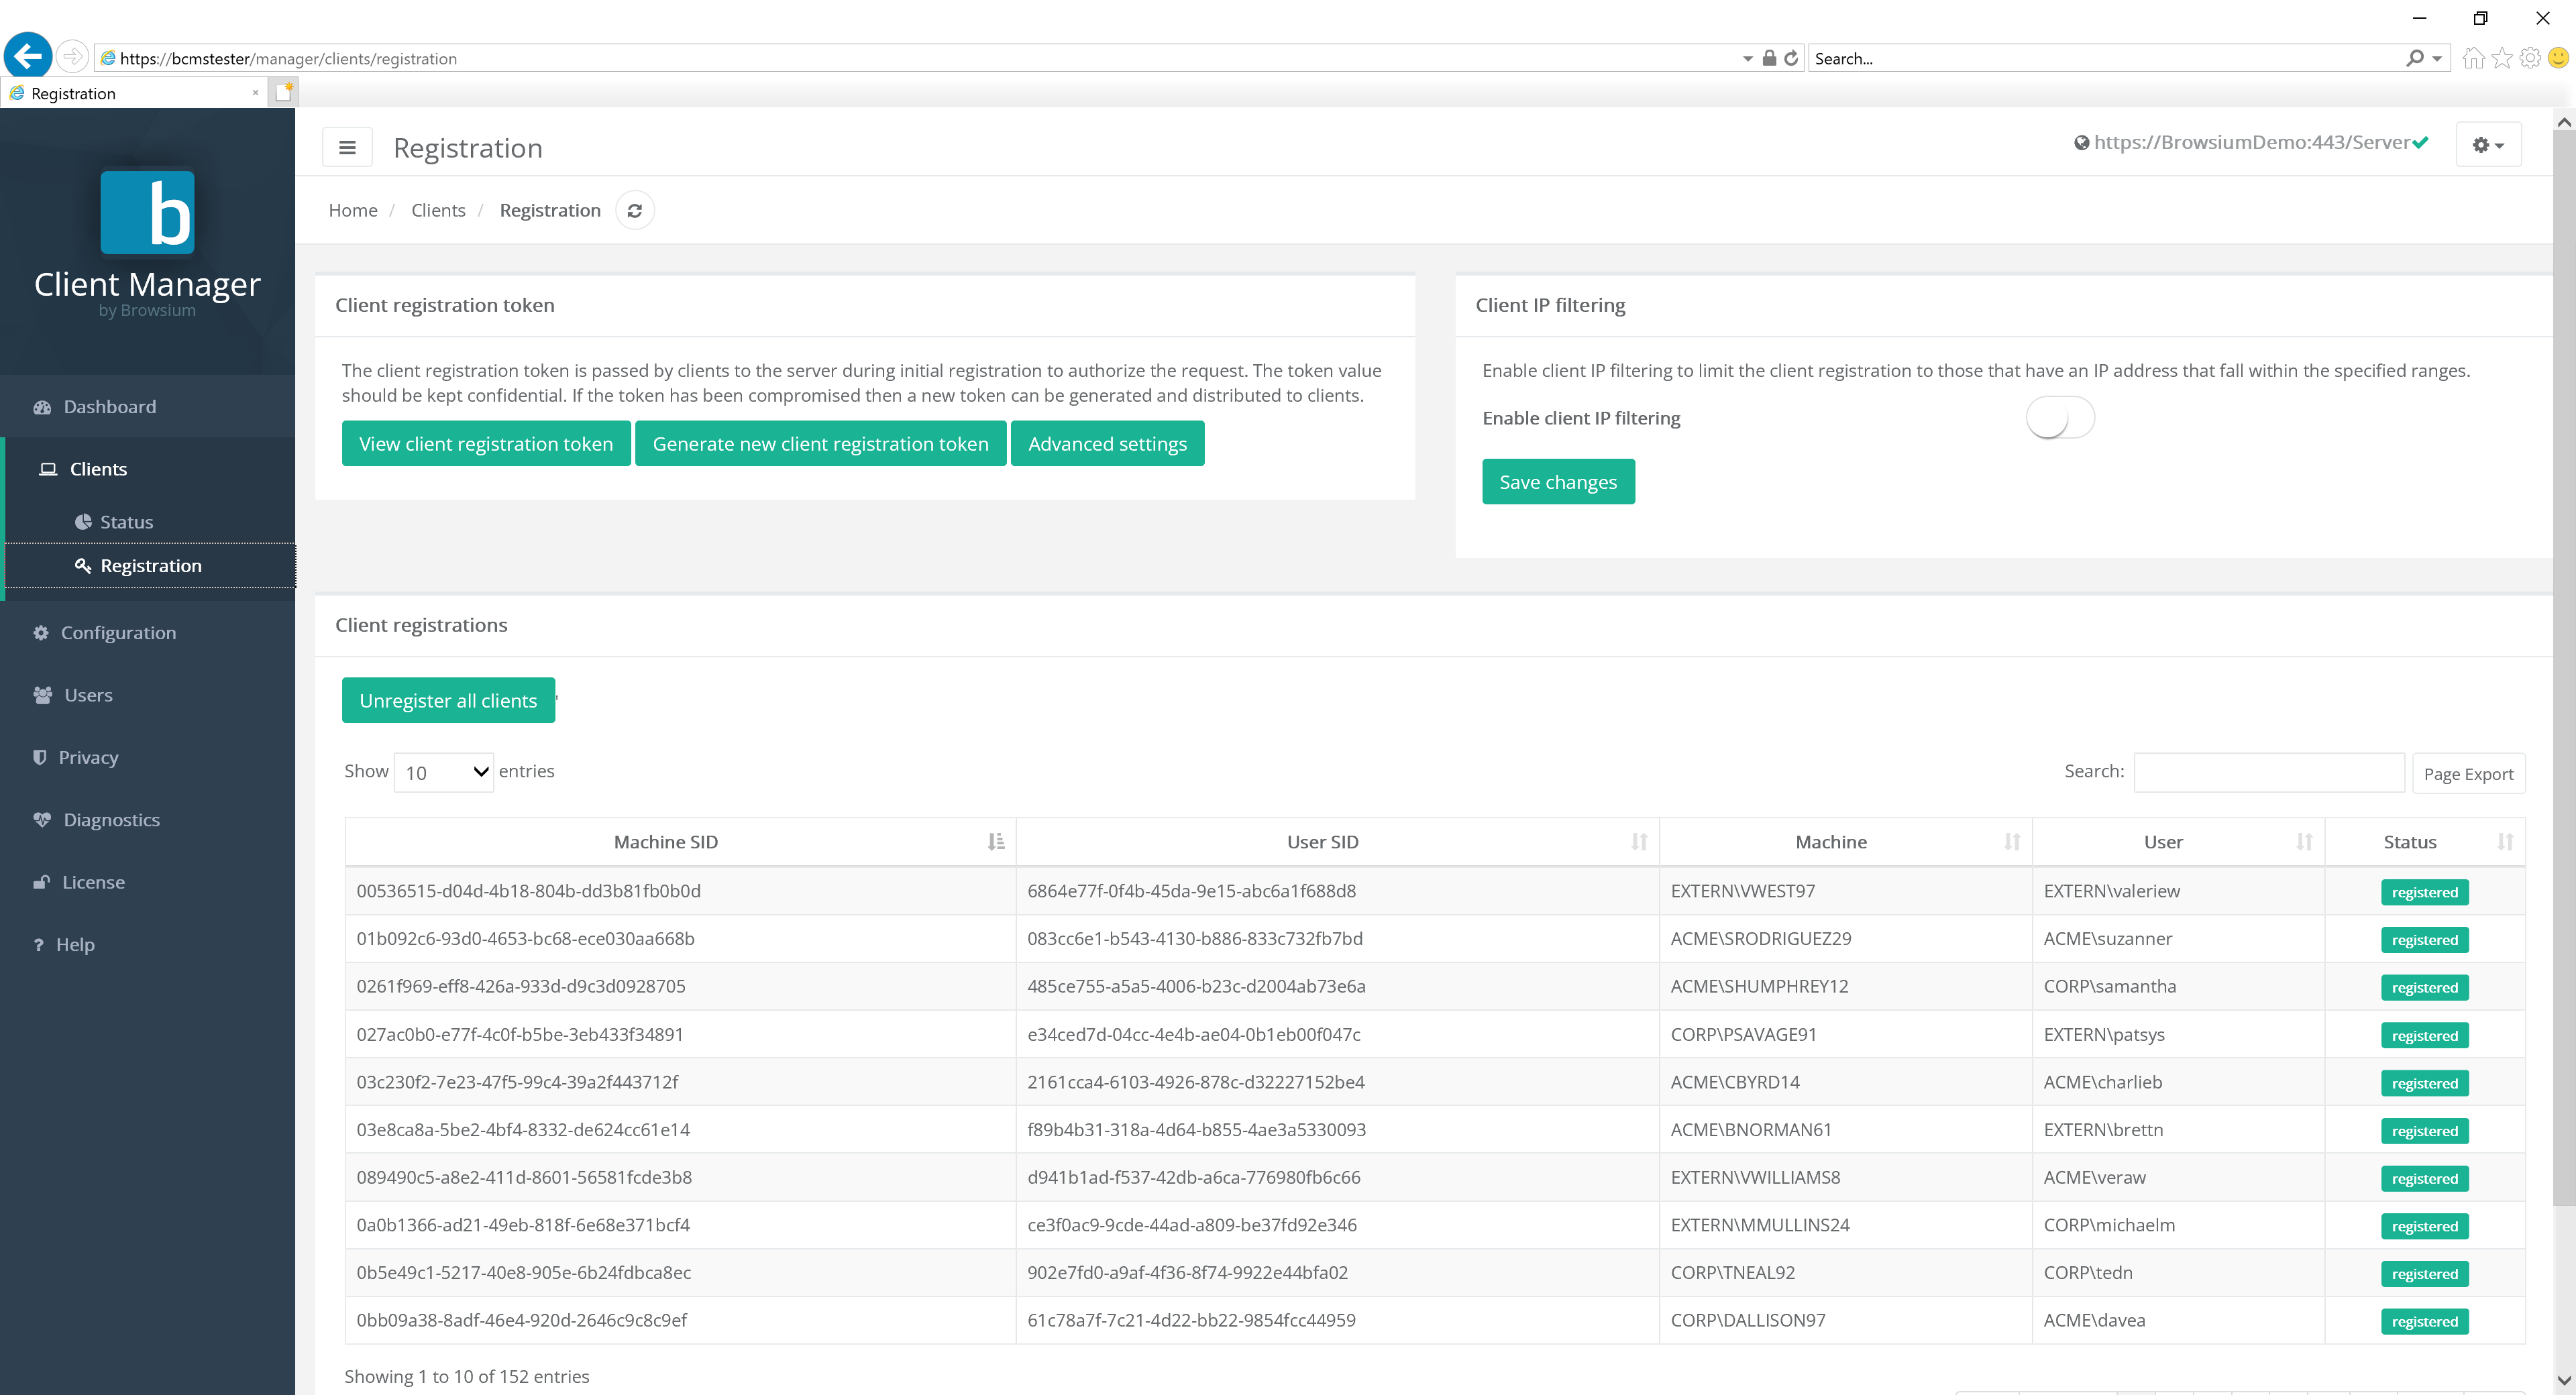 {width=“6.606270778652668in” height=“3.324514435695538in”}
Client Registration Tokens
Section titled “Client Registration Tokens”Client registration tokens restrict which clients are allowed to connect to the Browsium Client Management System. If configured, only clients with a specific token will be allowed to connect - clients without the correct client registration token are not allowed to activate any products.
Clients without the correct registration token cannot upload Proton data.
 {width=“5.30482283464567in” height=“1.2932152230971128in”}
The View client registration token button displays the client registration token and also provides a link to download the client registration token file for deployment.
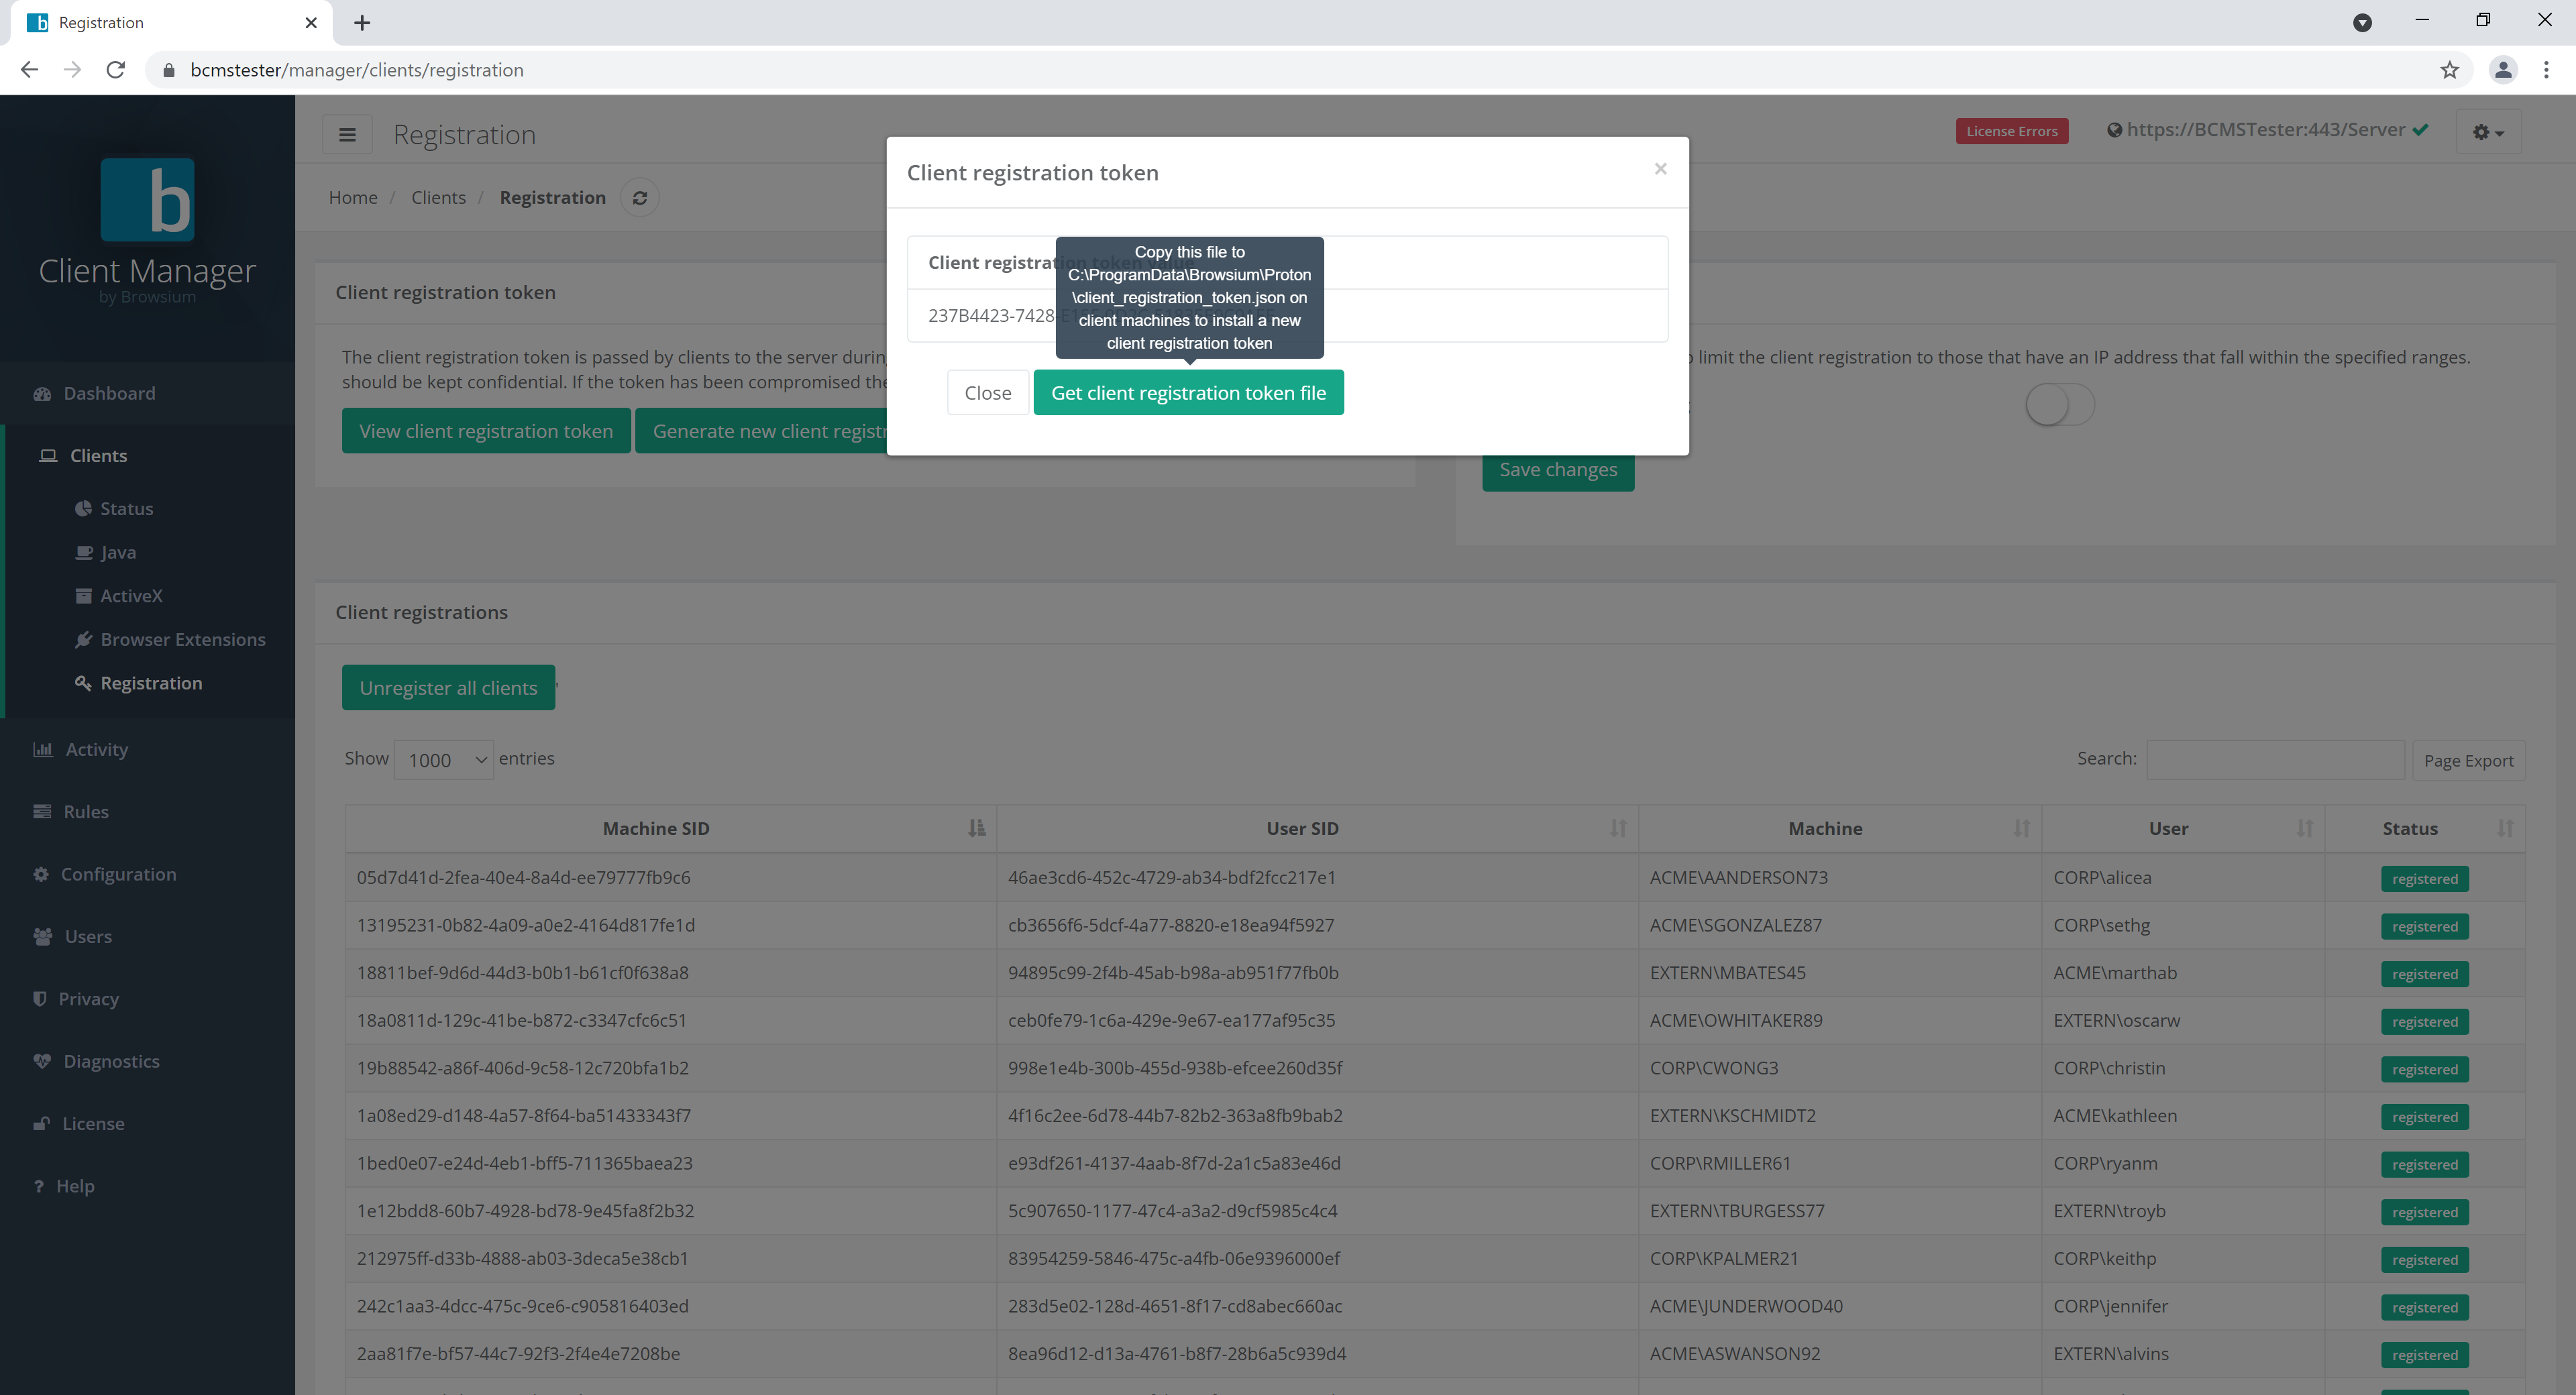 {width=“4.287236439195101in” height=“1.7267071303587052in”}
The Generate new client registration token button does exactly that - generates a new client registration token.
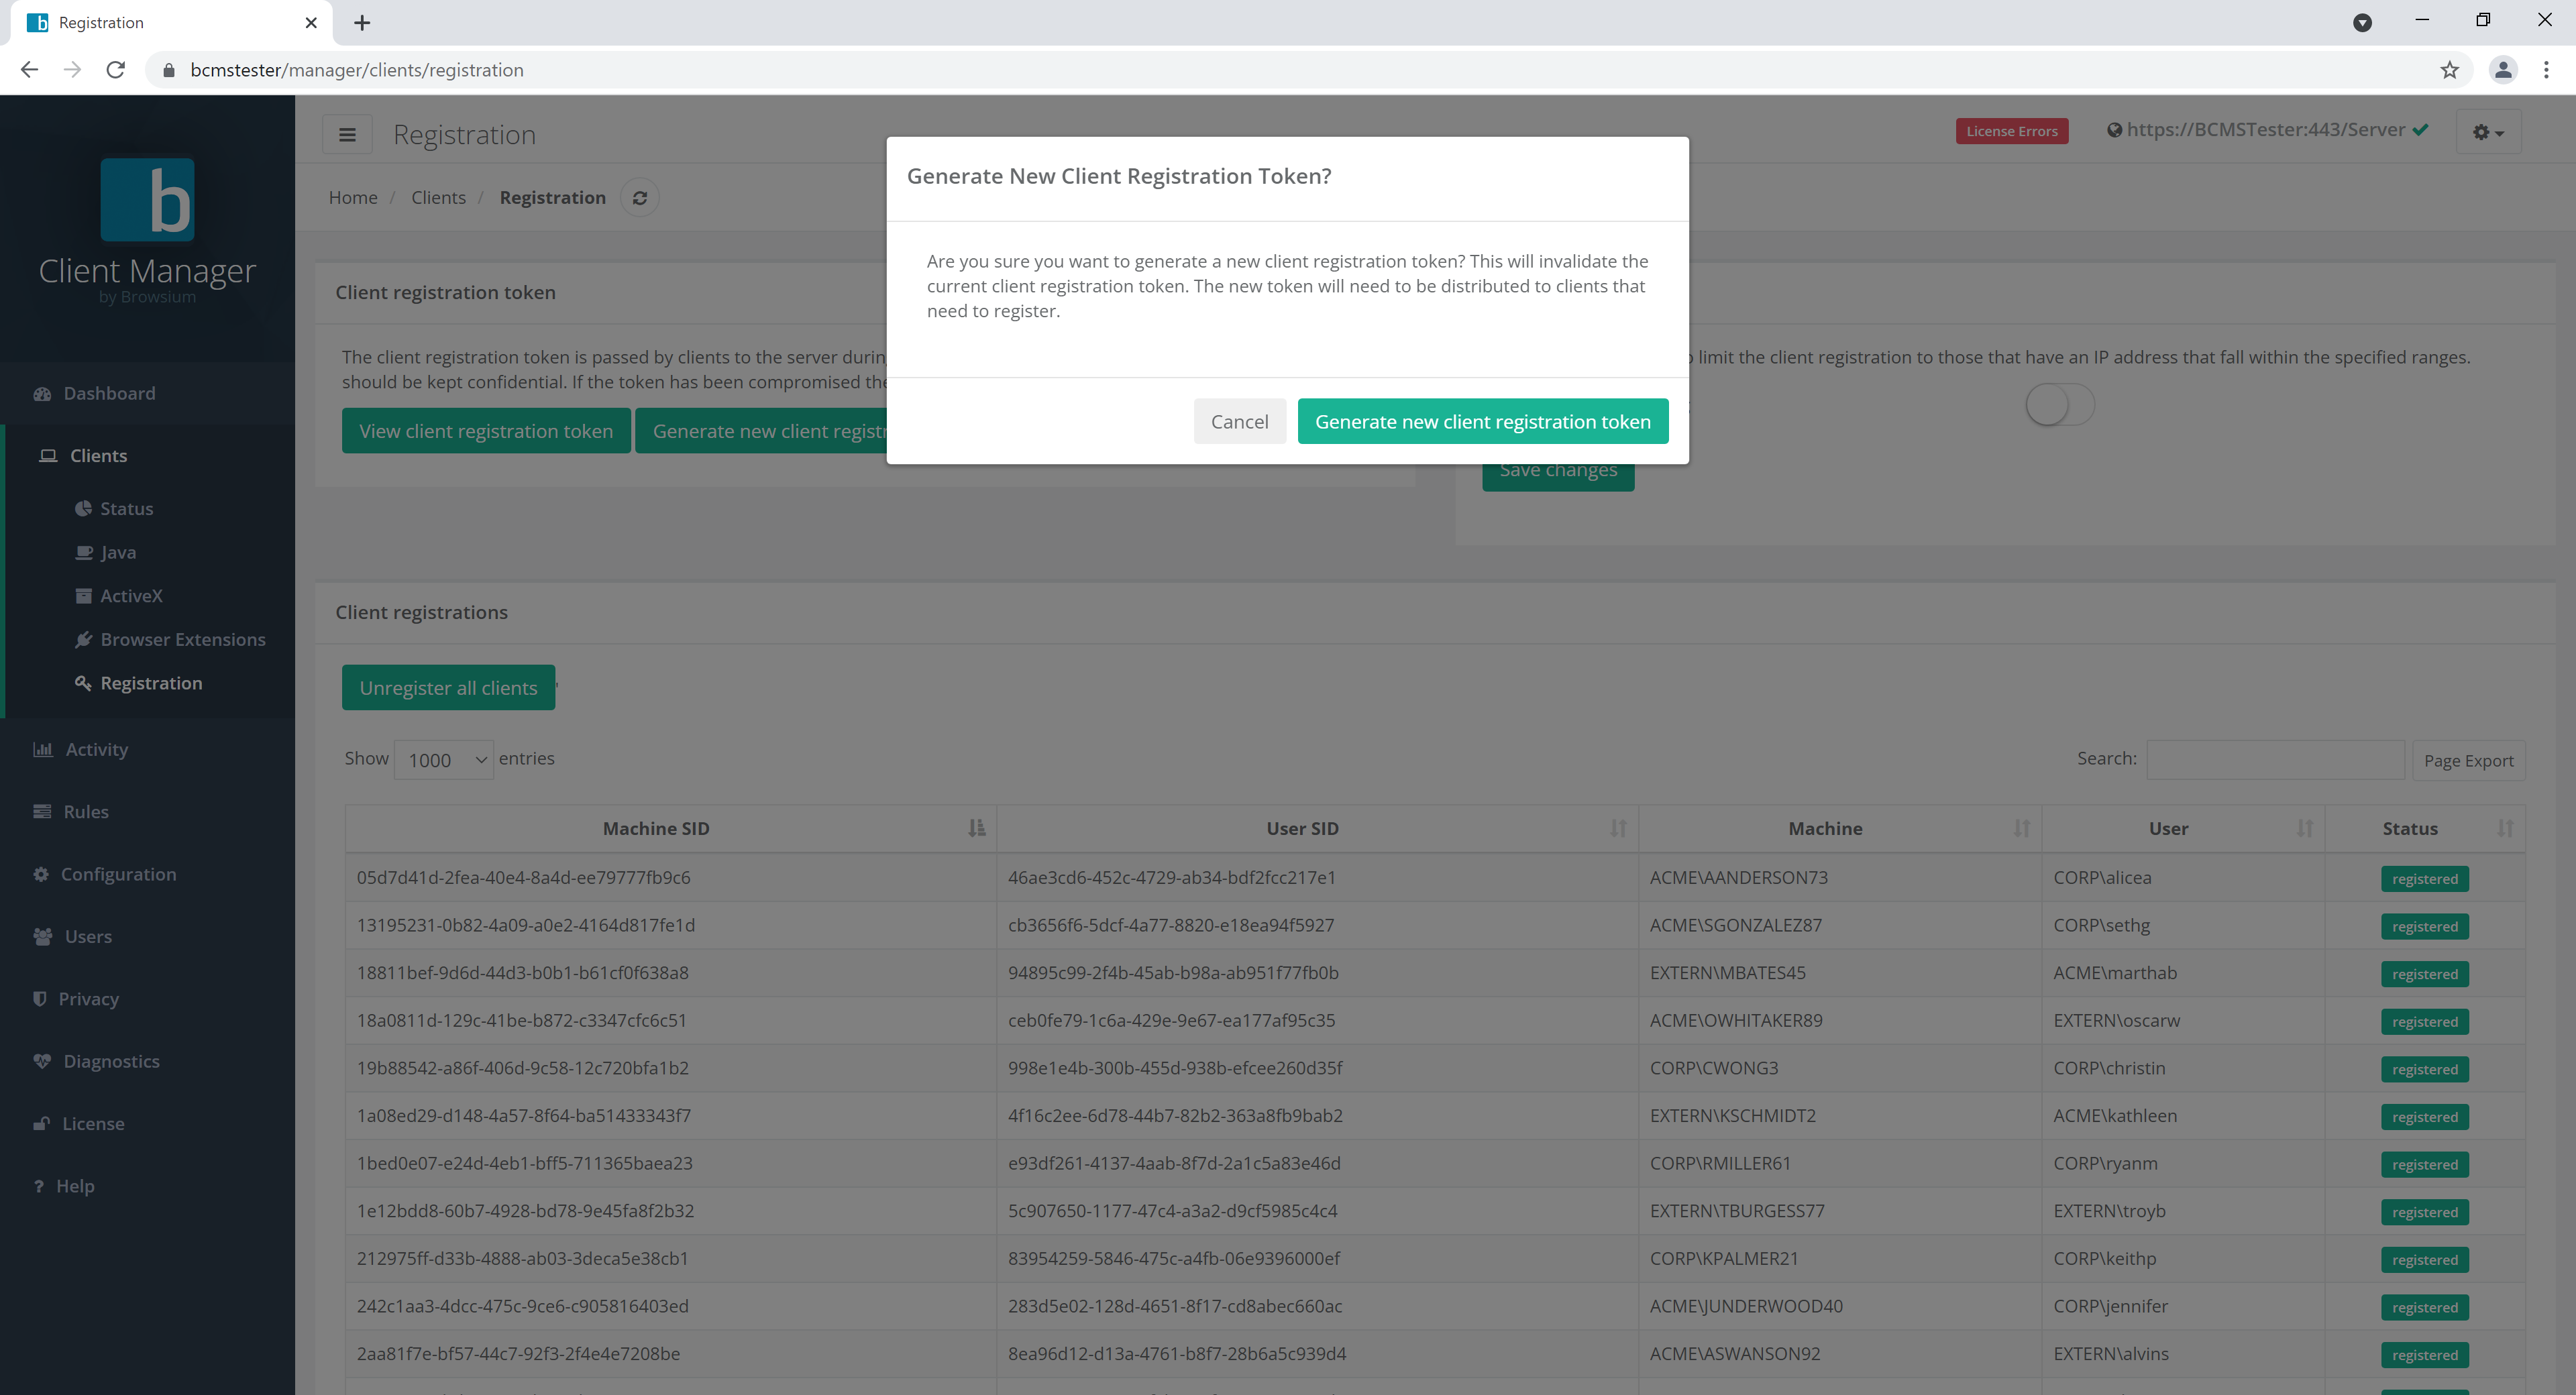 {width=“4.303232720909886in” height=“1.7845341207349081in”}
Clients with the old token will become immediately unregistered when at the next interval check-in. The interval check-in values are set on the Configuration page. Generating a new client registration token should only be done as part of a new deployment or if the original token becomes compromised.
The Advanced settings button offers options for customers to enable features that may be required for some installation scenarios.
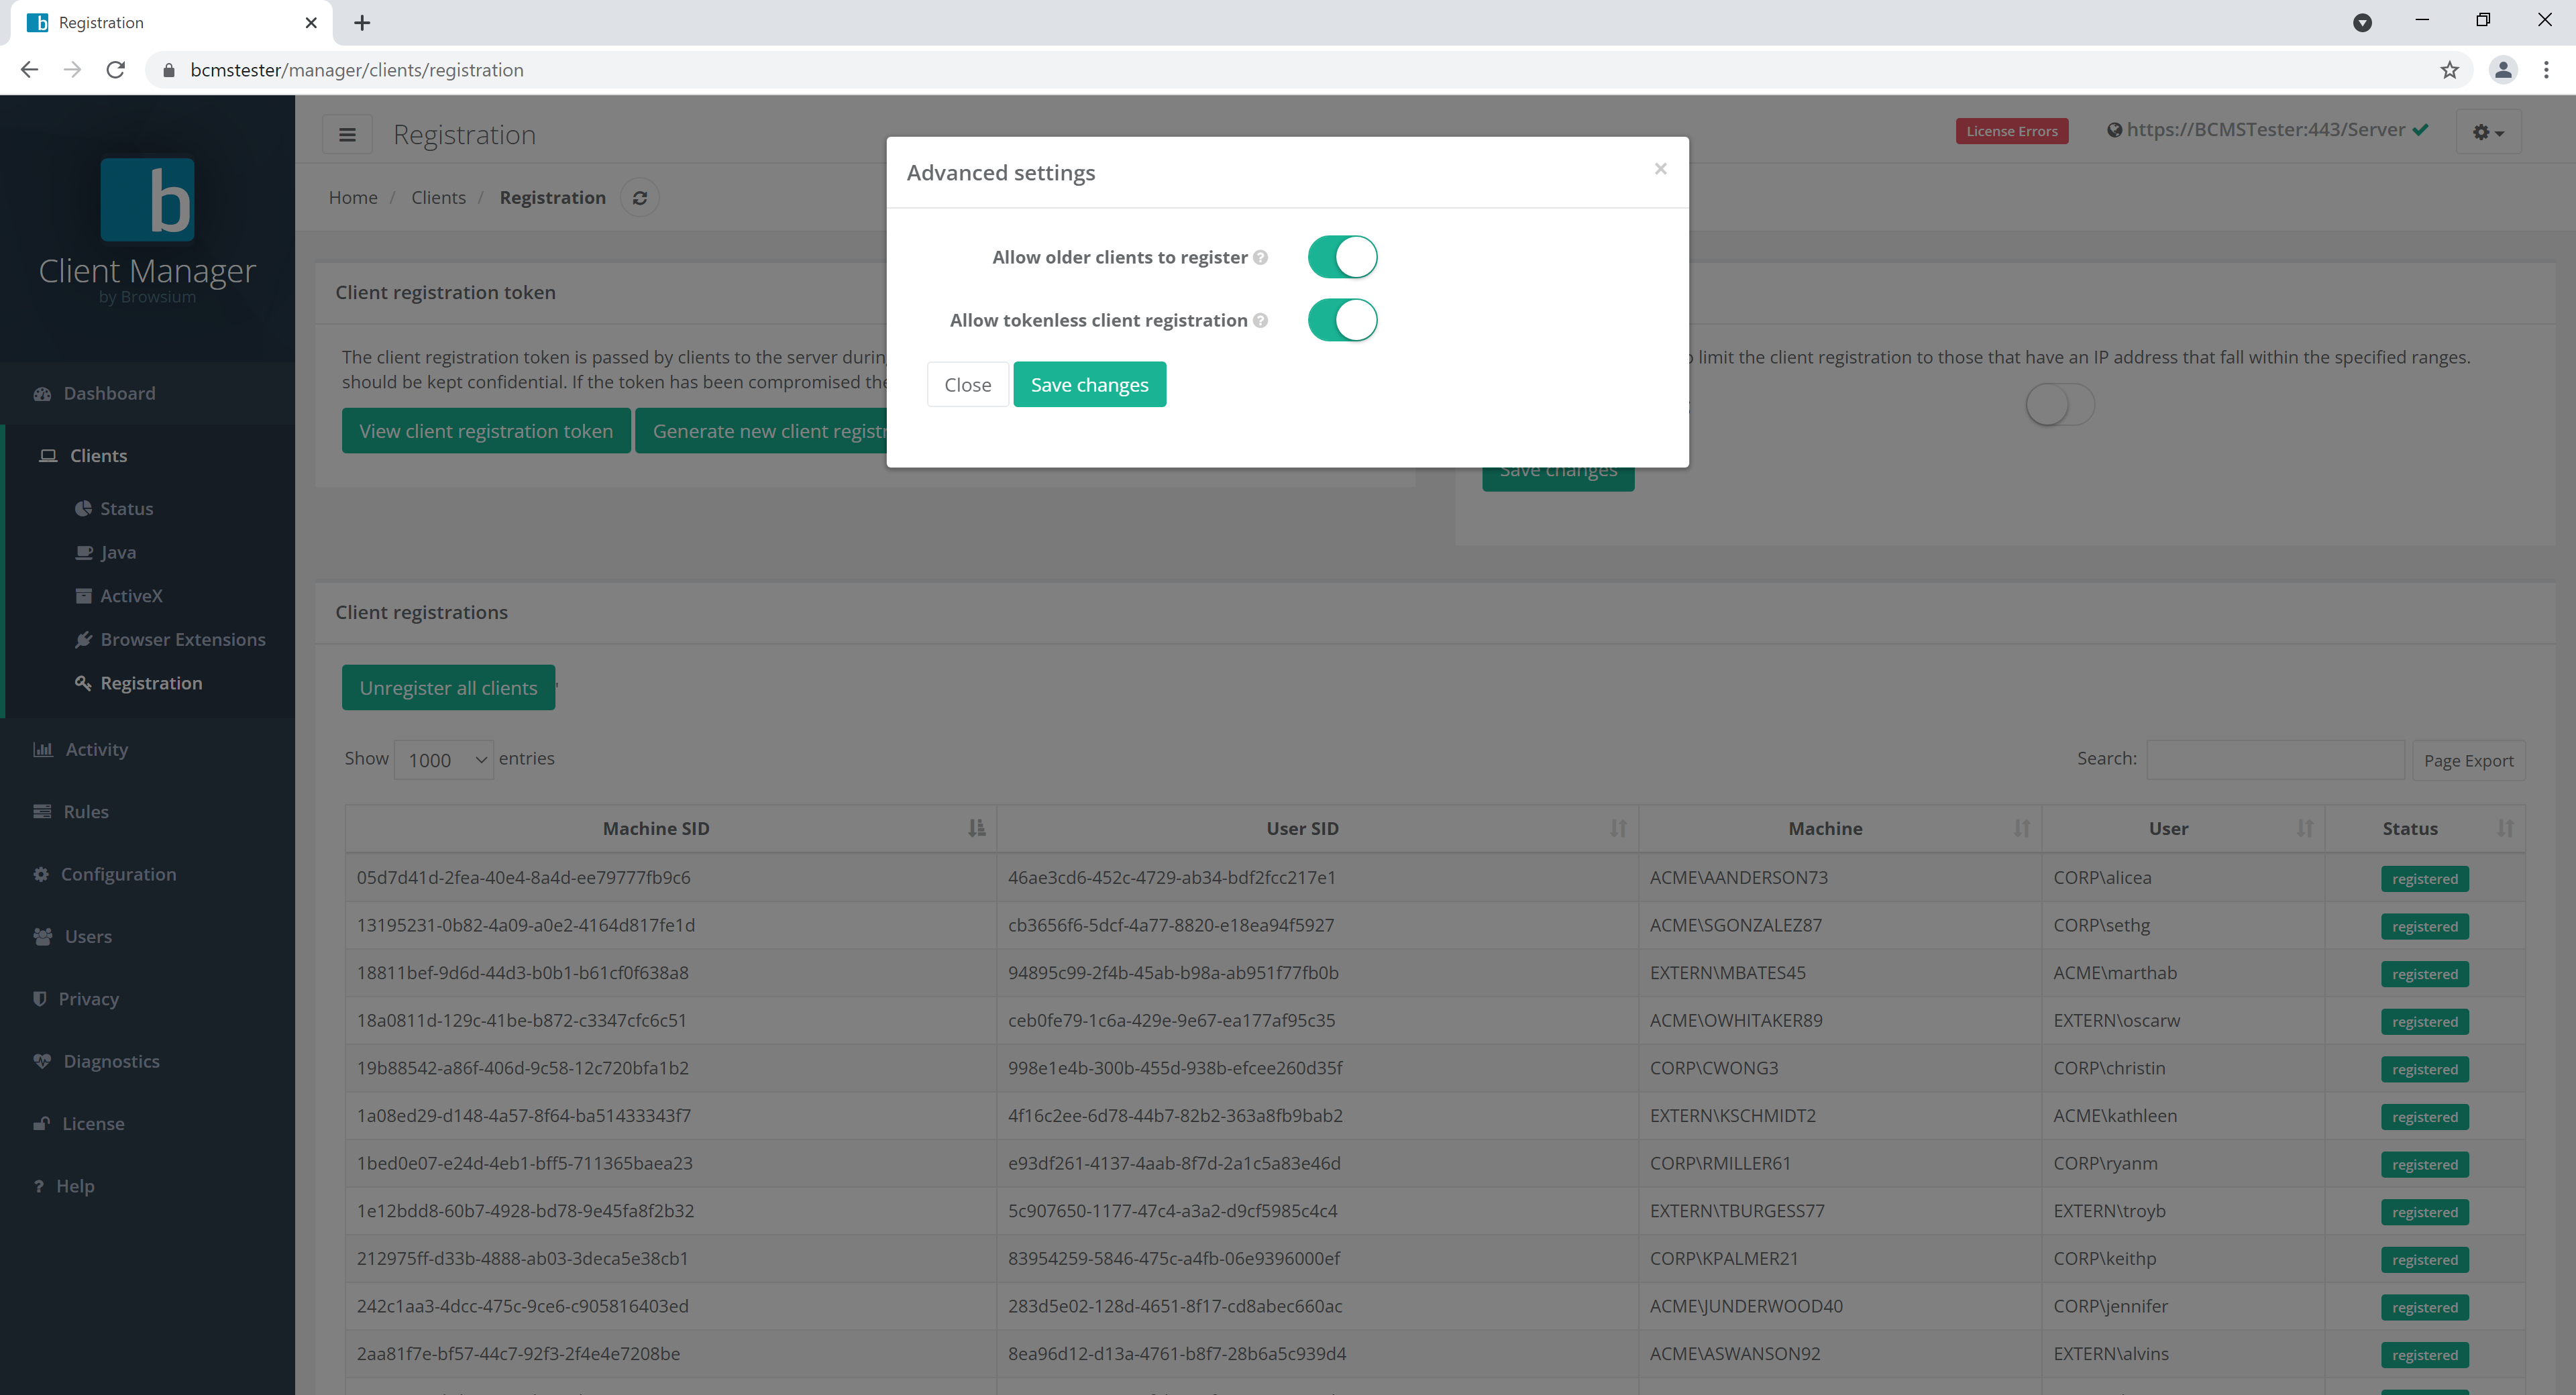 {width=“4.329529746281715in” height=“1.8091994750656168in”}
- Allow older clients to register. Enable this setting if you have Browsium Client 4.3 or earlier installed in your environment as those versions did not support client registration tokens.
Browsium Client versions 4.3 and earlier are no longer supported.
- Allow tokenless client registration. If enabled, clients without the client registration token will still be able to register.
Tokenless registration could allow for unauthorized clients to connect to BCMS. Do not enable this option if company security or regulatory requirements prohibit unauthorized or unauthenticated connections to company systems.
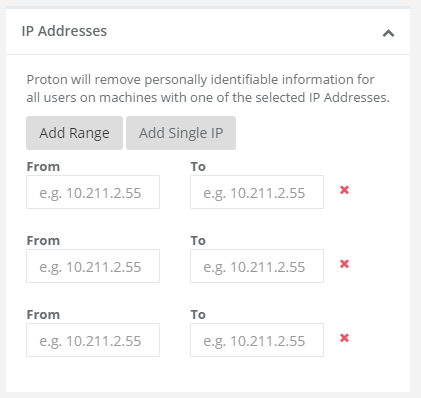
Client IP Filtering
Section titled “Client IP Filtering”This section allows you to configure which clients may register with BCMS based on their IP address. Both ranges and/or single IP addresses can be added.
 {width=“4.418065398075241in” height=“1.2024201662292213in”}
If enabled, clients that do not match configured address ranges will not be able to register.
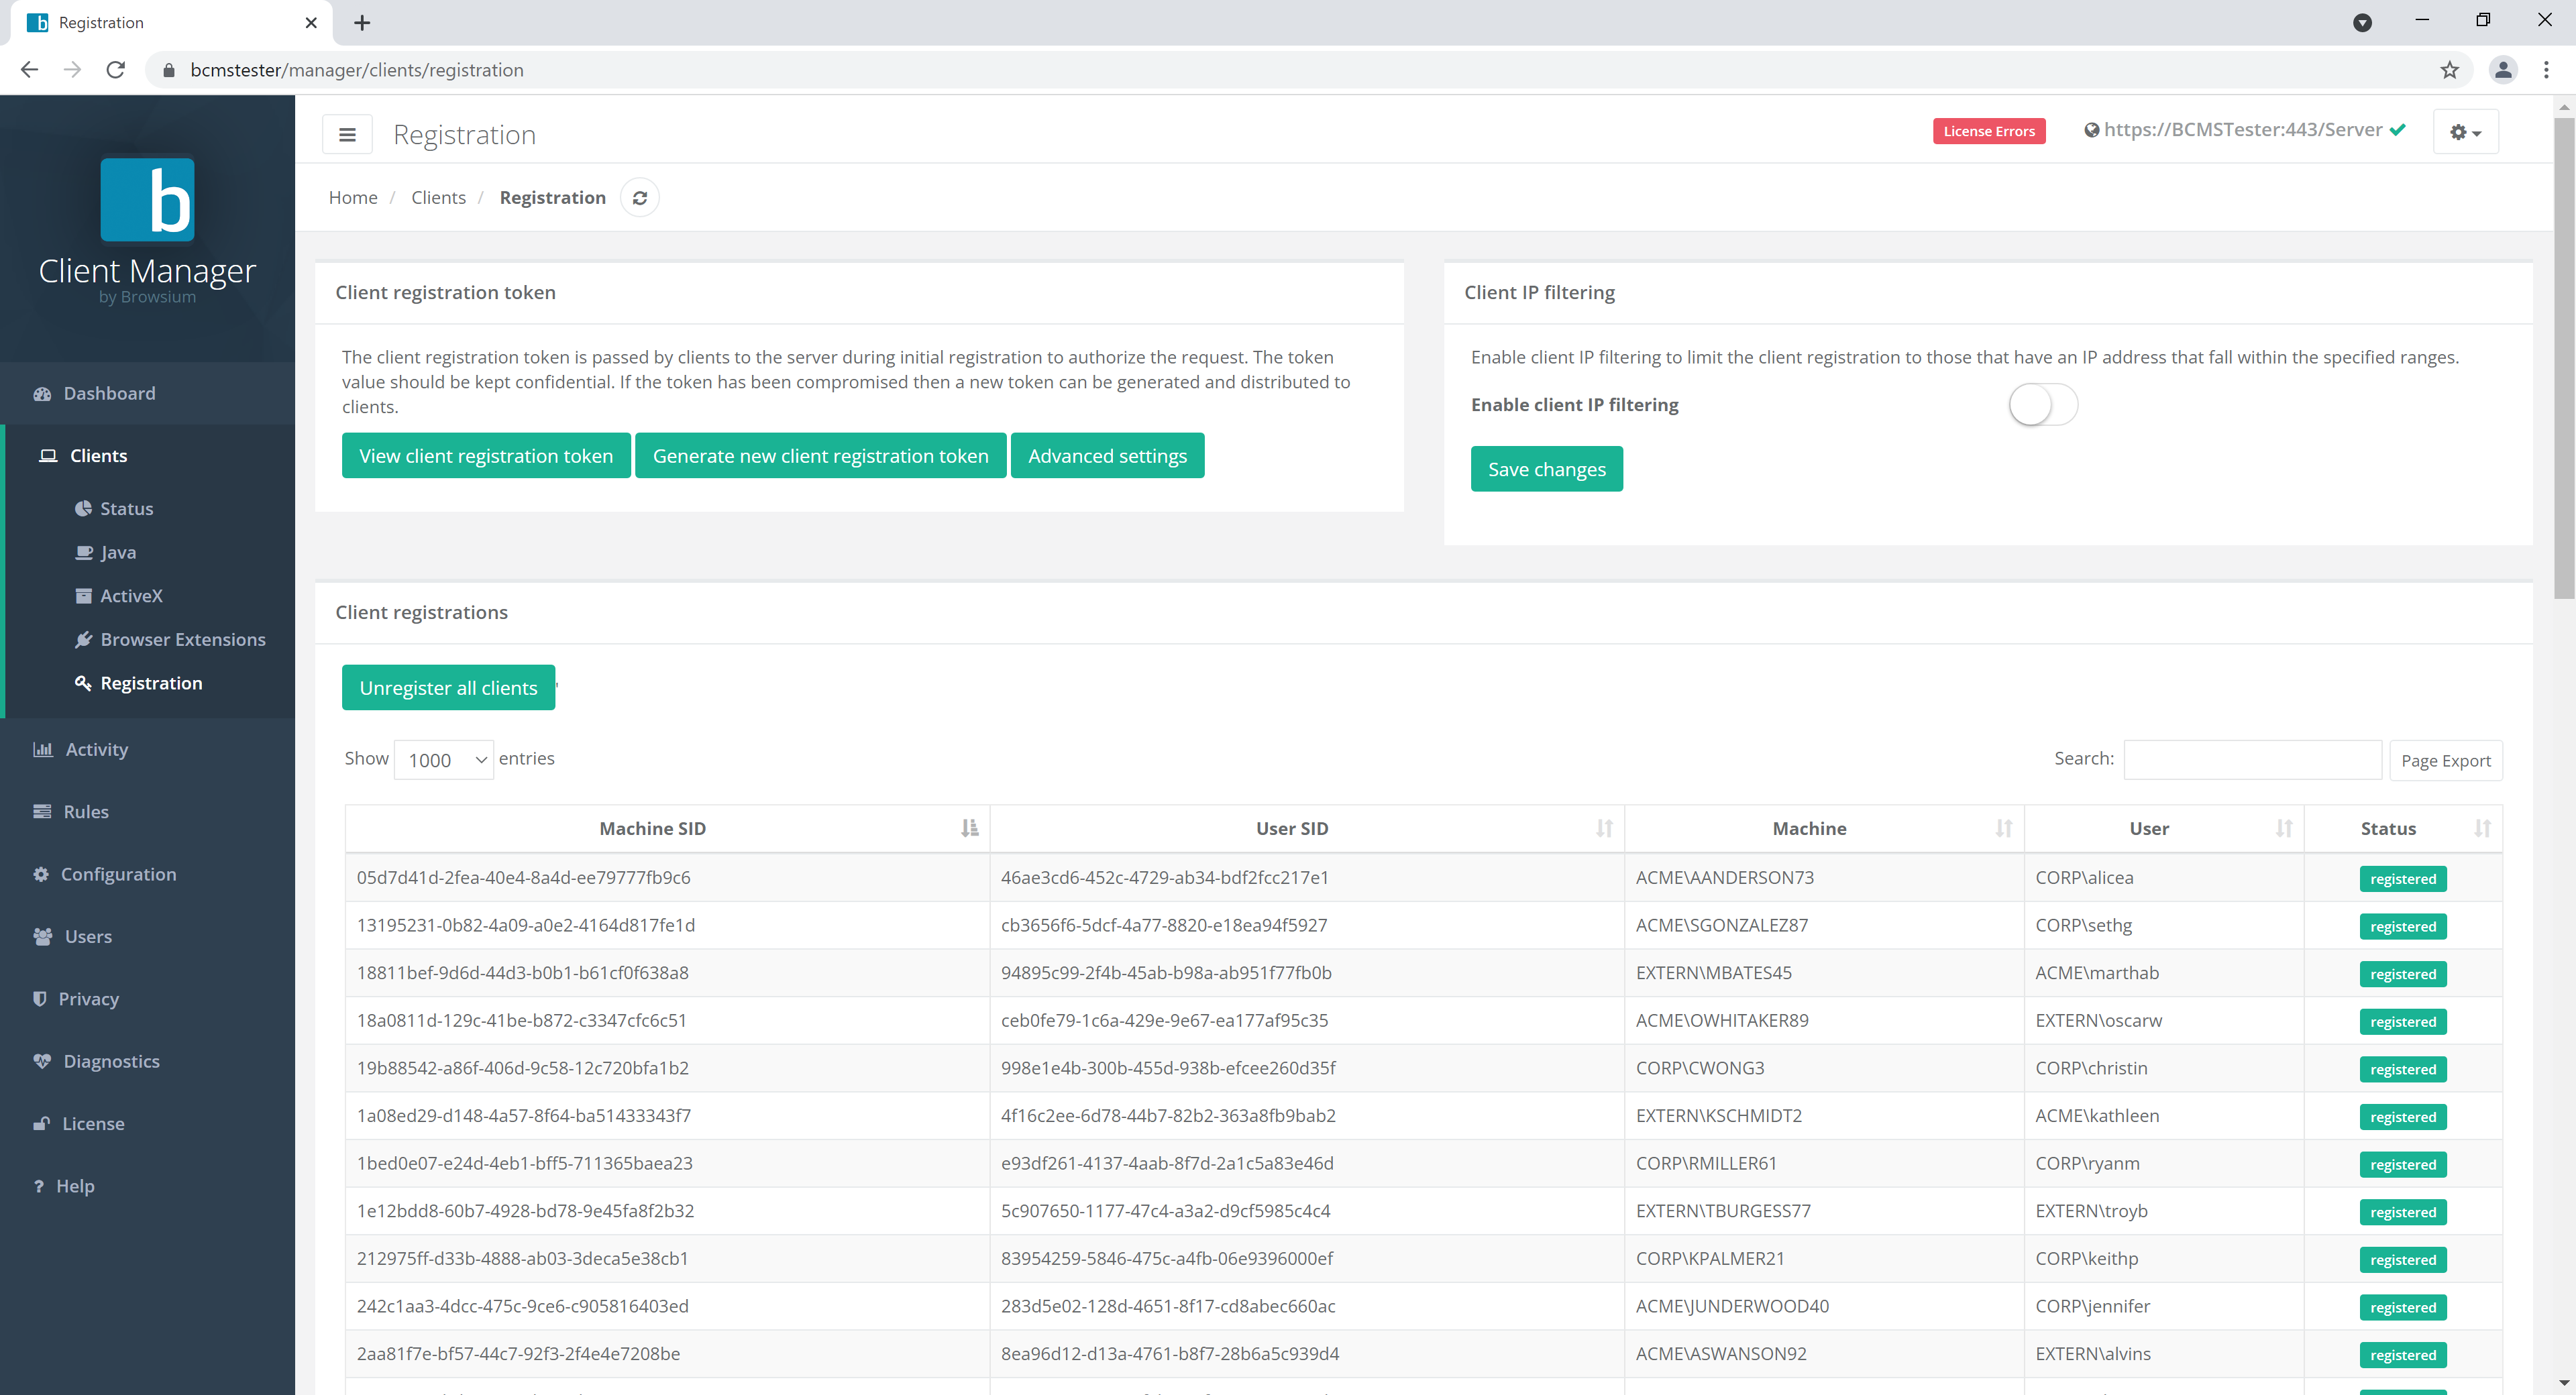
Client Registrations
Section titled “Client Registrations”This section allows you to see all clients that are registered with BCMS. You can also unregister all clients here.
{width=“6.490583989501312in” height=“1.216984908136483in”}
Configuration Page
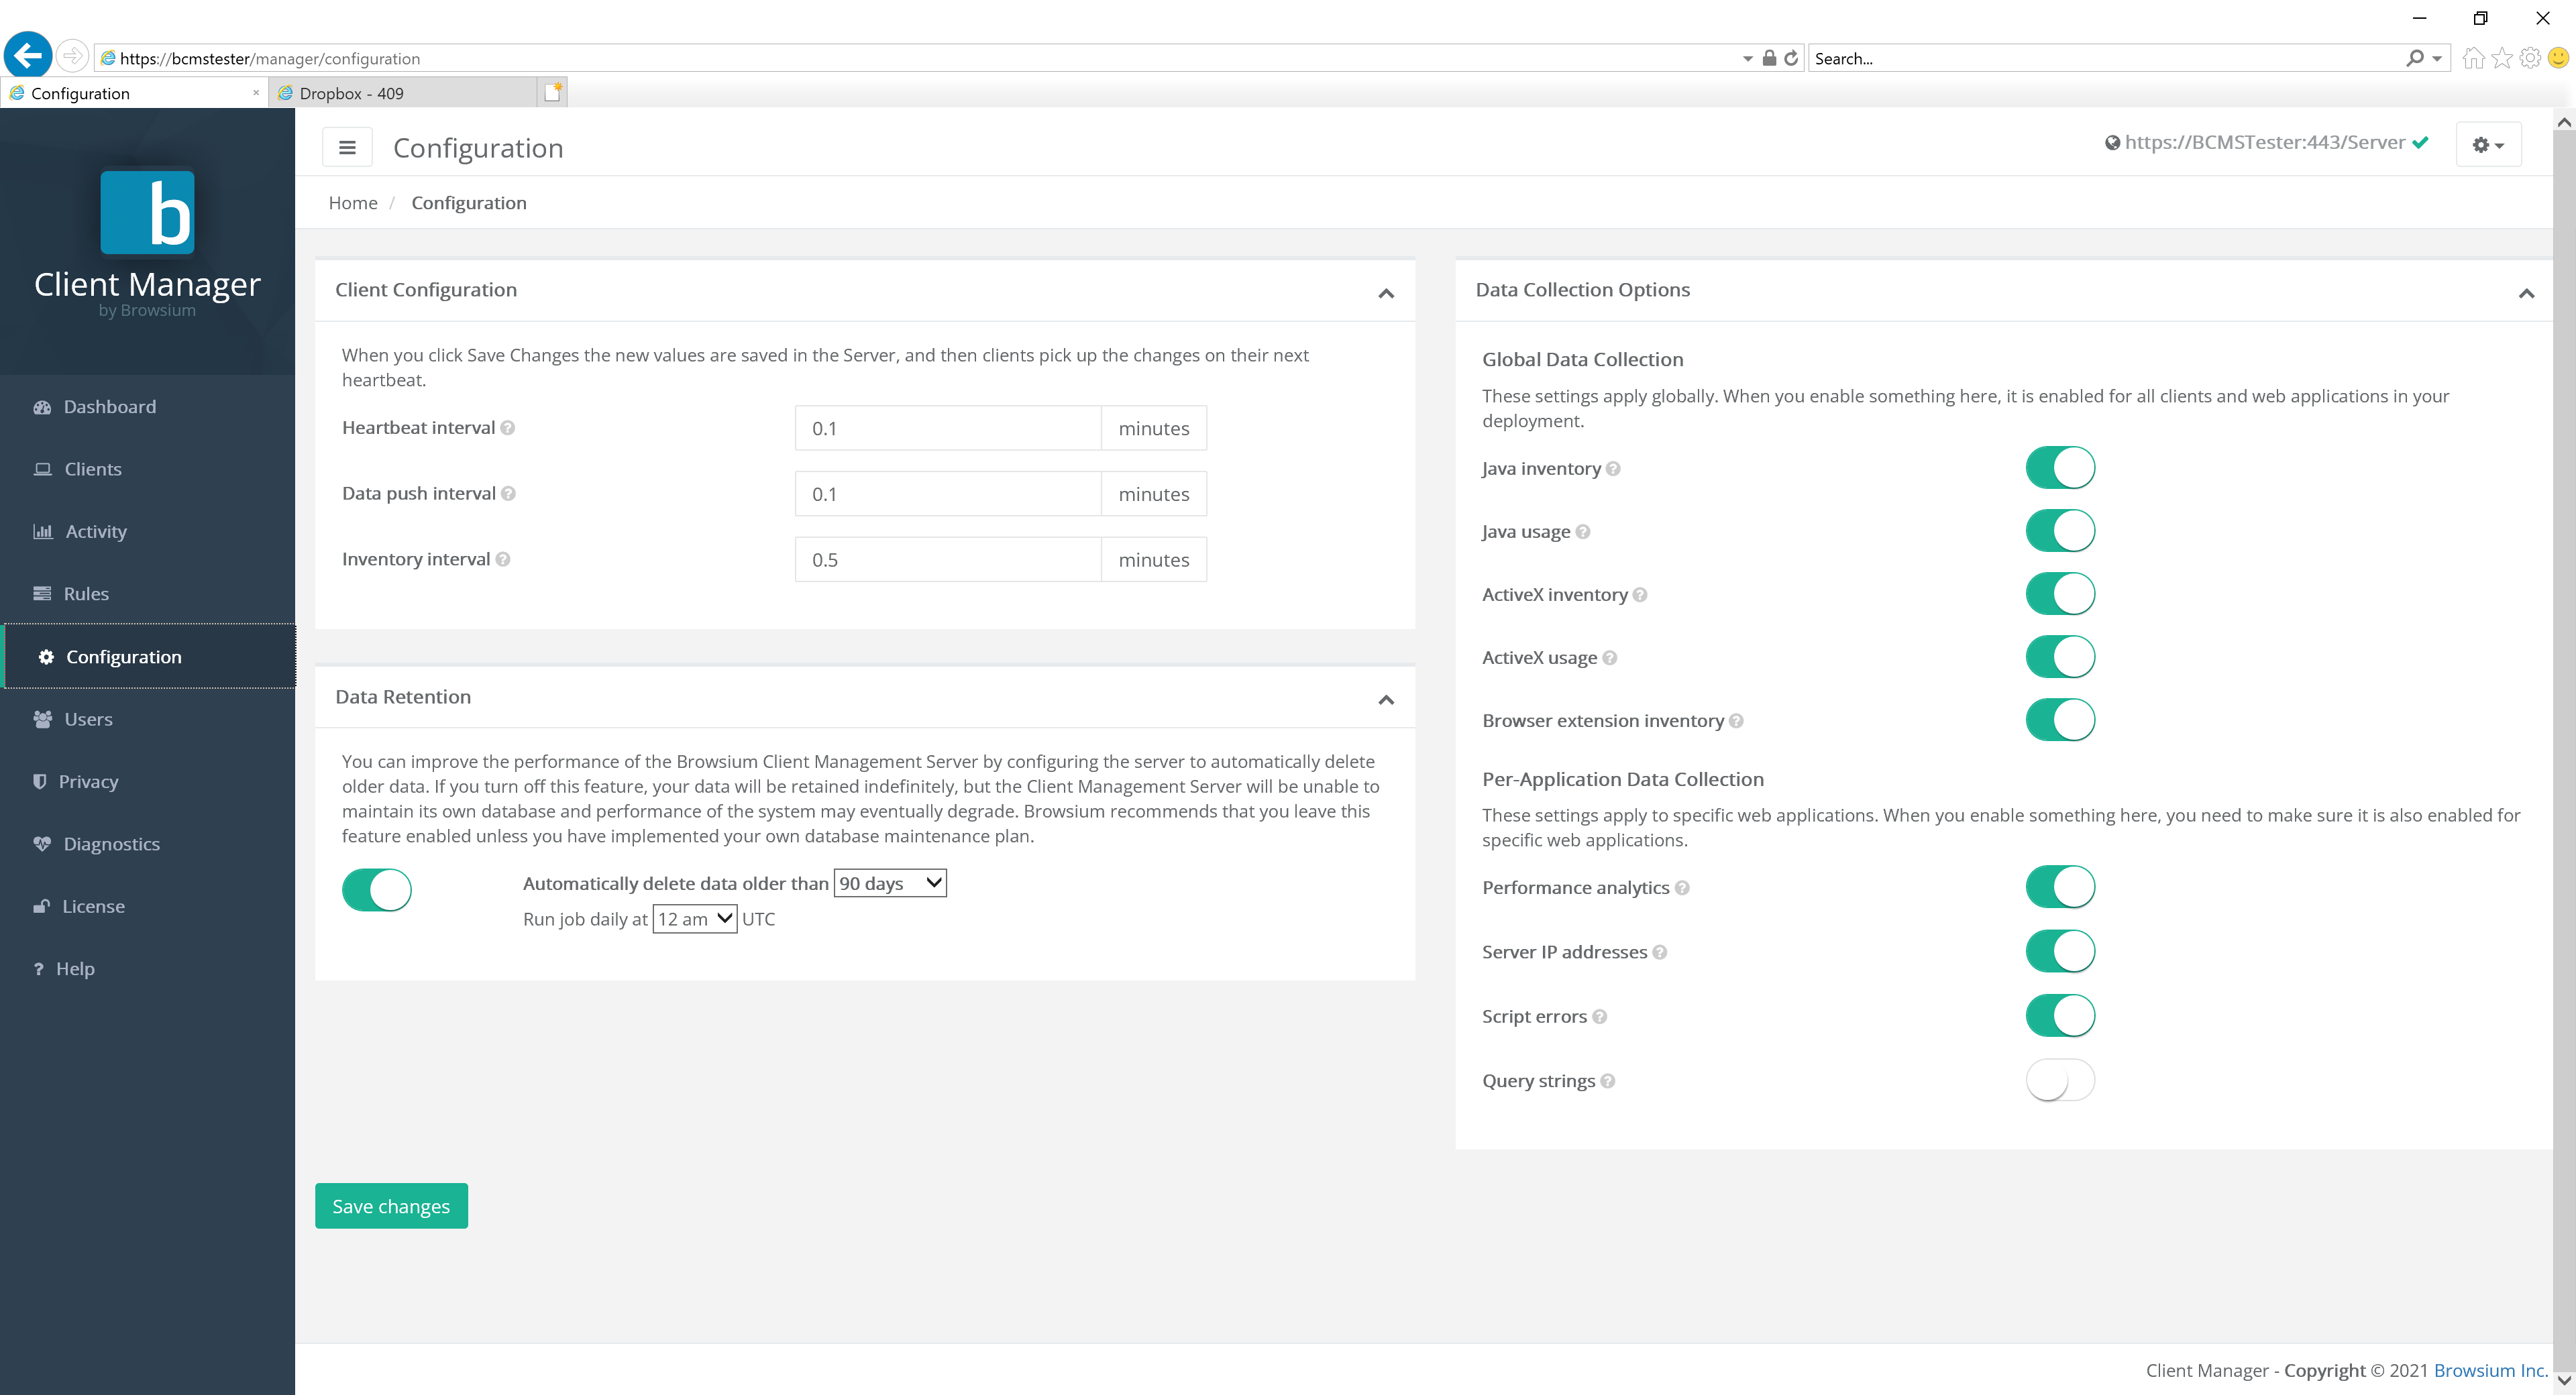
Section titled “Configuration Page”The Configuration page allows BCMS administrators (and power users, but not standard users) to control client configuration settings (heartbeat and inventory intervals) and data retention options.
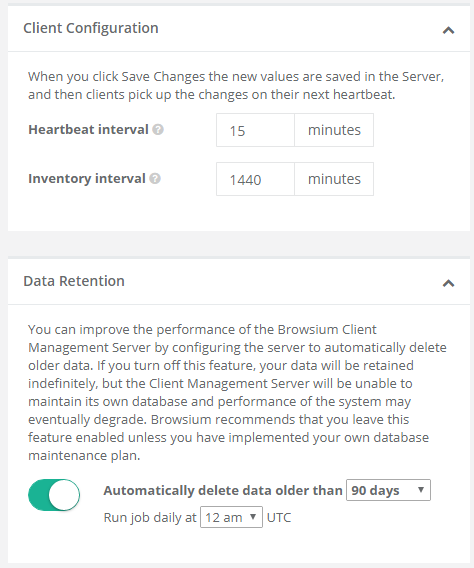
Client Configuration
Section titled “Client Configuration”For the Client Configuration options, administrators can specify the frequency in which Browsium clients will interact with the BCMS server.
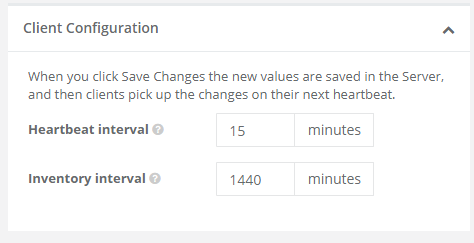
The available settings for Client Configuration are as follows:
Value Description BCMS Server Default
Heartbeat interval The interval at which clients poll the server (for changes or updates) 5 minutes
Inventory interval The interval at which clients perform the basic inventory of installed components. 1440 minutes
Section titled “Inventory interval The interval at which clients perform the basic inventory of installed components. 1440 minutes”Data Retention
Section titled “Data Retention”BCMS offers the ability to define data retention policies to support organizational or regulatory compliance requirements, as well as serve to ensure organizations have the ability to limit unbounded growth of the BCMS (and potentially Proton) dataset. The default settings for BCMS are to automatically delete data on a rolling 90-day window, each night at midnight. The values can be adjusted by using the drop-down menu. Alternatively, data retention policies can be entirely disabled by switching the button to the left (off) position.
 {width=“5.496873359580053in” height=“1.6198840769903762in”}
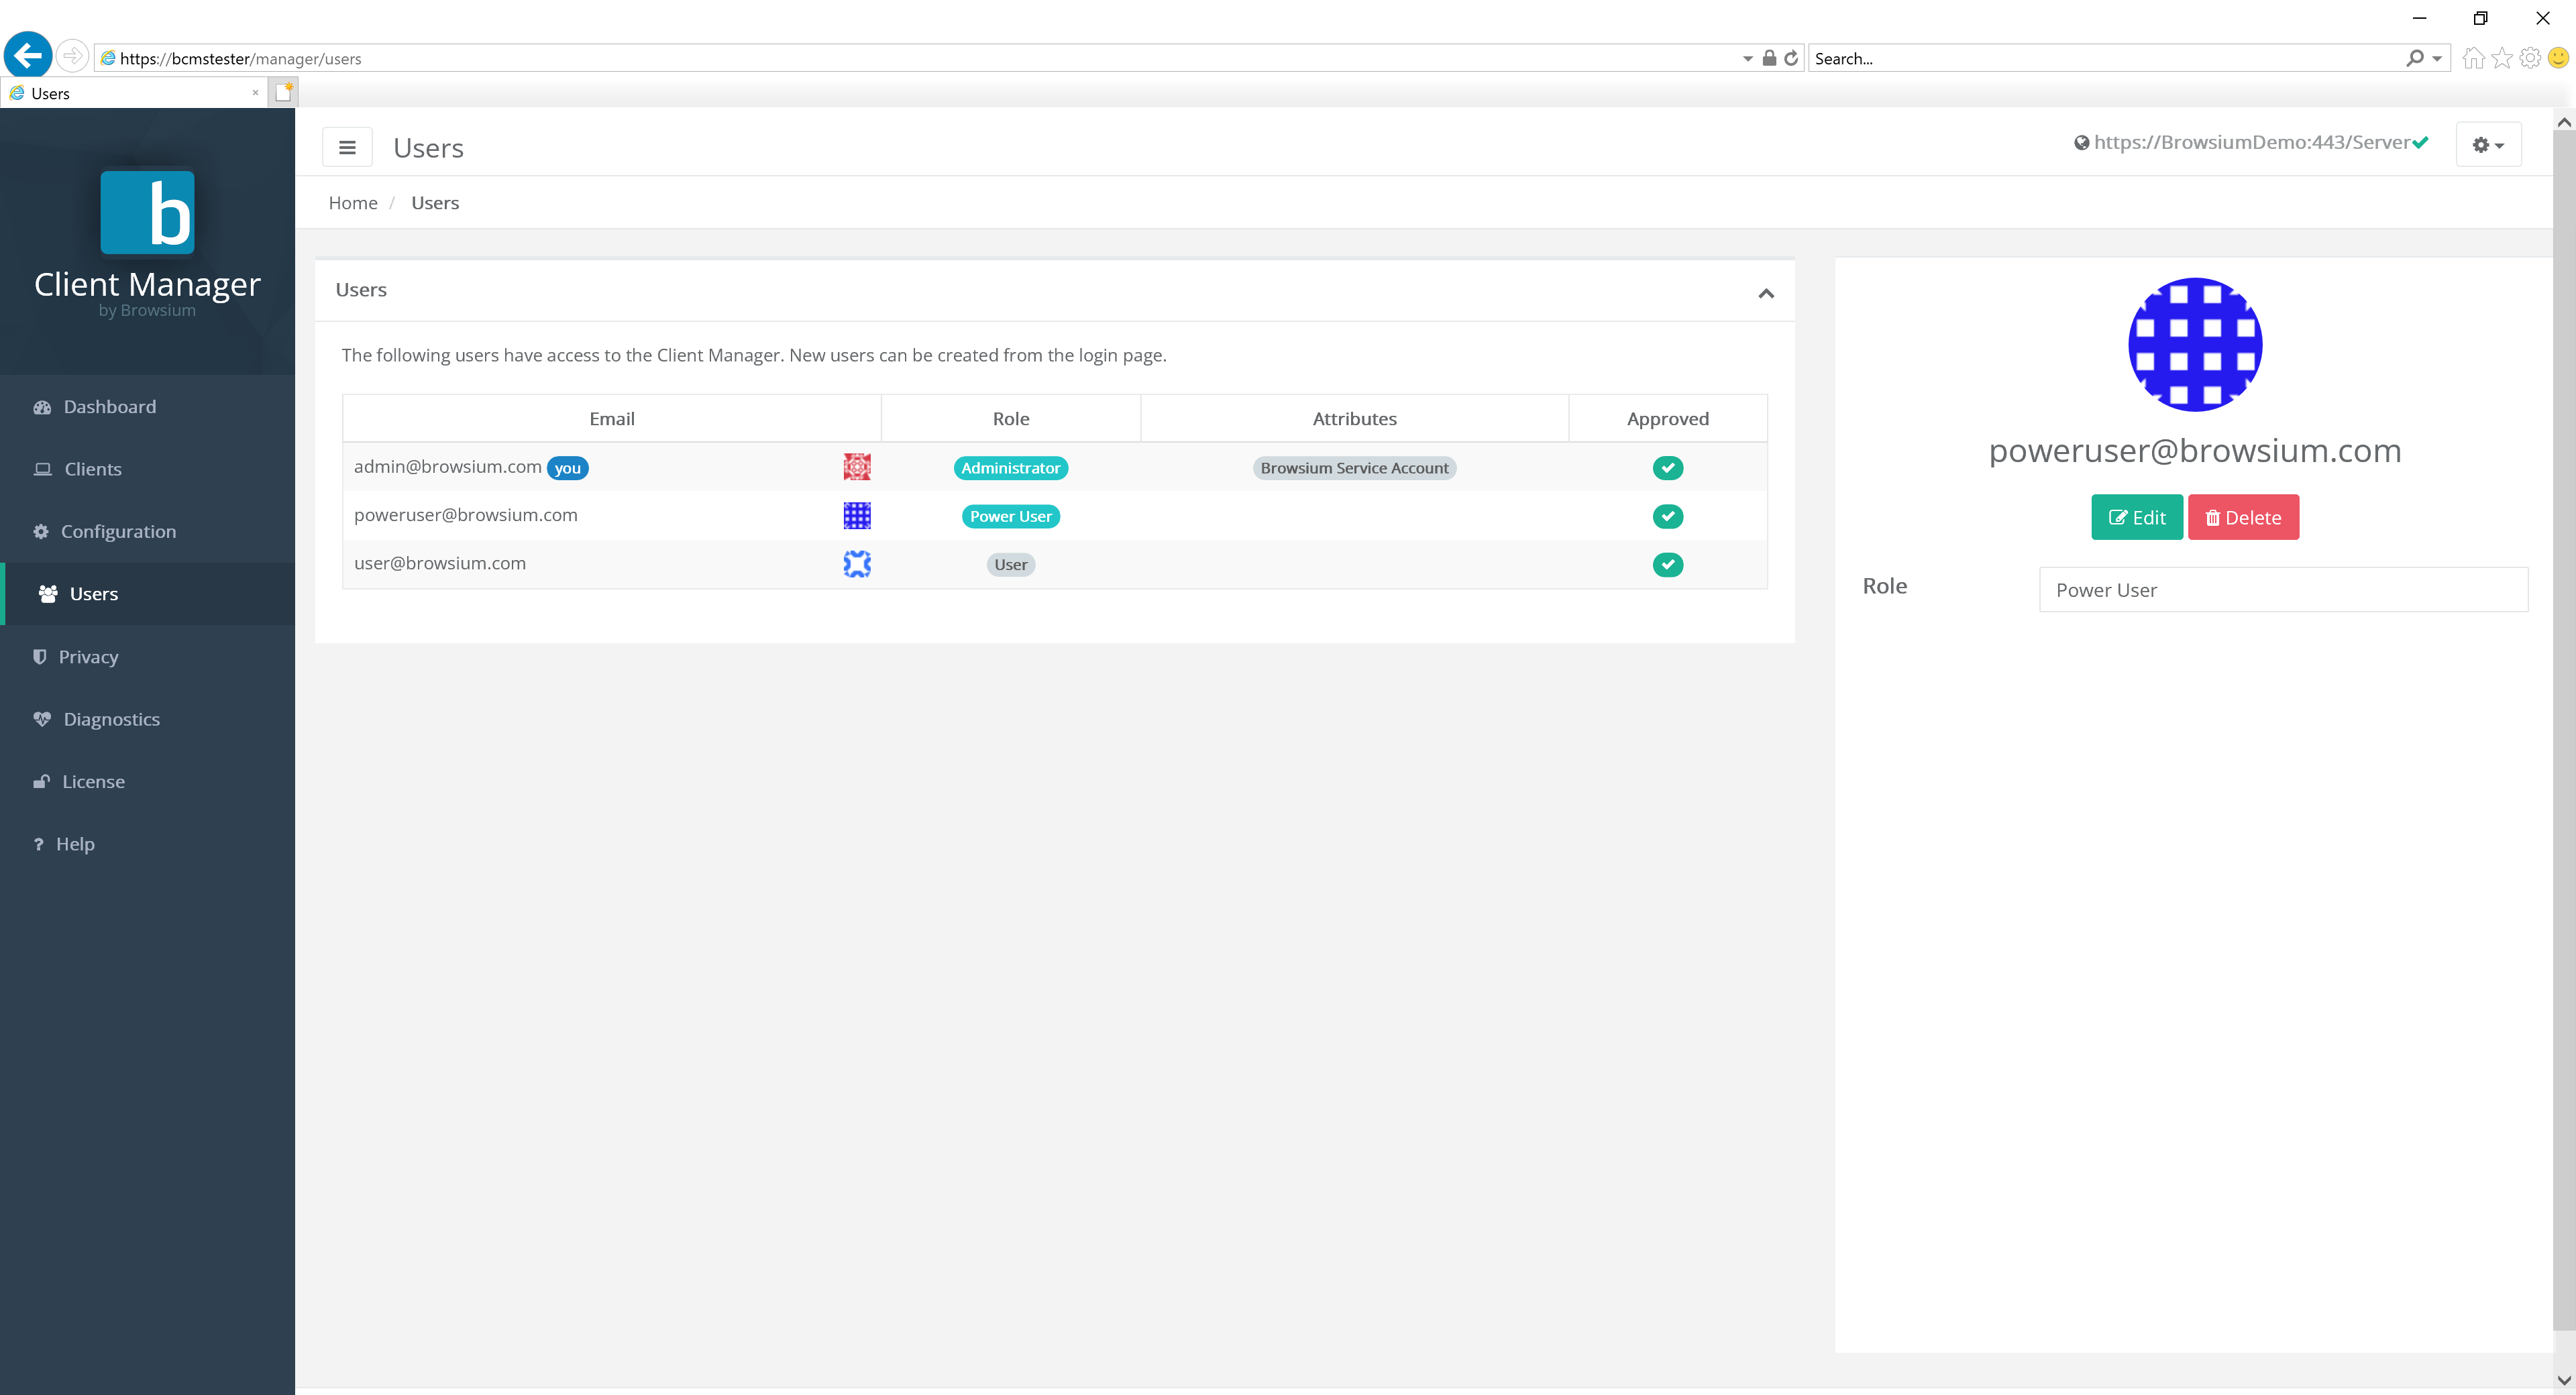
Users Page
Section titled “Users Page”The Users page allows BCMS administrators to view and control the list of approved BCMS user accounts. BCMS User and Power User account types are not able to view this page.
As mentioned previously, for BCMS administration purposes the only account type required is the Administrator account. Power and Standard user accounts should only be used by customers with Proton enabled. They are discussed here for the purposes of completeness.
User account requests are made by end users at Manager login screen — see section 4.1.4. Pending requests can be approved by clicking on the pending account name and then selecting the Approve button. Accounts can be promoted to administrator or power user status (or demoted to user status) by clicking on the account name and selecting User, Power User or Administrator.
After the initial installation of BCMS Server, the first account created is automatically promoted to administrator status. Once multiple users have been created you can select that first user account to modify it.
 {width=“6.060430883639545in” height=“1.6331496062992126in”}
Customers with specific support and management agreements will see accounts marked as ‘Browsium Service Account’. These accounts cannot be deleted by customers. Browsium Service Accounts can only be created and designated by Browsium and is not necessary for all customers. There is nothing wrong if the installation has no Browsium Service Accounts.
User accounts marked as ‘external’ denote the account is authenticated by SSO.
Clicking on a specific user brings up the account details:
 {width=“5.71875in” height=“1.0625in”}
Select Edit to change the user account type.
{width=“2.1502930883639544in” height=“2.094682852143482in”}[]{#_Configuring_Password_Restrictions .anchor}
Password Policy Management
Section titled “Password Policy Management”BCMS has a range of user account password policy management features, some configured by default (which can be modified) and others that are off by default but can be enabled by a BCMS administrator. Password policies can only be configured in the Web.config file on the BCMS server, not in BCMS Manager. More on how to locate and edit the Web.config later in this section.
BCMS provides password and login policies for the following attributes:
Session Timeout — sets the number of minutes until an idle session of BCMS Manager ends and displays the logon screen. The Web.config attribute is timeout, located in the system.web/authentication/forms section. The default value is 2880 minutes (2 days).
Minimum Required Password Length — sets the minimum length of the password The Web.config attribute is minRequiredPasswordLength and the default value is 8 characters.
Minimum Required Non Alpha Numeric Characters — sets the minimum number of special characters that the password must have. The Web.config attribute is minRequiredNonalphanumericCharacters and the default value is 1 character.
Maximum Invalid Password Attempts — sets the maximum number of invalid password entries before the user’s account is locked out. The Web.config attribute is maxInvalidPasswordAttempts and the default value is 1000000 (virtually unlimited).
Password Attempt Window — sets the number of minutes to keep track of invalid password attempts. After the window has expired, the number of invalid password attempts is reset. The Web.config attribute is passwordAttemptWindow and the default value is 1.
Password Expiration — sets the number of days until a new password expires, forcing the user to change the password before logging on. The Web.config attribute is PasswordExpiration and there is no default value for this attribute.
Password Strength Regular Expression — sets a regular expression that every password must match. This can be used to set custom password policies. The Web.config attribute is passwordStrengthRegularExpression and there is no default value for this attribute.
You’ll find a series of regular express examples in the Web.config file. An example using many of the above attributes is:
minRequiredPasswordLength=“12” minRequiredNonalphanumericCharacters=“1” passwordStrengthRegularExpression=”(?=(.*[A-Z]){1,})(?=(.*\d){1,})”
The preceding example sets a password policy requiring that all passwords be at least 12 characters long and contain at least one upper-case letter, at least one digit, and at least one special character.
When the passwordStrengthRegularExpression attribute is used, you should set an InsecurePasswordMessage in the appSettings element in Web.config so that your users will know what the password requirements are. The default InsecurePasswordMessage is
”The password must be at least <minRequiredPasswordLength> characters long and contain at least <minRequiredNonalphanumericCharacters> special character(s).”
To locate the Web.config file on your Proton server, navigate to
C:\Program Files (x86)\Browsium\Browsium Client Management Server\Server\Sites\Server (or C:\Program Files\ … if you’re using a 32-bit Windows server). You’ll find Web.config in this directory. It can be edited with any text editor, including Notepad. Familiarize yourself with the various sections of Web.config as the entries to control the password configuration outlined earlier in this section are found in various places inside the file.
Once you’ve made your edits to Web.config, save the file. IIS will automatically restart with the web service to immediately apply your new configuration.
If you deploy BCMS across a farm of load-balanced web servers, you’ll need to make the same changes to Web.config on each server to ensure the password policies are enforced consistently. To simplify this process, change Web.config on one server and copy the file to the other servers in your server farm. Note: This guidance assumes all web servers are communicating with a single BCMS database.
Web.config is automatically overwritten when upgrading to a new version of BCMS Server. You’ll need to save a copy of your Web.config file (or keep a separate document with the edits you have made) before upgrading and apply your custom settings to the new file. You should not assume that the old Web.config file will work on the new version of BCMS as other aspects of Web.config may have changed to support new features in BCMS.
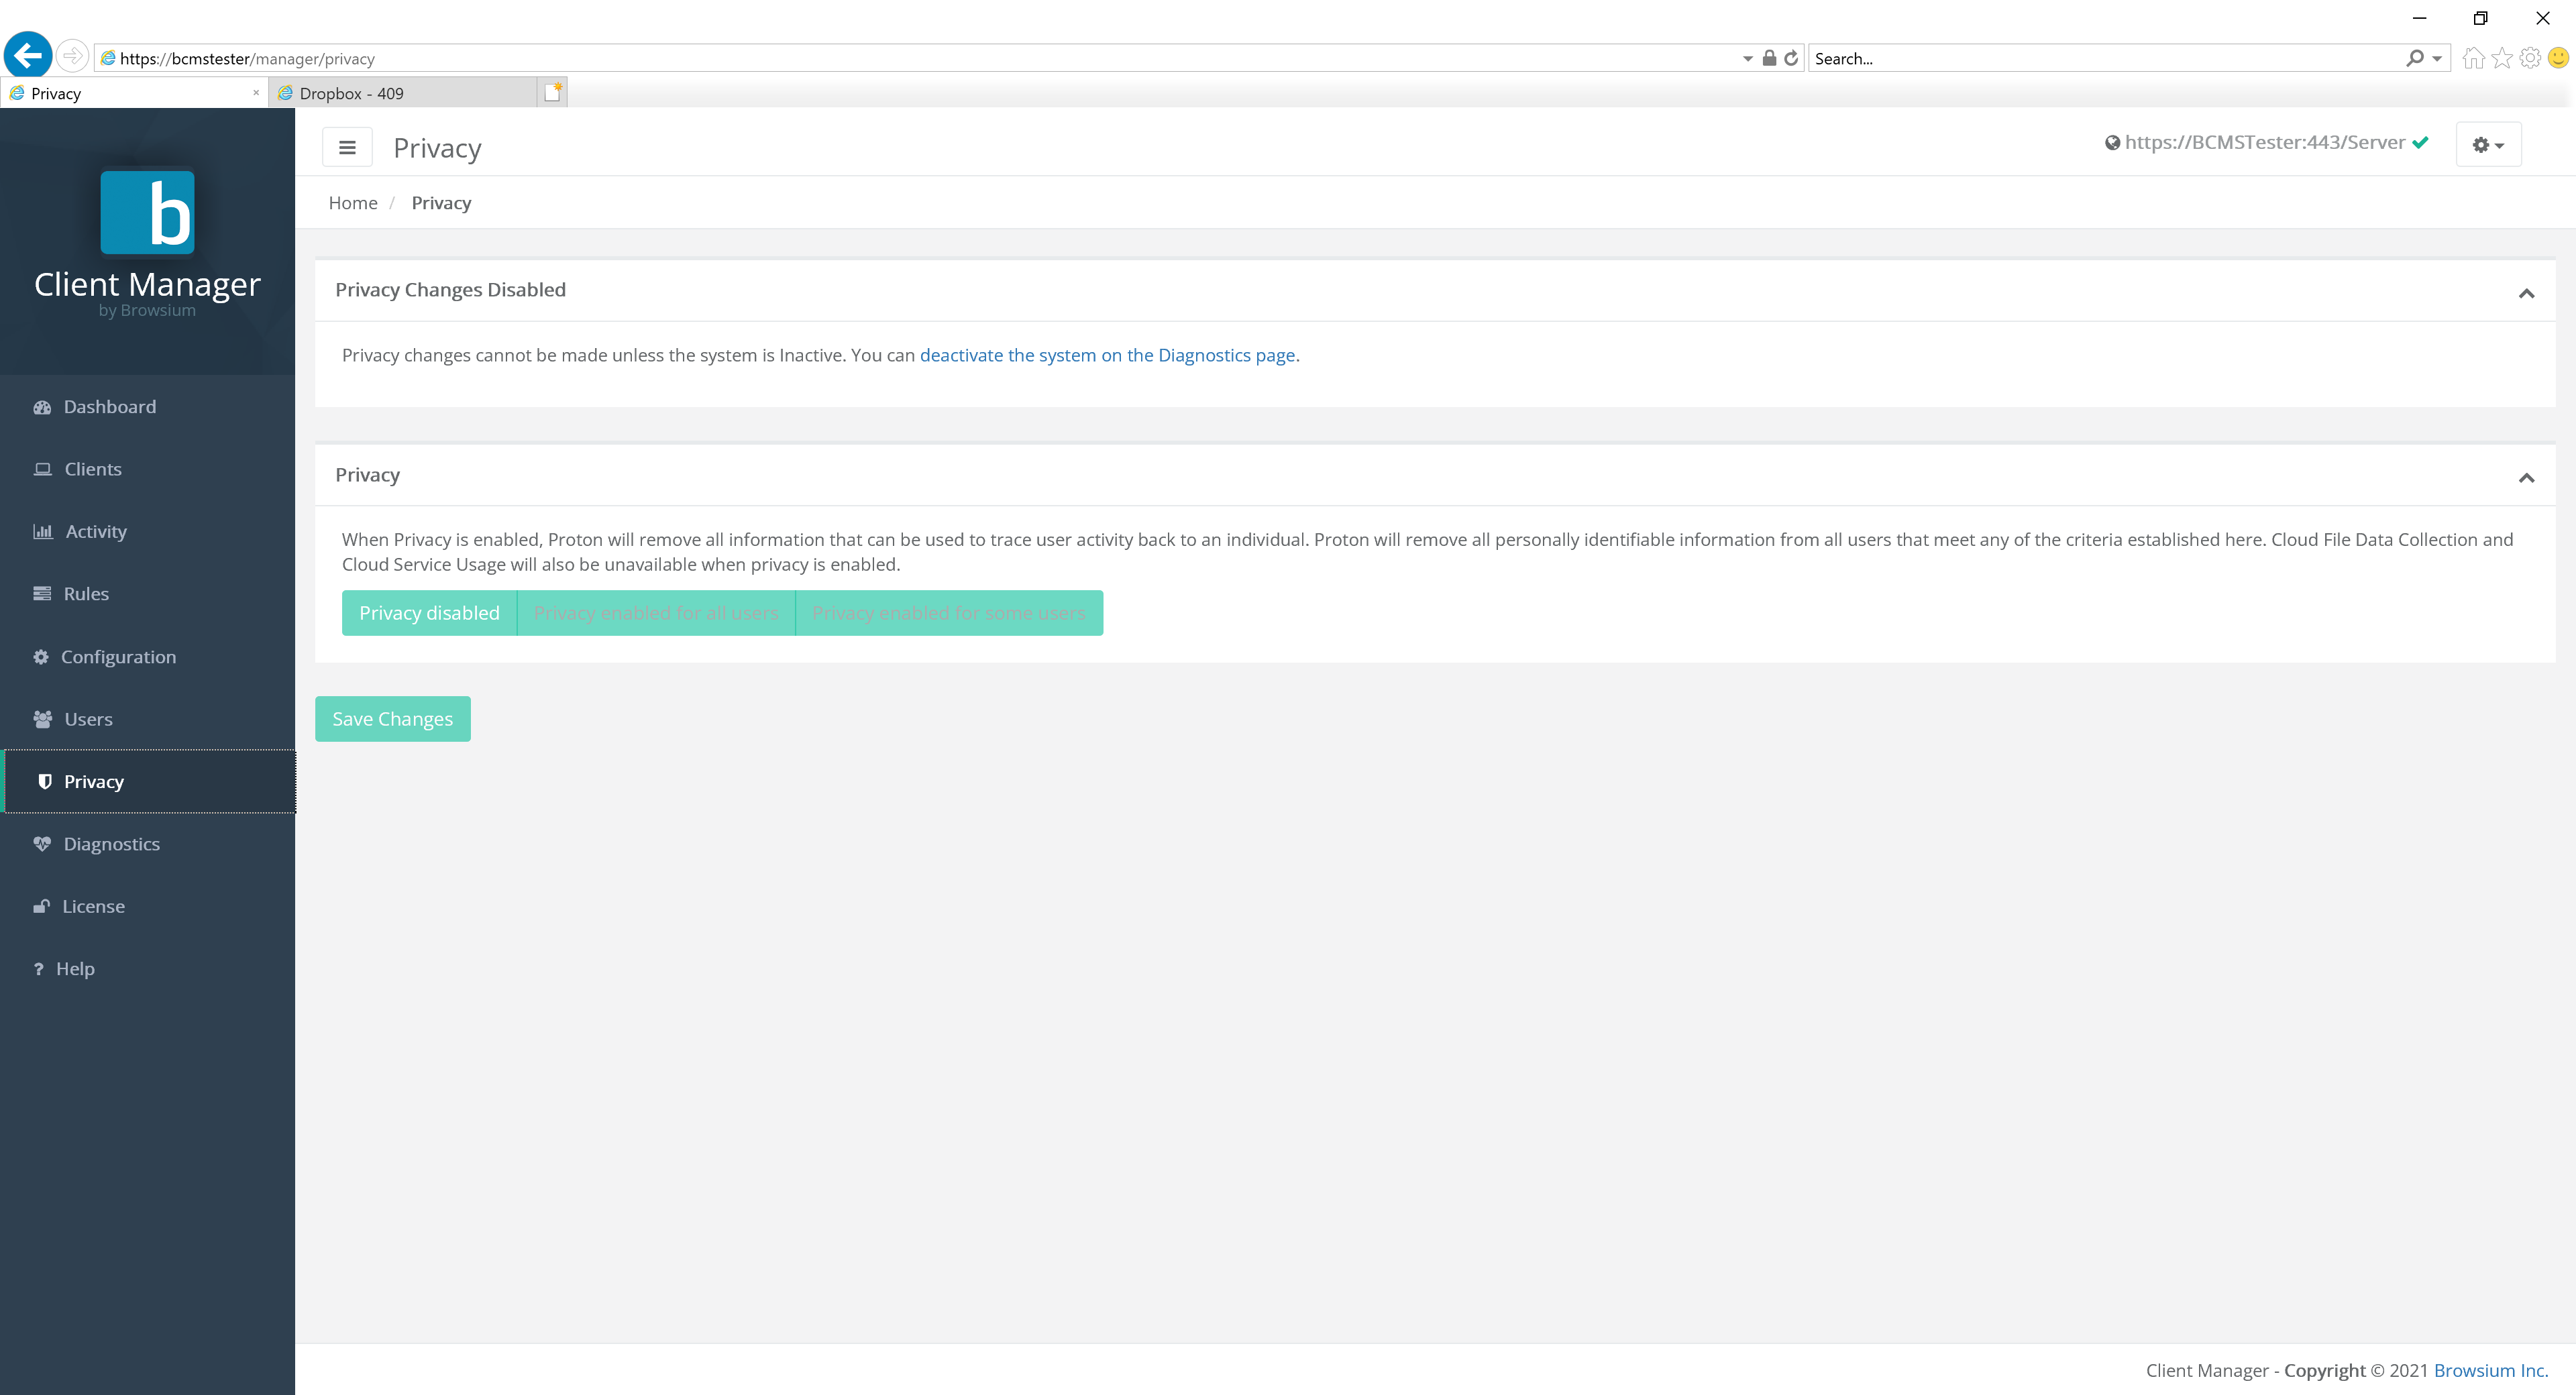
Privacy Page
Section titled “Privacy Page”BCMS includes a Privacy mode to comply with certain international regulations on tracking specific activity to specific users. When Privacy is enabled, BCMS will remove all information that can be used to trace user activity back to an individual. BCMS will remove all personally identifiable information from all client user accounts that meet any of the criteria established in the Privacy settings.
Since Privacy is disabled by default, this notice will be displayed until Privacy is enabled.
 {width=“6.5in” height=“0.5177045056867892in”}
Enabling Privacy will require the system to be made inactive and reactivated in order to make the necessary changes to the system.
The Privacy options become selectable when the feature is enabled.
{width=“5.542215660542432in” height=“1.1510761154855642in”}
To enable Privacy for all client user accounts, select the ‘Privacy enabled for all users’ button. Then select the scope — either ‘Anonymize users’ to only anonymize usernames and IP addresses, or ‘Anonymize users and machines’ to also anonymize machine names. Then Save Changes to commit the Privacy setting. This will anonymize all client user accounts, IP addresses, and (optionally) machine names for all activity from this point forward. It will not retroactively anonymize any prior activity. If you’ve already collected activity data, it will remain in the database and be visible on reports until that data is purged by the data retention policy settings.
{width=“5.821130796150481in” height=“2.368876859142607in”}
Anonymized activity data will be evident in three fields: User, IP Address, and (optionally) Machine. In the example below, the user who accessed www.msn.com has been anonymized to Anonymous155. (The next anonymized user seen by this BCMS server will be Anonymous156.) The IP Address has also been anonymized, zeroing out the last octet. Machine anonymization is not enabled in this example.
{width=“4.456827427821523in” height=“1.7341622922134734in”}
Maintaining unique anonymized user and machine names is key to Proton’s ability to track access counts and other data for each web application used by your organization. While the activity can’t be tracked to an individual user, it can be correlated with other data to help you to make informed decisions when managing your web browser and web application environment.
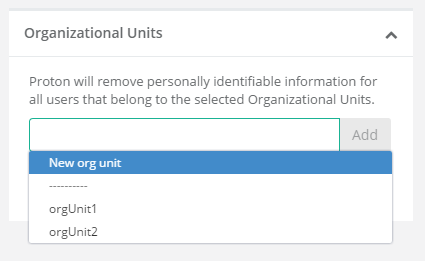
To enable more granular control over which client user accounts are anonymized on your Proton server, select the ‘Privacy enabled for some users’ button. This expands the controls available on the privacy page.
{width=“5.7858081802274715in” height=“3.7972462817147856in”}
Privacy settings can be limited by Organizational Unit, Active Directory Sites, or IP Address ranges. You can read from existing data to add OU or AD Sites filtering, or add new entries based on your knowledge of your Active Directory structure.
 {width=“2.6362445319335084in” height=“1.6189643482064742in”}
  {width=“2.150472440944882in” height=“1.5910400262467193in”}
You can add multiple IP address ranges by clicking the ‘Add Range’ button.
 {width=“2.3675196850393703in” height=“2.238176946631671in”}
For systems and settings management only, these settings offer limited value when just using BCMS for client management. Browsium Client data collected with BCMS is minimal, so Privacy settings may not limit access to much data. As mentioned previously, the BCMS server and Proton systems are integrated to make deployments easier and more streamlined for customers. As such, the Privacy management settings controls are included with BCMS by default.
Diagnostics Page
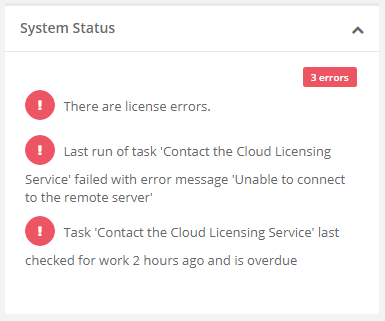
Section titled “Diagnostics Page”The Diagnostics page includes System Controls to enable or disable the BCMS server and provides administrators with information on the Background Tasks and internal health of the BCMS system and processes. This data is useful for administrators to review for troubleshooting and may be required when contacting Browsium support.
{width=“5.677083333333333in” height=“1.8125in”}
Value Description
Contact the Cloud Licensing Service The BCMS server routinely connects to the Browsium Cloud Licensing Service to validate the licenses assigned to your organization. No company or system configuration information is transmitted. This connection is done to ensure licenses remain valid and seat counts are properly implemented.
Data retention The data retention process is set by default to run at midnight each night. This item shows the status of the data retention enforcement and cleanup process.
Expire seat reservations Client machines that do not report or connect to the BCMS server on a regular basis will have their license seat reservations expired. This is done to ensure retired systems are removed from license seat counts, as well as ensure accurate accounting is maintained on a regular basis.
Section titled “Expire seat reservations Client machines that do not report or connect to the BCMS server on a regular basis will have their license seat reservations expired. This is done to ensure retired systems are removed from license seat counts, as well as ensure accurate accounting is maintained on a regular basis.”When an error condition occurs, the task switches to status Error. The task will remain in status Error until the task runs again without triggering an error. However, the Last Error Message will remain indefinitely so BCMS administrators can see the most recent error, even if status returns to OK**.** The Last Error Message can be cleared from the Diagnostics display via the green “Clear last error” button. However, all errors are written to the Browsium log in Event Viewer so you can retain a copy for future troubleshooting.
 {width=“6.214038713910761in” height=“1.1618132108486439in”}
When a task has an active error, you’ll also see the status on the BCMS Dashboard in the System Status section.
 {width=“2.424398512685914in” height=“2.021382327209099in”}
License Page
Section titled “License Page”The License page is used for managing Browsium software licenses, all in one place. Licenses can be added during BCMS installation, or anytime. If licenses were added during installation they will be displayed here.
To add licenses, see section 4.3. If there is reason to remove a license key, simply click the red ‘X’. To copy your license key to the clipboard, click the green logo.
{width=“6.5130260279965in” height=“3.4722222222222223in”}
In addition to license management, this node displays usage data on seat counts. This example also shows a client which was rejected by the server.
{width=“6.5in” height=“3.5229166666666667in”}
Organizations can use this interface to know how many clients/seats are being used, how many remain and refer to exactly which machines are using licenses. See the next section to learn more about how to search, sort and export client views.
Exporting Client Report Data Views
Section titled “Exporting Client Report Data Views”Some organizations may want to work with Browsium Client data outside the BCMS system. To enable easier sharing or integration of the data sets into other applications and existing internal reports, BCMS offers several export options of the currently active view:
-
Copy to Clipboard
-
Save as CSV
-
Print
Any of these export options can be accessed by clicking the Page Export button in the Export Bar interface to the right of the Search box.
{width=“1.6159722222222221in” height=“1.1354166666666667in”}
{width=“4.479166666666667in” height=“0.4791666666666667in”}
You may also export the entire dataset for the current report to CSV only using the Full Export button.
Exported data will be in the same layout and format as the on-screen report. Column headers, ordering and labeling is preserved in the export. CSV exported data contain a header row defining the columns. The Copy (to clipboard) option contains all text, but formatting is lost due to limitations of the copy/paste process.
**
 {width=“0.9194444444444444in” height=“0.9194444444444444in”}Section Four
The first time with BCMS
In this section, you will learn:
-
How to get started with your BCMS Server
-
Activating your BCMS Server
-
Adding licenses to BCMS Server