Proton Deployment in the Enterprise
Like any enterprise software deployment, Proton deployment in the enterprise requires careful planning. This begins with the Browsium Client, which is designed to be centrally deployed and managed by IT and be completely invisible to end users.
Proton configuration information required by the Browsium Client, such as how often to send inventory and browsing activity data to the Proton server and which sites to ignore (not send to the server), is centrally managed on the Browsium Client Management Server (BCMS). So once the Browsium Client is installed on all PCs in the enterprise, and configured with the URL of the organization’s BCMS, no additional direct management is necessary.
However, readying client systems for central management requires a bit of planning. To communicate with your organization’s Browsium Client Server, the Browsium Client must be deployed to end user PCs with the BCMS URL. This can be set during installation or via a post-installation registry edit using desktop management tools or Group Policy. In addition, the Browsium Client extensions for Microsoft Internet Explorer, Microsoft Edge, Google Chrome, and Mozilla Firefox must be enabled and (optionally) locked down so end users don’t disable or remove them.
In this section, we’ll examine the best practices for enterprise deployment of the Browsium Client and provide guidance for enabling and locking down browser extensions.
Deploying Browsium Client
Section titled “Deploying Browsium Client”Installing BCMS includes a link to the Browsium Client and makes it readily available to install throughout your organization — with a reasonably sized server supporting up to 10,000 clients. (Multiple servers can be grouped together in clusters to scale to hundreds of thousands of clients.) To get the most out of Proton, you’ll want to install Browsium Client on every PC in your enterprise. This is easy to do using Browsium-ClientSetup.exe and some careful planning.
Browsium software is licensed per user, and seat licenses are required for each PC so check your Browsium license agreement before deploying.
It is assumed that the reader of this guide is familiar with enterprise deployment of client software and has available tools to perform a scaled deployment. Section 1.2 of this guide details the command line switches available when installing Browsium Client in an enterprise environment. These options range from silent installation with no installation user interface visible to end users to pre-configuring the BCMS URL in the client registry.
Installing Browsium Client
Section titled “Installing Browsium Client”To deploy Browsium-ClientSetup.exe, along with the Proton Server URL, there are two simple steps:
-
Retrieve a copy of Browsium-ClientSetup.exe from the Browsium Proton zip file you received from Browsium, the Browsium Client Manager web page, or from the Proton Program Files directory where you installed BCMS. This is found in the C:\Program Files (x86)\Browsium\Browsium Client Management Server\Server\Sites\Server folder of the BCMS.
-
Identify the URL to your BCMS to include in your installation command line script as the value for SERVER_URL. This URL must be the Fully Qualified Domain Name and port (if other than 443). You may leave this blank and add it later via Group Policy, as detailed in section 2.1.2.
The SERVER_URL value must end with the /server so the clients can communicate with the Browsium Client server. Failure to set the SERVER_URL value properly may result in errors or unexpected client performance.
The following example will install Browsium-ClientSetup.exe with a Browsium Client Server URL in ‘quiet mode’ with ‘no user interface’. This command can be scripted to deploy to hundreds or thousands of client PCs using a variety of enterprise management tools.
Open Command Prompt as Administrator, enter the path to Browsium-ClientSetup.exe (located in C:\Browsium in this example), add the /qn switch, and substitute the SERVER_URL value with your FQDN/server. Include :<your server port> before /server if using any port other than 443.
{width=“5.913510498687664in” height=“1.2054461942257217in”}
Enabling Browsium Client with the BCMS URL
Section titled “Enabling Browsium Client with the BCMS URL”To facilitate client deployment scenarios, Browsium Client can be deployed in a dormant state. By default, all Browsium Client installations will be dormant until a BCMS URL value is defined in the registry (or a Catalyst or Ion configuration file pointer in the appropriate LoadFromFileName registry entry). Setting SERVER_URL at install time will populate the ConfigurationServerURL registry value and Browsium Client will be immediately enabled for communication with your BCMS.
If no SERVER_URL value is passed during the client installation, or no value is set using Group Policy, the Browsium Client processes will silently terminate immediately after startup and failing to find this value (unless Catalyst or Ion configuration file pointers are found in the registry). This option is especially useful for organizations to deploy the Browsium Client during a maintenance window and then activate the clients at any time outside that period.
To activate Browsium Client later, populate the appropriate registry key location and value. The Proton service will activate automatically when Browsium Controller starts (at reboot or user logoff/logon) and detects a ConfigurationServerURL value in the registry.
Browsium software follows the standard Windows registry hive precedence hierarchy to load the configuration that will be used on a given end user system. Once a valid configuration is found, the Browsium software will stop searching and that configuration will be used.
Deploying different Proton server URL values on a single PC may cause unpredictable results as only the configuration highest in the hierarchy will be used.
The following table provides the hierarchy of Proton Server URL precedence in the Windows registry. The string “(Wow6432Node)” in the registry path denotes the Wow6432Node registry key that will be included in the path on 64-bit Windows systems. 32-bit Windows systems do not contain this key, hence the use of parentheses in the example.
The following example shows ConfigurationServerURL populated during Browsium Client installation (1^st^ in the hierarchy above).
{width=“5.919442257217848in” height=“1.167445319335083in”}
This next example shows ConfigurationServerURL populated by Group Policy (2^nd^ in the hierarchy above).
{width=“5.872178477690289in” height=“0.9761876640419948in”}
Managing the Browsium Client Browser Extensions
Section titled “Managing the Browsium Client Browser Extensions”It is important to develop a strategy to properly deploy and manage the Browsium Client software on end user PCs. As part of your strategy, two important system configuration options should be considered.
The first is to ensure the Browsium Client browser extensions are enabled for all browsers on each client PC. This is a must as the Browsium Client will not capture or send data to the Browsium Client Server without the extensions enabled.
The second is to block end users from disabling or removing the Browsium browser extensions once they’ve been enabled. This is optional but highly recommended.
These important configuration options can be managed by Group Policy in Internet Explorer, Microsoft Edge (Chromium) and Google Chrome. Group Policy template support for Mozilla Firefox can be downloaded from https://github.com/mozilla/policy-templates/releases.
Alternatively, you can manage the enforcement of the browser settings for Internet Explorer, Microsoft Edge (Chromium) and Chrome by adding or changing registry settings manually. To modify settings manually in the local PC registry, administrators will need to use a registry editor. The default Windows registry editor which must be launched from the Run command is regedit.exe. For a large organization, registry edits can be scripted and applied using a variety of enterprise management tools.
The remainder of this section covers management of the Browsium Client browser extensions.
Enable the Browsium Internet Explorer Extension via Group Policy
Section titled “Enable the Browsium Internet Explorer Extension via Group Policy”Recent versions of Microsoft Edge (Legacy) require user confirmation before any new extension (or “add-on”) is enabled unless that extension is set to ‘enabled’ during the deployment process. The most common way to enable the Browsium Internet Explorer Extension during deployment is by utilizing Group Policy to make the necessary registry changes on client PCs. Alternative methods to modify the registry on client PCs, such as using a registry editing tool, a Visual Basic Script or making the changes to the registry with software distribution tools.
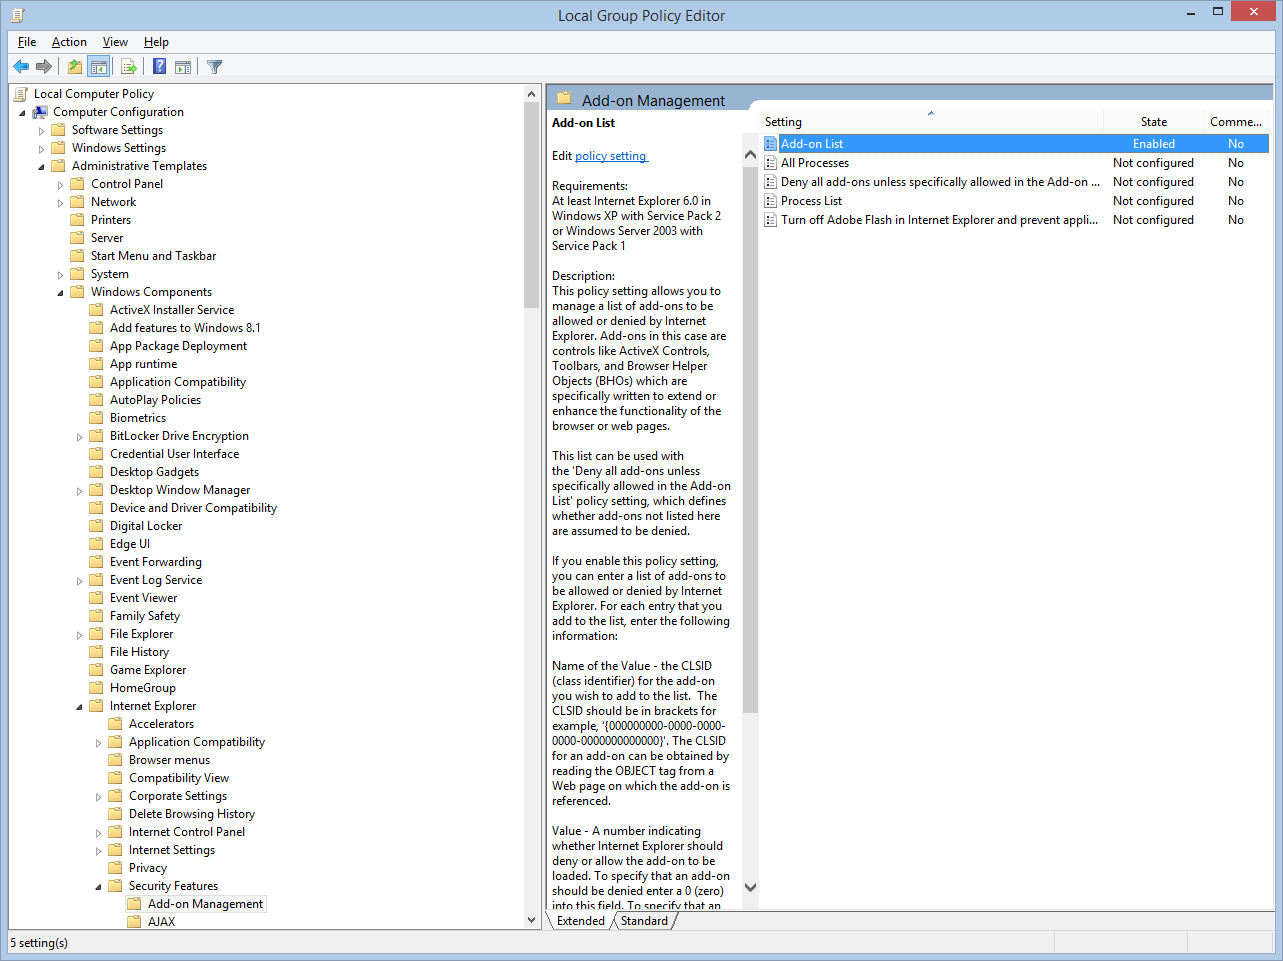
Group Policy - Understanding the ‘Add-on List Policy’
Administrators can control the use of specific browser extensions through the add-on list policy. Administrators can choose to enable or disable an extension as well as allow a specific extension to be managed by the user.
Policy Name: add-on list
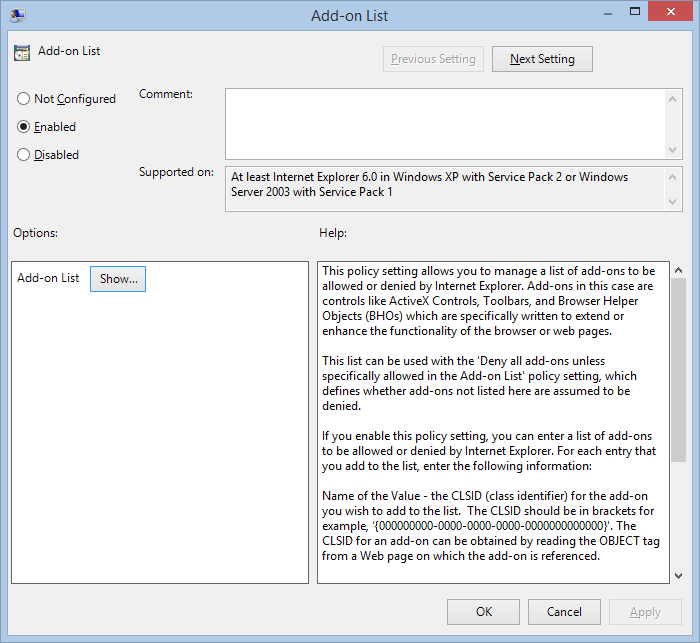
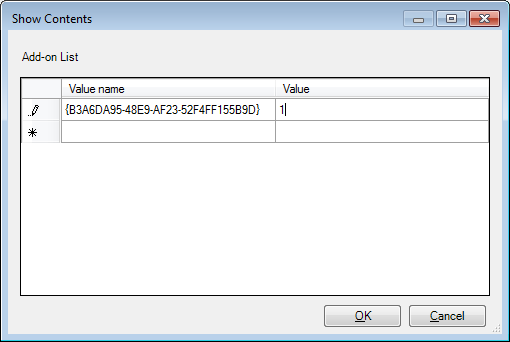
Path: User Configuration or Computer Configuration node; Administrative Templates\Windows Components\Internet Explorer\Security Features\Add-on Management. To set this policy, an administrator can enable the policy and enter the GUID/CLSID of the Browsium extension to the Add-on List and set the value to 1.
 {width=“5.6038965441819775in” height=“1.3397025371828521in”}
 {width=“4.311688538932634in” height=“2.1345384951881017in”}
 {width=“3.482795275590551in” height=“1.1110356517935258in”}
**
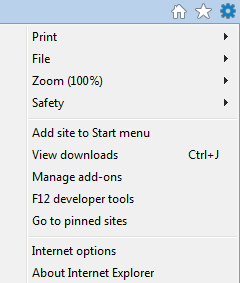
Determining the GUID/CLSID of the Browsium Internet Explorer Extension
After installing the Browsium Client, go to the Tools menu in Internet Explorer and choose Manage add-ons.
 {width=“1.311923665791776in” height=“1.546505905511811in”}
You’ll then be presented with the Manage Add-ons interface where you should see Browsium Internet Explorer Extension in the list among the Toolbars and Extensions that are currently loaded in Internet Explorer.
 {width=“5.958334426946632in” height=“1.1666666666666667in”}
Right Click on the Browsium Internet Explorer Extension and choose “More Information” from the dropdown menu.
{width=“1.3771259842519685in” height=“1.2654669728783903in”}
The CLSID, (Class ID) will appear in the dialog box.
{width=“4.95998687664042in” height=“2.992420166229221in”}
Click the “Copy” button and then paste the contents of this dialog box (including the Class ID) to Notepad for later reference and save the text file. When you make the registry changes documented above, you will need to use the Class ID to identify the extension in the policy.
To set this policy with a manual or automated registry entry, an administrator can create a registry value based on the GUID/CLSID of the extension in either of the following keys and then set the desired value. When you enter the GUID/CLSID be sure to include the open brace at the beginning and the close brace at the end.
HKEY_CURRENT_USER\SOFTWARE\Microsoft\Windows\CurrentVersion\Policies\Ext\CLSID\{CLSID}
HKEY_LOCAL_MACHINE\SOFTWARE\Microsoft\Windows\CurrentVersion\Policies\Ext\CLSID\{CLSID}
Each add-on is a value in this registry key with the following properties.
Name: GUID of add on which is {B3A6DA95-9243-48E9-AF2E-52F4FF155B9D}
Type: REG_SZ
Value:
-
0 - Add-on is disabled and cannot be managed by the end user.
-
1 - Add-on is allowed and cannot be managed by the end user.
The Add-on (CLSID) lists are empty by default.
{width=“5.9376498250218726in” height=“1.0035640857392827in”}
Enable the Browsium Client Extension for Google Chrome
Section titled “Enable the Browsium Client Extension for Google Chrome”To ease your Group Policy setup, several templates can guide you through the configurable options. Group Policy templates, and associated guidance, are provided by Google and can be found on Google’s support site. You may find additional settings (beyond those documented here) that you may wish to enforce or enable based upon your organization’s preferences.
By default, Chrome automatically disables all extensions that are side loaded (installed by a 3^rd^ party program, like the Browsium Client installation package), requiring users to enable them manually. The only way to centrally enable the Browsium Client Extension for Chrome for enterprise deployment is via Group Policy for domain-joined systems.
The policy Configure the list of force-installed extensions (a.k.a. ExtensionInstallForcelist) allows you to specify a list of extensions that will be installed silently and enabled by default, without user interaction. This policy also works for side-loaded extensions, effectively overriding the default behavior in Chrome.
Each item of the list is a string that contains an extension ID and an update URL, separated by a semicolon (;). The extension ID is the 32-letter string found e.g. on chrome://extensions when in ‘Developer mode’. The update URL must point to an Update Manifest XML document as described at http://code.google.com/chrome/extensions/autoupdate.html. Note that the update URL set in this policy is only used for the initial installation; subsequent updates of the extension will use the update URL indicated in the extension’s manifest.
For each item, Google Chrome will retrieve the extension specified by the extension ID from the update service at the specified update URL and silently install it. Users will be unable to uninstall extensions that are specified by this policy. If you remove an extension from this list, it will be automatically uninstalled by Google Chrome. Extensions specified in this list are also automatically whitelisted for installation; the Configure extension installation blacklist (a.k.a. ExtensionInstallBlackList) does not affect them.
A by-product of the ExtensionInstallForceList policy is that managed extensions are silently installed in Chrome, enabled by default, and block users from disabling or removing them. This is desired for enterprise deployment of Browsium Client. If this policy is ‘Not Configured’, users can delete any extension in Chrome, including Browsium Client Extension, from the Extensions page. This is undesirable, as side-loaded extensions that are deleted are automatically blacklisted and re-enabling them is tricky (but achievable). Contact Browsium Support if this happens.
To force-enable the Browsium Client Extension for Chrome and lock it down so users can’t disable or delete it, you will use the Configure the list of force-installed extensions policy. This process requires an XML Manifest, which references the Proton extension’s .crx file. Both must be available on a server or in the Chrome web store. Browsium is hosting these files for all customers on browsium.com.
Follow these steps to ensure that this method is properly configured using Group Policy for your domain-joined systems. These instructions assume you’re using the ADM template. The Group Policy location will change if using ADMX.
As of Chrome 33, the ExtensionInstallForceList policy is only enforced for domain-joined systems. All client PCs in your environment must be joined to a Windows domain or you will not be able to centrally manage the Browsium Client Extension. Attempting to configure ExtensionInstallForceList via the Local Policy Editor will result in unpredictable behavior of the extension.
-
Install Browsium Client software.
-
Download the Group Policy templates for Chrome from the Google support site.
-
Import the Google Chrome Group Policy template into your Group Policy editor.
-
Enable the policy Configure the list of force-installed extensions.http://dl.google.com/dl/edgedl/chrome/policy/policy_templates.zip
-
Enter the following value by selecting the ‘Show…’ button in the Options window and apply the setting.
(This is the Browsium Client Extension ID followed by the URL for the manifest XML document, with no spaces in the string.)
adociibhpcfhbfkahfbdkakmehnmnkgd;http://crx.browsium.com/browsium-chrome-4.9.1.xml
 {width=“6.495833333333334in” height=“1.1458333333333333in”}
The Browsium Client Extension for Chrome may have a different version number from the other Browsium Client and Proton components as maintenance versions are released. See the version number section of the Proton Version History KB article for details on the release date and version number for the Browsium Client Extension for Chrome.
Enable the Browsium Client Extension for Mozilla Firefox
Section titled “Enable the Browsium Client Extension for Mozilla Firefox”Mozilla Firefox does not allow client software to install an extension and enable it by default. Nor does it contain a centralized management facility to keep users from tampering with extensions like Internet Explorer and Chrome. However, Browsium Client includes a facility to automatically enable the extension every time the user logs onto the system, so administrators can ensure that the Firefox extension is always enabled.
To enable the Browsium Client Extension for Firefox automatically, create the following registry value:
… for 32-bit Windows systems:
HKEY_LOCAL_MACHINE\SOFTWARE\Microsoft\Windows\CurrentVersion\Run
Enable Browsium Extension (REG_SZ) =
“C:\Program files\Browsium\Client\BrowsiumController.exe” /ef
… for 64-bit Windows systems:
HKEY_LOCAL_MACHINE\SOFTWARE\Wow6432Node\Microsoft\Windows\CurrentVersion\Run
Enable Browsium Extension (REG_SZ) =
“C:\Program Files (x86)\Browsium\Client\BrowsiumController.exe” /ef
Enable the Browsium Client Extension for Microsoft Edge (Legacy)
Section titled “Enable the Browsium Client Extension for Microsoft Edge (Legacy)”Microsoft Edge (Legacy) requires systems to be domain joined and logged in with a domain user account to use the Browsium Client extension. In addition, application sideloading needs to be enabled.
To do this, you will need to configure the following Group Policy setting:
Local Computer Policy\Computer Configuration\Administrative Templates\Windows Components\App Package Deployment\Allow all trusted apps to install
This setting must be set to ‘Enabled’ or the Browsium Client extension will not be installed and enabled for Microsoft Edge.
{width=“2.8739129483814523in” height=“1.4195384951881014in”}
Enable the Browsium Client Extension for Microsoft Edge (Chromium)
Section titled “Enable the Browsium Client Extension for Microsoft Edge (Chromium)”Microsoft provides Group Policy templates that allow you to force installation of extensions based on a provided list of extension IDs and sources.
-
Download the Edge (Chromium) Group Policy templates if you do not already have them imported — (https://www.microsoft.com/en-us/edge/business/download — You will need to list a version/build before the “Get Policy” link will become enabled.)
-
Locate the ExtensionInstallForceList policy, configure it and add the extension ID
ebiecfallkolbcgiafkjlfapnlnlhijf;http://crx.browsium.com/browsium-chrome-4.9.7.xml
 {width=“6.5in” height=“0.7722222222222223in”}
Managing Browsium Client Logging Settings
Section titled “Managing Browsium Client Logging Settings”In a default installation, Browsium Client logs Warning level information which will provide basic information about the Proton configuration and any important errors that may occur on client systems, includes errors from Ion and Catalyst if configured on the client.
Browsium Client can be configured to record more detailed logging information to troubleshoot problems or validate Ion configuration settings on the local system. Browsium Client logging is written to the standard Windows event log under an application-level source named Browsium. The Logging Level setting determines the amount and type of data collected in the Windows event log. This table summarizes the various levels and data collected:
Value Level Description
1 Error Writes Error entries
2 Warning Writes Warn and Error entries (Default)
4 Info Writes Info, Warn and Error entries
Section titled “4 Info Writes Info, Warn and Error entries”To adjust the level of logging, a registry value must be configured on the target system. Once the logging value is created, the Browsium Controller must be restarted to recognize the specified logging value.
Browsium Controller looks in the Windows registry for the presence of the logging setting at HKEY_CURRENT_USER\Software\Browsium\Client. The value is a REG_DWORD type, with value name “LogLevel”. The data in that value can be 1, 2 or 4 (see chart above).
 {width=“5.838845144356956in” height=“1.0124409448818898in”}
If no LogLevel registry value is present in the defined registry location (the default Browsium Client state), or any invalid values are found at that location, Browsium Client will revert to using the default Level 2 — Warning.