Catalyst Deployment in the Enterprise
Like any enterprise software deployment, Catalyst deployment in the enterprise requires careful planning. This begins with Browsium Client, which is designed to be centrally deployed and managed by IT and be completely invisible to end users.
The Catalyst configuration required by Browsium Client is delivered by an independently deployed project file. Once Browsium Client is installed on all PCs in the enterprise, and configured with a pointer to the project file, no additional direct management is necessary.
To provide maximum flexibility for managing enterprise deployments, Catalyst supports a variety of methods for deploying Browsium Client and hosting project files (containing Catalyst rules and settings). In this section, we’ll examine the available deployment options, provide recommendations, explain the loading & caching behaviors, and offer specific deployment guidance for typical enterprise scenarios.
The Catalyst configuration is read from a Catalyst project file — a single, XML-formatted data file containing the browsers, rules, and settings that were created by Catalyst Configuration Manager. The file can be pushed out to a known location on end user PCs, stored on a shared network location, or hosted at an easily accessible URL. The project file can be updated easily and separately from Browsium Client executable code, making ongoing support and maintenance easy to integrate into existing organizational processes.
Each client system must be made aware of the location of the Catalyst project file containing the configuration that is relevant to that user’s web applications. Your organization may use one configuration for all end users or have separate configurations for various departments or geographic locations. As many enterprise organizations are standardizing on a single Windows image, standardizing on a single Catalyst configuration is a modern best-practice.
A client system loads its Catalyst configuration by reading the project file referenced in the LoadFromFileName registry value. As a Catalyst administrator, you determine the best way to deploy this registry value to your organization. You can do this using a variety of methods, ranging from scripted registry editors to Group Policy.
Many organizations prefer to use Group Policy to deploy this registry value. The registry preference extension for Group Policy is often the most efficient way to streamline the LoadFromFileName registry value deployment. Another option is to use Browsium’s ADM and ADMX templates, which can be easily customized for the location of your project file. These templates, with usage instructions, can be found in the Browsium Catalyst Knowledge Base. See section 5.4 for details on deploying project files and LoadFromFileName registry pointers.
Deploying Browsium Client
Section titled “Deploying Browsium Client”To get the most out of Catalyst, you’ll want to install Browsium Client on every licensed PC in your enterprise. This is easy to do using Browsium-ClientSetup.exe and some careful planning.
Catalyst seat licenses are required for each PC so check your Browsium license agreement before deploying.
It is assumed that the reader of this guide is familiar with enterprise deployment of client software and has available tools to perform a scaled deployment. Section 2.6 of this guide details the command line switches available when installing Browsium Client in an enterprise environment. These options range from silent installation with no installation user interface visible to end users to pre-configuring the BCMS location in the client registry.
Installing Browsium Client
Section titled “Installing Browsium Client”To deploy Browsium-ClientSetup.exe simply with a Catalyst license key, there are two simple steps:
-
Retrieve a copy of Browsium-ClientSetup.exe from the Browsium Catalyst zip file you received from Browsium.
-
Ensure you have the location of your Browsium Client Management Server (BCMS) to ensure Catalyst clients properly authorize for use. If Catalyst clients are unable to connect to the BCMS, they will fail to operate after 30 days.
To learn more about the Browsium Client Management Server and how Browsium Clients connect to it, please review the BCMS Administration Guide
The following example will install Browsium-ClientSetup.exe with the BCMS location in Quiet Mode with No User Interface. Launch the Command Prompt as Administrator, enter the path to Browsium-ClientSetup.exe (located in C:\Browsium for this example), add the /qn switch, and substitute your BCMS location for the hash marks (#).
 {width=“5.958424103237095in” height=“0.8651170166229222in”}
More information on deploying Browsium Client to ensure the browser extensions are enabled by default can be found in section 5.2.
Managing Browsium Client Browser Extensions
Section titled “Managing Browsium Client Browser Extensions”If the Browsium Client was installed using the suggested default option to allow for enabling and management of the Browsium extension, this section can be ignored and no additional action is needed. This section is included for customers that opted to control settings manually.
It is important to develop a strategy to properly deploy and manage Browsium Client software on end user PCs. As part of your strategy, two important system configuration options should be considered when using Catalyst.
The first is to ensure Browsium Client browser extensions are enabled for all supported browsers on each client PC. It is recommended that you also block end users from disabling Browsium Client browser extensions once they’ve been enabled.
The second is to ensure that neither Internet Explorer, Edge, Chrome, nor Firefox are selected as the ‘default browser’ or set to prompt to become the default — Catalyst itself (actually Browsium Client Launcher) must be the default so it can route all navigation to the appropriate browser. Catalyst will take over as the default browser automatically, every time the Controller starts.
These important configuration options can be managed by Group Policy in both Internet Explorer and Google Chrome. Mozilla Firefox does not natively support Group Policy today.
Alternatively, you can manage the enforcement of the browser settings for Internet Explorer and Chrome by adding or changing registry settings manually. To modify settings manually in the local PC registry, administrators will need to use a registry editor. The default Windows registry editor which must be launched from the Run command is regedit.exe. For a large organization, registry edits can be scripted and applied using a variety of enterprise management tools.
The remainder of this section covers management of Browsium Client browser extensions.
Enable the Browsium Internet Explorer Extension via Group Policy
Section titled “Enable the Browsium Internet Explorer Extension via Group Policy”A critical element of any Catalyst deployment is ensuring the Browsium Internet Explorer Extension is set to ‘enabled’ in Internet Explorer on all client PCs. To prevent malicious or unwanted add-ons from impacting the user experience, recent versions of Internet Explorer require user confirmation before any new add-on is enabled, unless that add-on is set to ‘enabled’ during the deployment process. In this section, you will learn the procedures for centrally enabling the Browsium Internet Explorer Extension during deployment.
The most common way to enable the Browsium Internet Explorer Extension during deployment is by utilizing Group Policy to make the necessary registry changes on client PCs. Alternative methods to modify the registry on client PCs, such as a Visual Basic Script, can also be employed. The following guidance is adapted from articles on Microsoft’s TechNet website, and includes the process to identify the GUID/CLSID of the Browsium Internet Explorer Extension, which must be located in the registry once it is installed in your environment.
Group Policy - Understanding the ‘Add-on List Policy’
Administrators can control the use of specific add-ons in Internet Explorer through the Add-on List Policy. Administrators can choose to enable or disable an add-on as well as allow a specific add-on to be managed by the user.
Policy Name: add-on list
Path: User Configuration or Computer Configuration node; Administrative Templates\Windows Components\Internet Explorer\Security Features\Add-on Management. To set this policy, an administrator can enable the policy and enter the GUID/CLSID of the Browsium Client add-on to the Add-on List and set the value to 1.
{width=“4.659722222222222in” height=“1.113982939632546in”}
{width=“3.3819444444444446in” height=“1.6742596237970253in”}
{width=“3.0776891951006125in” height=“0.9818044619422572in”}
**
Determining the GUID/CLSID of the Browsium Internet Explorer Extension
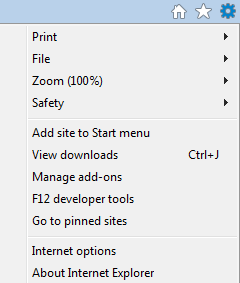
After installing Browsium Client, use Internet Explorer Tools menu to choose Manage add-ons.
 {width=“1.0695647419072616in” height=“1.260812554680665in”}
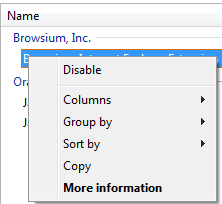
You’ll then be presented with the Manage Add-ons interface where you will see Browsium Internet Explorer Extension in the list.
 {width=“5.958334426946632in” height=“1.1666666666666667in”}
Right Click on the Browsium Internet Explorer Extension and choose “More Information” from the dropdown menu.
 {width=“1.276454505686789in” height=“1.1729582239720036in”}
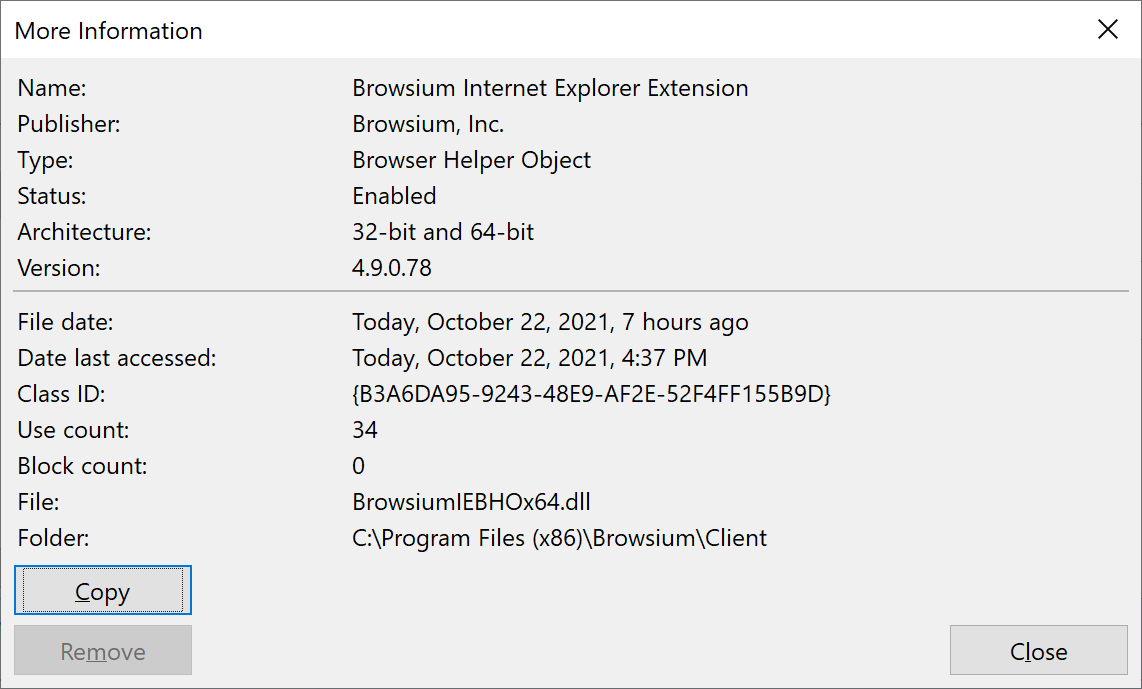
The CLSID, (Class ID) will appear in the dialog box.
 {width=“4.95998687664042in” height=“2.992420166229221in”}
Click the “Copy” button and then paste the contents of this dialog box (including the Class ID) to Notepad for later reference and save the text file. When you make the registry changes documented above, you will need to use the Class ID to identify the extension in the policy.
To set this policy with a manual or automated registry entry, an administrator can create a registry value based on the GUID/CLSID of the extension in either of the following keys and then set the desired value. When you enter the GUID/CLSID be sure to include the open brace at the beginning and the close brace at the end.
HKEY_CURRENT_USER\SOFTWARE\Microsoft\Windows\CurrentVersion\Policies\Ext\CLSID\{CLSID}
HKEY_LOCAL_MACHINE\SOFTWARE\Microsoft\Windows\CurrentVersion\Policies\Ext\CLSID\{CLSID}
Each add-on is a value in this registry key with the following properties.
Name: GUID of add on which is {B3A6DA95-9243-48E9-AF2E-52F4FF155B9D}
Type: REG_SZ
**
Value:
-
0 - Add-on is disabled and cannot be managed by the end user.
-
1 - Add-on is allowed and cannot be managed by the end user.
The Add-on (CLSID) lists are empty by default.
{width=“5.9376498250218726in” height=“1.0035640857392827in”}
Disable Internet Explorer’s Default Browser Check
Section titled “Disable Internet Explorer’s Default Browser Check”By default, some versions of Internet Explorer will prompt the user to select it as the default browser. Since Catalyst becomes the default browser, you will want to prevent this behavior.
With Group Policy settings and local registry settings, you can remove the ability for end users to change the default browser to Internet Explorer. Depending on which Group Policy template is on the system, this policy will vary. This policy allows you to prevent Internet Explorer from checking to see whether it is the default browser and prevents the user from changing it.
Before you enable this policy, you will want to uncheck the box “Tell me if Internet Explorer is not the default browser”. The check box is on the Program tab in the Internet Options dialog box. You can uncheck the box with a registry setting in the HKCU hive. The path to the registry key is below. The value for “Check Associations” should be “no”.
[HKEY_CURRENT_USER\Software\Microsoft\Internet Explorer\Main]“Check_Associations”=“no”
The Group Policy settings are listed below. All of them can be found at the following path:
Path: User Configuration\Administrative Templates\Windows Components\Internet Explorer
For IE8 & IE9:
Policy Name: Prevent changing default browser check
For IE10:
Policy Name: Disable changing default browser check
For IE11:
Policy Name: Notify users if Internet Explorer is not the default web browser
If you enable this policy, the Internet Explorer Should Check to See Whether It Is the Default Browser. Also, the check box on the Programs tab in the Internet Options dialog box appears dimmed and the user cannot change the default browser to IE. If you disable this policy or do not configure it, users can determine whether Internet Explorer will check to see if it is the default browser. When Internet Explorer performs this check, it prompts the user to specify which browser to use as the default.
Enable Browsium Client Extension for Microsoft Edge (Legacy)
Section titled “Enable Browsium Client Extension for Microsoft Edge (Legacy)”Microsoft Edge (Legacy) requires systems to be domain joined and logged in with a domain user account to use the Browsium Client extension. In addition, application sideloading needs to be enabled.
To do this, you will need to configure the following Group Policy setting:
Local Computer Policy\Computer Configuration\Administrative Templates\Windows Components\App Package Deployment\Allow all trusted apps to install
This setting must be set to ‘Enabled’ or the Browsium Client extension will not be installed and enabled for Microsoft Edge.
{width=“2.8739129483814523in” height=“1.4195384951881014in”}
Enable Browsium Client Extension for Microsoft Edge (Chromium)
Section titled “Enable Browsium Client Extension for Microsoft Edge (Chromium)”Microsoft provides Group Policy templates that allow you to force installation of extensions based on a provided list of extension IDs and sources.
-
Download the Edge (Chromium) Group Policy templates if you do not already have them imported — (https://www.microsoft.com/en-us/edge/business/download — You will need to list a version/build before the “Get Policy” link will become enabled.)
-
Locate the ExtensionInstallForceList policy, configure it and add the extension ID
adociibhpcfhbfkahfbdkakmehnmnkgd;http://crx.browsium.com/browsium-chrome-4.9.1.xml
 {width=“6.5in” height=“0.7722222222222223in”}
Enable Browsium Client Extension for Google Chrome
Section titled “Enable Browsium Client Extension for Google Chrome”To ease your Group Policy setup, several templates can guide you through the configurable options. Group Policy templates, and associated guidance, are provided by Google and can be found on Google’s support site. You may find additional settings (beyond those documented here) that you may wish to enforce or enable based upon your organization’s preferences.
By default, Chrome automatically disables all extensions that are side-loaded (installed by a 3^rd^ party program, like Browsium Client installation package), requiring users to enable them manually. The only way to centrally enable Browsium Client Extension for Chrome for enterprise deployment is via Group Policy for domain-joined systems.
The policy Configure the list of force-installed extensions (a.k.a. ExtensionInstallForcelist) allows you to specify a list of extensions that will be installed silently and enabled by default, without user interaction. This policy also works for side-loaded extensions, effectively overriding the default behavior in Chrome.
Each item of the list is a string that contains an extension ID and an update URL, separated by a semicolon (;). The extension ID is the 32-letter string found e.g. on chrome://extensions when in ‘Developer mode’. The update URL must point to an Update Manifest XML document as described at http://code.google.com/chrome/extensions/autoupdate.html. Note that the update URL set in this policy is only used for the initial installation; subsequent updates of the extension will use the update URL indicated in the extension’s manifest.
For each item, Google Chrome will retrieve the extension specified by the extension ID from the update service at the specified update URL and silently install it. Users will be unable to uninstall extensions that are specified by this policy. If you remove an extension from this list, it will be automatically uninstalled by Google Chrome. Extensions specified in this list are also automatically whitelisted for installation; the Configure extension installation blacklist (a.k.a. ExtensionInstallBlackList) does not affect them.
A by-product of the ExtensionInstallForceList policy is that managed extensions are silently installed in Chrome, enabled by default, and block users from disabling or removing them. This is desired for enterprise deployment of Browsium Client. If this policy is ‘Not Configured’, users can delete any extension in Chrome, including Browsium Client Extension, from the Extensions page. This is undesirable, as side-loaded extensions that are deleted are automatically blacklisted and re-enabling them is tricky (but achievable). Contact Browsium Support if this happens.
To force-enable Browsium Client Extension for Chrome and lock it down so users can’t disable or delete it, you will use the Configure the list of force-installed extensions policy. This process requires an XML Manifest, which references the Proton extension’s .crx file. Both must be available on a server or in the Chrome web store. Browsium is hosting these files for all customers on browsium.com.
Follow these steps to ensure that this method is properly configured using Group Policy for your domain-joined systems. These instructions assume you’re using the ADM template. The Group Policy location will change if using ADMX.
As of Chrome 33, the ExtensionInstallForceList policy is only enforced for domain-joined systems. All client PCs in your environment must be joined to a Windows domain or you will not be able to centrally manage Browsium Client Extension. Attempting to configure ExtensionInstallForceList via the Local Policy Editor will result in unpredictable behavior of the extension.
-
Install Browsium Client software.
-
Download the Group Policy templates for Chrome from the Google support site.
-
Import the Google Chrome Group Policy template into your Group Policy editor.
-
Enable the policy Configure the list of force-installed extensions.http://dl.google.com/dl/edgedl/chrome/policy/policy_templates.zip
-
Enter the following value by selecting the ‘Show…’ button in the Options window and apply the setting.
(This is the Browsium Client Extension ID followed by the URL for the manifest XML document, with no spaces in the string.)
adociibhpcfhbfkahfbdkakmehnmnkgd;http://crx.browsium.com/browsium-chrome-4.9.1.xml
 {width=“6.495833333333334in” height=“1.1458333333333333in”}
Browsium Client Extension for Chrome may have a different version number from the other Browsium Client and Catalyst components as maintenance versions are released. See the version number section of the Catalyst Version History KB article for details on the release date and version number for the Browsium Client Extension for Chrome.
Disable Chrome’s Default Browser Check
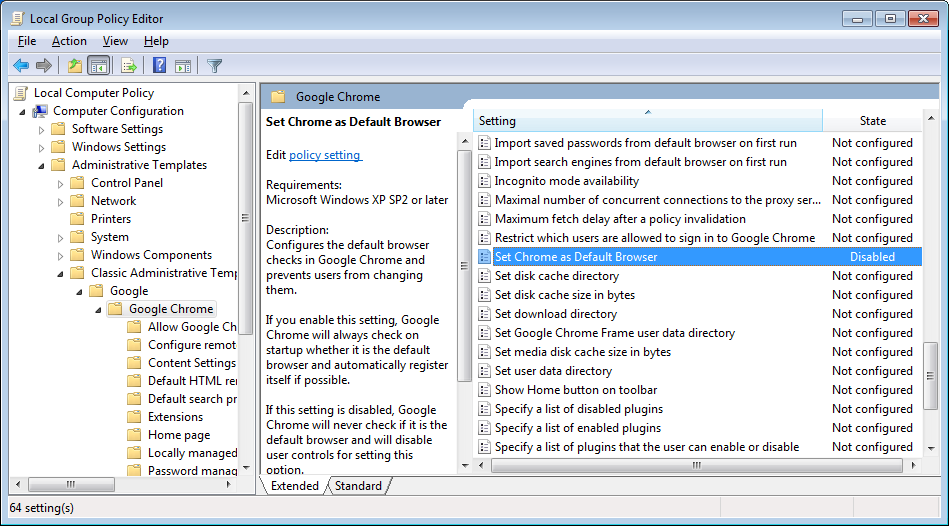
Section titled “Disable Chrome’s Default Browser Check”Group policy can be used to configure the default browser checks in Google Chrome and prevent users from changing them. If you ‘Enable’ this setting, Chrome will always check on startup whether it is the default browser and automatically register itself if possible. If this setting is ‘Disabled’, Chrome will never check if it is the default browser and will disable user controls for setting this option (the desired state when using Catalyst). If this setting is ‘Not Configured’, Chrome will allow the user to control whether it is the default browser and whether user notifications should be shown when it isn’t.
For all users running Catalyst, the Set Chrome as Default Browser setting (a.k.a. DefaultBrowserSettingEnabled) should be “Disabled” in your Group Policy editor. The path for this setting in the Local Group Policy Editor is Local Computer Policy\Administrative Templates\Classic Administrative Templates (ADM)\Google\Google Chrome.
 {width=“4.793098206474191in” height=“2.656686351706037in”}
Enable the Browsium Client Extension for Mozilla Firefox
Section titled “Enable the Browsium Client Extension for Mozilla Firefox”Mozilla Firefox does not allow client software to install an extension and enable it by default. Nor does it contain a centralized management facility to keep users from tampering with extensions like Internet Explorer and Chrome. However, Browsium Client includes a facility to automatically enable the extension every time the user logs onto the system, so administrators can ensure that the Firefox extension is always enabled.
To enable Browsium Client Extension for Firefox automatically, create the registry value:
… for 32-bit Windows systems:
HKEY_LOCAL_MACHINE\SOFTWARE\Microsoft\Windows\CurrentVersion\Run
Enable Browsium Extension (REG_SZ) = “C:\Program files\Browsium\Client\BrowsiumController.exe” /ef
… for 64-bit Windows systems:
HKEY_LOCAL_MACHINE\SOFTWARE\Wow6432Node\Microsoft\Windows\CurrentVersion\Run
Enable Browsium Extension (REG_SZ) = “C:\Program Files (x86)\Browsium\Client\BrowsiumController.exe” /ef
Disable Firefox’s Default Browser Check
Section titled “Disable Firefox’s Default Browser Check”This policy configures the default browser checks in Mozilla Firefox and prevents users from changing them. If you enable this setting, Firefox will not check on startup whether it is the default browser and also will not allow the user to change this setting.
For all users on a PC, the Disable Firefox Default Browser Check setting should be “enabled” in your Group Policy editor. The path for this setting is Local Computer Policy\Administrative Templates\Classic Administrative Templates (ADM)\Mozilla Firefox.
This setting will make the following changes to the PC’s registry once the policy is propagated:
Data type: REG_DWORD
Windows registry location: HKEY_LOCAL_MACHINE\Software\Policies\Firefox\FirefoxCheckDefault
Example value: 0x00000001
The value in this case should set be “0”
Data type: REG_SZ
Windows registry location: HKEY_LOCAL_MACHINE\Software\Policies\Firefox\FirefoxCheckDefaultType
The value in this case should be “Locked”
Understanding Catalyst Project Registry Locations
Section titled “Understanding Catalyst Project Registry Locations”Before we look at deployment specifics for enterprise client systems, it is important to understand methodologies for deploying configurations on test systems during configuration development. Catalyst makes it easy to test a configuration without requiring a centralized deployment methodology. This is done via the Start Test Configuration option from the File menu of Catalyst Configuration Manager.
This option saves the project file to disk, places a pointer to the file in the registry, and starts Browsium Controller to load the new configuration. The pointer is written to the LoadFromFileName registry value in HKEY_LOCAL_MACHINE\SOFTWARE\(Wow6432Node)\Browsium\Catalyst.
Start Test Configuration should only be used for project development and testing as it requires the Catalyst Configuration Manager which should never be made available to end users. In addition, the HKEY_LOCAL_MACHINE\SOFTWARE\(Wow6432Node)\Browsium\Catalyst registry location should only be used for testing as it is easily overwritten by Catalyst Configuration Manager and may not persist during a Browsium Client upgrade.
The last concept that must be understood before embarking on a Catalyst deployment is the precedence hierarchy for the evaluation of configurations when multiple LoadFromFileName values are found on a system. Catalyst follows this hierarchy to load the configuration that will be used on a given end user system (and on test systems). Once a valid configuration is found, Catalyst will stop searching and that configuration will be used.
Deploying different Catalyst configurations using multiple methodologies on a single PC may cause unpredictable results as only the configuration highest in the hierarchy will be used.
The following table provides the hierarchy of Catalyst configuration precedence. The string “(Wow6432Node)” in the registry path denotes the Wow6432Node registry key that will be included in the path on 64-bit Windows systems. 32-bit Windows systems do not contain this key, hence the use of parentheses in the chart.
Catalyst 2.0 and earlier used a registry key called RulesFilePath. That key has been deprecated in Catalyst 3.0 and later. Only LoadFromFileName values will be used to determine the active Catalyst configuration. Contact Browsium Support if you need assistance upgrading from an older version of Catalyst.
Working with Test Configurations in Group Policy Environments
Section titled “Working with Test Configurations in Group Policy Environments”Understanding configuration loading hierarchy is critical to ensuring configurations load as expected during project development. Testing on systems that receive a LoadFromFileName value via Group Policy may not behave as expected.
Catalyst reads LoadFromFileName from the Test Configuration location prior to Group Policy locations to ensure that the project you are testing is used by Browsium Controller. However, as soon as you Clear Test Configuration, the configuration deployed via Group Policy will become the active project. This will make it difficult to compare your new Test Configuration with a native, unmanaged environment. To achieve a clean Catalyst test system, you must remove your system from the domain, exclude it from Catalyst project file Group Policy settings, or temporarily delete the LoadFromFileName value delivered by Group Policy. (It will return on the next Group Policy refresh.)
Browsium recommends testing Catalyst on systems that are not controlled by Catalyst project file Group Policy settings to avoid configuration conflicts.
Multi-user Testing Configurations
Section titled “Multi-user Testing Configurations”As mentioned previously, Catalyst Configuration Manager should be installed only for administrators and project developers — not for end users. However, this creates a challenge when working on a multi-user server system, such as a Citrix XenDesktop or Microsoft Terminal Server environment.
Start Test Configuration writes to the HKEY_LOCAL_MACHINE registry hive. This means the Catalyst configuration will be deployed for all users on a multi-user system if any user with administrator privileges uses Start Test Configuration from Catalyst Configuration Manager. Therefore, Browsium recommends that project development and testing be performed on a single-user system only.
Start Test Configuration in Catalyst Configuration Manager always writes to the shared HKEY_LOCAL_MACHINE registry hive on a multi-user system.
Deploying Catalyst Configurations
Section titled “Deploying Catalyst Configurations”Since Catalyst is a client solution with no server component, getting the configuration settings to the client is critical for proper operation. Configuration management is extremely flexible and can be tailored to meet the design and requirements of your environment.
Catalyst’s project files are standard XML documents, allowing you to take full advantage of this versatile and very compact format. Configurations are easy to update by simply replacing the project file on end user systems, network share, or web server.
By design, Catalyst will not look in any specific location for a project file — you must configure where each client system will look for the configuration. This only needs to be done once, no matter how often the project file is updated, provided the file name and location do not change. The following steps provide guidance to specify where Catalyst should look for the project file.
There are two options for deploying the Catalyst project file — on each client system or hosted on a file share or web server. Browsium recommends using the hosted method for deploying configurations to provide the most flexibility. Browsium Client makes the network calls needed to ‘pull down’ the configuration from the hosted project file, so no additional packaging or user login configuration steps are needed when using the hosted option.
When using a project file loaded from a client system, administrators must use some other software distribution solution (SMS, SCCM, login script, file copy, etc.) to deploy the project file to the client file system.
Project File Deployment Option A: Network Share or Web Server Location
Section titled “Project File Deployment Option A: Network Share or Web Server Location”In this section you will learn how to instruct Catalyst to load the configuration from a network share or web server location. To do this, you must edit the system registry manually (for local testing) or via a script or Group Policy (for remote deployment) to create the LoadFromFileName registry value and data at the appropriate location. Browsium recommends using the registry preference extension for Group Policy or the Browsium ADM and ADMX templates as the most efficient way to streamline deployment of this registry value.
The Catalyst project file (.cax) must be stored in a user-readable location on the network share or web server. For network share locations, Browsium recommends client systems have only read access permissions to ensure the file is not accidently removed or modified. For both network share and web server locations, organizations must ensure client systems have both security credentials for, and network access to, the resource.
Security credentials must be established for the end user, not the client system as required for Ion, as the Catalyst project file is accessed directly by the Browsium Controller, which runs with user privileges.
Remote/mobile users will need to have VPN access if the file or web server hosting the Ion configuration file is not publicly accessible and the user’s system has not cached the configuration from a prior connection.
If the network share or web server is unavailable when Browsium Controller starts, and no configuration is found in Catalyst’s cache from a previous connection, the Controller will not start (provided neither Proton nor Ion are configured on the client system). As long as the user successfully connects to the server once during Controller startup, the configuration will be cached indefinitely.
The following registry keys and associated values must be created, depending on the system and user accounts being targeted:
For per-user settings on 32-bit or 64-bit Windows systems, find or create:
HKEY_CURRENT_USER\Software\Policies\Browsium\Catalyst
For per-machine settings on 32-bit Windows systems, find or create:
HKEY_LOCAL_MACHINE\Software\Policies\Browsium\Catalyst
For per-machine settings on 64-bit Windows systems, find or create:
HKEY_LOCAL_MACHINE\Software\Wow6432Node\Policies\Browsium\Catalyst
Then create or populate the following String Value in the key:
LoadFromFileName (REG_SZ) = \\Server\Share\Catalyst\… [the path to your Catalyst project file]
This setting will direct the Catalyst software to the project file the next time Browsium Controller is restarted.
Slashes in the file path must be escaped with a slash when invoking Regedit.exe via a .reg file. So \\Server\Share becomes \\\\Server\\Share. http://server/file remains http://server/file.
In this example, LoadFromFileName has been configured to use the Catalyst project file “Catalyst test.cax” in the \\server\share directory on a 64-bit Windows system. These entries can be scripted and delivered to the Registry on remote clients via the following text in a .reg file.
Windows Registry Editor Version 5.00
[HKEY_LOCAL_MACHINE\SOFTWARE\Wow6432Node\Policies\Browsium\Catalyst]
“LoadFromFileName”=“\\\\server\\share\\Catalyst test.cax”
 {width=“6.068295056867892in” height=“0.8110509623797025in”}
Project File Deployment Option B: Client File System Location
Section titled “Project File Deployment Option B: Client File System Location”In this section you will learn how to instruct Catalyst to load the configuration file from a local file system location. To do this, you must edit the system registry manually (for local testing) or via a script or Group Policy (for remote deployment) to create the LoadFromFileName registry value and data at the appropriate location. Browsium recommends using the registry preference extension for Group Policy or the Browsium ADM and ADMX templates as the most efficient way to streamline deployment of this registry value.
The Catalyst project file (.cax) must be stored in a user-readable location on the client PC. If not already on the client PC, administrators must have a distribution plan and process for ensuring the project file is copied to the client PC prior to starting Browsium Controller. If Catalyst is unable to find the project file in the defined location, and none exists in the cache from a previous configuration, Browsium Controller will not start the Catalyst service. For more information on Catalyst file caching behaviors see the Catalyst Project File Caching Behavior section.
The following registry keys and associated values must be created, depending on the system and user accounts being targeted:
For per-user settings on 32-bit or 64-bit Windows systems, find or create:
HKEY_CURRENT_USER\Software\Policies\Browsium\Catalyst\
For per-machine settings on 32-bit Windows systems, find or create:
HKEY_LOCAL_MACHINE\Software\Policies\Browsium\Catalyst\
For per-machine settings on 64-bit Windows systems, find or create:
HKEY_LOCAL_MACHINE\Software\Wow6432Node\Policies\Browsium\Catalyst\
Then create or populate the following String Value in the key:
LoadFromFileName (REG_SZ) = C:\directory\… [the path to your Catalyst project file]
This setting will direct the Catalyst service to the configuration file the next time Browsium Controller is restarted.
Slashes in the file path must be escaped with a slash when invoking Regedit.exe via a .reg file. So C:\directory becomes C:\\directory in the registry value.
In this example, LoadFromFileName has been configured to use the file “Catalyst test.cax” in the C:\Browsium directory on a 64-bit Windows system. These entries can be scripted and delivered to the Registry on remote clients via the following text in a .reg file.
Windows Registry Editor Version 5.00
[HKEY_LOCAL_MACHINE\SOFTWARE\Wow6432Node\Policies\Browsium\Catalyst]
“LoadFromFileName”=“C:\\Browsium\\Catalyst test.cax”
 {width=“5.9623053368328955in” height=“0.7968853893263342in”}
Readying Windows 8 and Windows 10 for Catalyst
Section titled “Readying Windows 8 and Windows 10 for Catalyst”For Catalyst to work properly in all scenarios, it must be the default browser in Windows. In earlier versions of Windows, Catalyst was able to set itself the default browser. Microsoft has made significant changes with Windows 8 and later in this area which impacts all browsers, forcing users to take specific action or IT to manage default browser settings centrally.
Prior to Windows 8, Catalyst automatically configured itself as the default browser, or more specifically, the default program for the HTTP and HTTPS protocols. This enabled Catalyst to direct traffic to the appropriate browser for desktop shortcuts and links to websites in applications, such as email programs.
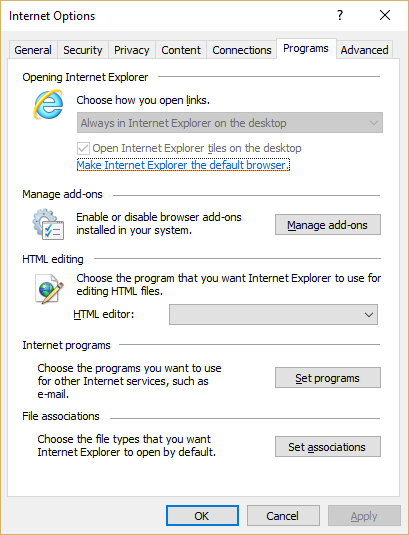
With Windows 8 and Windows 10, Microsoft has blocked applications from programmatically configuring the default browser. Only end users (or IT administrators via Group Policy) can set a default browser. This is even true of Internet Explorer, which can only invoke the Set Default Programs control panel to when selecting “Make Internet Explorer the default browser” from Internet Options.
 {width=“2.9632622484689413in” height=“1.3221730096237971in”}
 {width=“4.422590769903762in” height=“3.31788823272091in”}
Because of these new restrictions in Windows 8 and later, default browser settings must be manually configured for Catalyst. The following sections will guide you through this process for two scenarios:
-
Catalyst Project Development, which includes evaluation and testing of Catalyst
-
Catalyst Enterprise Deployment, to set the default browser in a managed enterprise
Set Catalyst as Default Browser for Project Development
Section titled “Set Catalyst as Default Browser for Project Development”When developing Catalyst projects (or configurations), or simply evaluating Catalyst for future purchase, it’s not practical to configure Group Policy to set Catalyst as the default browser on Windows 8 and later. Instead, it’s much easier to set the default browser using the Default Programs control panel in Windows.
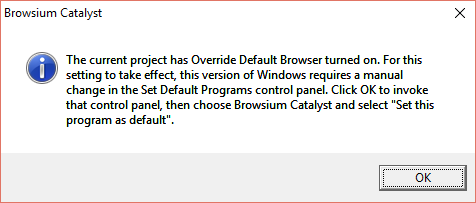
After creating a project in Catalyst Configuration Manager and executing Start Test Configuration for testing, Catalyst will alert you that it wants to become the default browser in Windows — assuming the Project Setting “Override Default Browser” is checked (which is the default setting in all projects). This works in much the same way as Internet Explorer, described in the prior section.
 {width=“3.7099825021872266in” height=“1.5821981627296589in”}
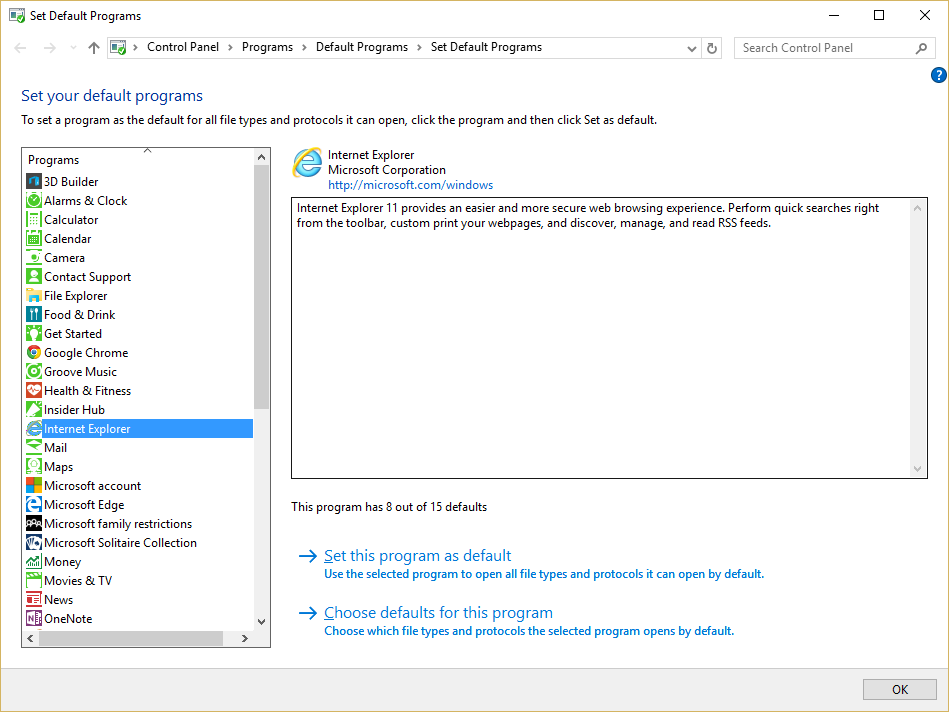
Clicking OK in this dialog will automatically launch the Set Default Programs control panel. It will also start Browsium Controller so you will see the Catalyst Splash Screen while the control panel is loading.
 {width=“4.800125765529309in” height=“3.601119860017498in”}
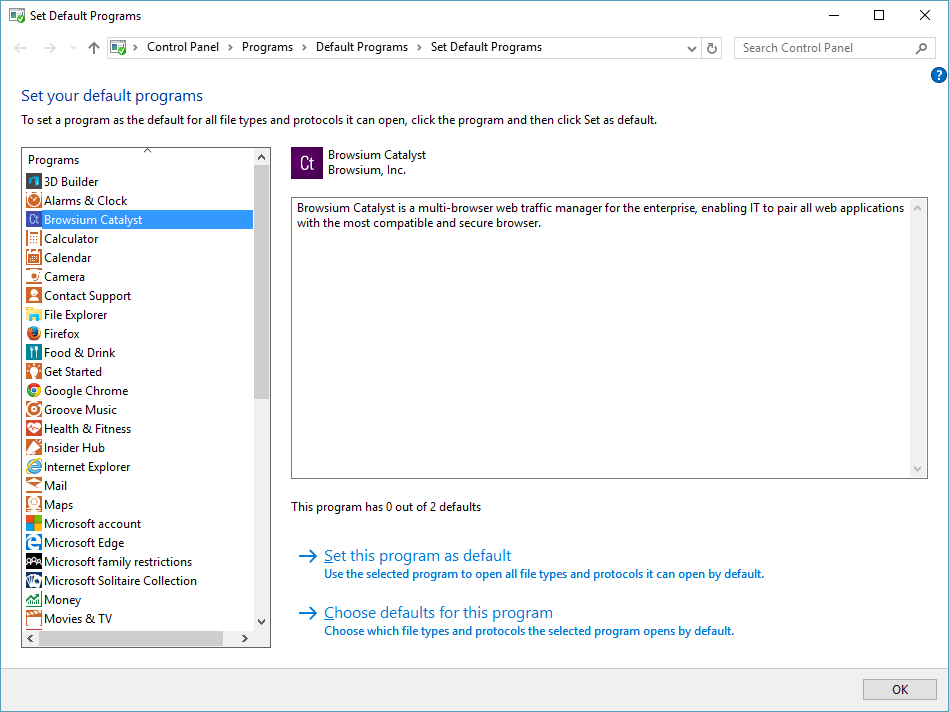
You’ll notice that Catalyst has “0 out of 2 defaults”. You want it to have both defaults — which correspond to HTTP and HTTPS. Select the option ‘Set this program as default’. Alternatively, to see the individual selections, select ‘Choose defaults for this program’ and then choose Select All to set Catalyst as the default for both HTTP and HTTPS and then click ‘Save’.
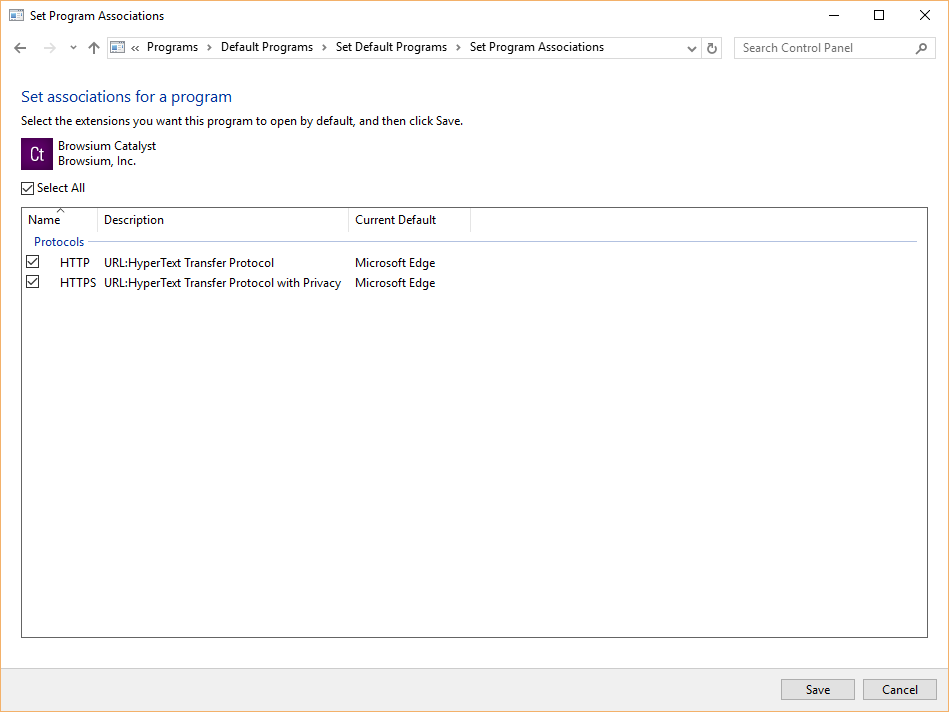 {width=“5.385827865266841in” height=“4.0405216535433075in”}
Catalyst will hold these defaults until you change the settings by selecting another browser as the default if prompted. If you plan to continue to use Catalyst, you should not change the default browser, per the guidance earlier in section 5.2. Catalyst has a built-in fail-safe if the Controller is stopped, either manually or by the Clear Test Configuration option in Catalyst Configuration Manager, where it will restore Internet Explorer as the default program for HTTP, and HTTPS, even though the Default Programs control panel still shows Catalyst owning the setting for these protocols.
Set Catalyst as Default Browser for Enterprise Deployment
Section titled “Set Catalyst as Default Browser for Enterprise Deployment”When deploying Catalyst across an enterprise running Windows 8 and later, you will want to use enterprise-class management tools to set Catalyst as the default browser.
Prior to Windows 8, applications could set the default handler for a file type/protocol by manipulating the registry. This means IT could easily have a script or a Group Policy manipulating the registry. For example, for the mailto: protocol, you just needed to change the “default” value under HKEY_CLASSES_ROOT\mailto\shell\open\command
With Windows 8 and later, this method is no longer available. But Microsoft has introduced a new Group Policy mechanism for declaring these defaults in Windows 8 and later to accommodate this type of scenario. The basic idea is to have an XML file that maps programs to the file type/protocol that they should be the default for. The following steps provide guidance for configuring and deploying Catalyst as the default browser across an enterprise of Windows 8 or Windows 10 systems.
This guidance is not required for Windows 7 or Windows XP as Catalyst is able to programmatically take over the default browser setting on those systems.
-
Create your XML file or export it from a system which has Catalyst as the default browser using DISM, per Microsoft’s guidance. Among the many entries in your XML file, the following association identifiers must point to Catalyst.
<?xml version=“1.0” encoding=“UTF-8”?>
<DefaultAssociations>
<Association Identifier=“http” ProgId=“CatalystHTML” ApplicationName=“Catalyst” />
<Association Identifier=“https” ProgId=“CatalystHTML” ApplicationName=“Catalyst” />
</DefaultAssociations> -
Use the new Windows 8 and later Group Policy that enables you to set the association for file types and protocols. Enable the policy “Set a default associations configuration file” found at “Computer configuration\administrative templates\Windows Components\File Explorer”. This will set the following registry entry:
<HKLM\Software\Policies\Microsoft\Windows\System!DefaultAssociationsConfiguration>
This policy specifies the path for the XML file that can be either stored locally or on a network location.
{width=“5.50133530183727in” height=“2.6342924321959753in”}
Using DISM to import the XML is not enough; you must still link it to the Group Policy Object.
In addition, the system needs to be domain-joined and the associations are applied at logon time.
Verifying Deployment Settings
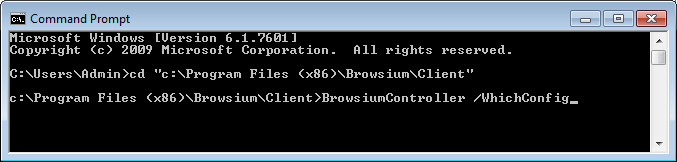
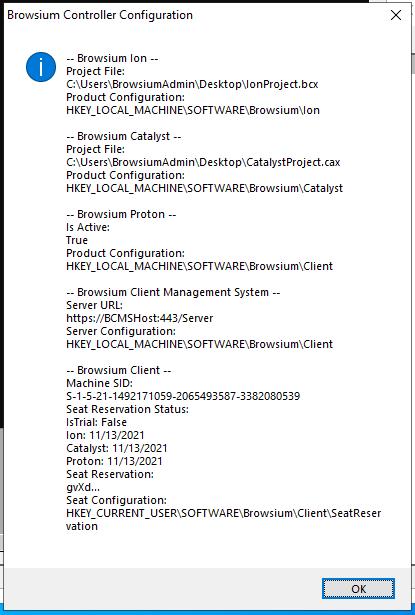
Section titled “Verifying Deployment Settings”Browsium Controller provides a command-line function to query the system and identify the location of the Proton, Ion, and Catalyst configurations to be used the next time the Controller starts. The command BrowsiumController /WhichConfig is run from a Command Prompt.
In the following example, a system is setup with a Catalyst project file deployed to HKEY_LOCAL_MACHINE\SOFTWARE\Policies\Browsium\Catalyst with the value
”C:\Browsium\Catalyst project.cax” stored in LocalFromFileName. (This example also contains an Ion project file and a Proton Server URL.)
The query uses registry reflection so the result ignores the Wow6432Node key on 64-bit systems, although it’s in the path of the registry value.
Executing this command …
 {width=“4.909666447944007in” height=“1.1749628171478566in”}
… results in the configuration acknowledged as:
 {width=“2.961049868766404in” height=“4.427083333333333in”}
‘WhichConfig’ shows the Ion, Catalyst, and Proton configurations TO BE LOADED at the next Controller restart. The values shown may be different from the currently loaded configurations, if the values in the registry keys have been changed since the Controller was last started.
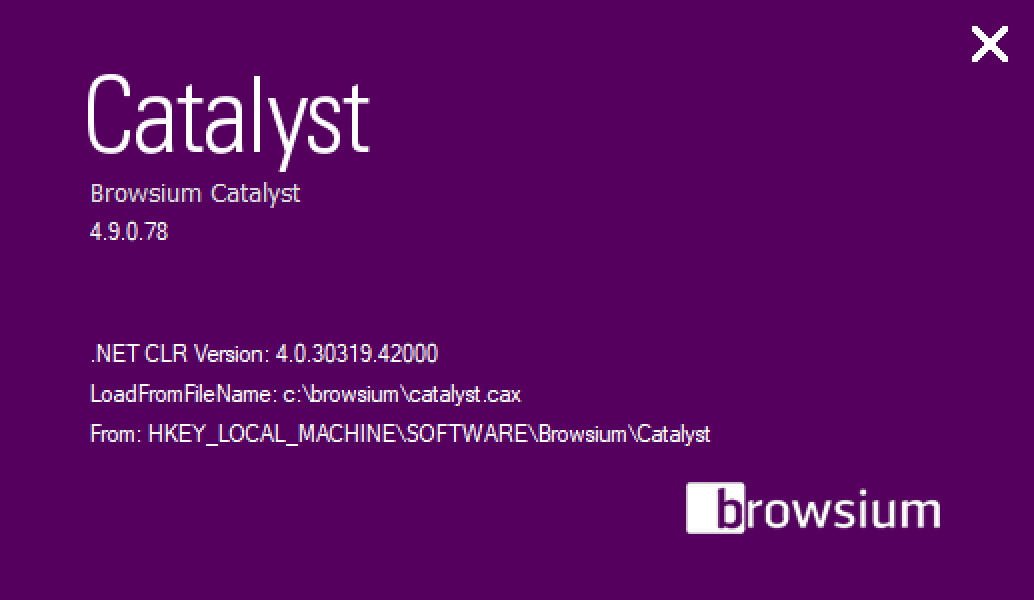
In addition to the command line option, administrators running Catalyst Configuration Manager can quickly check which configuration will load when the Controller is restarted by viewing About Box. Select ‘About Browsium Catalyst Configuration Manager’ from the Help menu. When the Catalyst About Box loads, press the Ctrl key to reveal the project file information. In addition to the LoadFromFileName registry location and project file path and name, you will see the installed .NET CLR version — another way to ensure the system is ready and working properly for testing.
In the following example, the project is read from the registry location written by Start Test Configuration, which takes precedence over all other registry locations as detailed in section 5.3.
 {width=“4.5459875328083985in” height=“2.6377416885389326in”}
Understanding Catalyst Project File Caching Process
Section titled “Understanding Catalyst Project File Caching Process”Browsium Controller reads the Catalyst project file when the Controller is started, then continues operating using that configuration until the Controller restarts and looks for a new project file, or until the configuration changes if non-default Project Update Activation settings are used. See section 5.6.2 for more details on Project Update Activation.
Catalyst Project File Caching Behavior
Section titled “Catalyst Project File Caching Behavior”Browsium Controller attempts to load the configuration from the Catalyst project file defined in the LoadFromFileName registry value whenever the Controller is started. The location of the file can be local on the client system, a network share, or a web server. The Controller must be able to reach the location where the file is stored, and the user must have at least read permissions on the project file. When the configuration is loaded, a copy of the project file is cached locally in the user’s AppData (HKCU deployment) or ProgramData (HKLM deployment) directory.
If multiple users share the same PC with unique user accounts, or when using a multi-user terminal server, each user will cache a copy of the project file in his/her AppData directory. Those files will be identical if the LoadFromFileName registry value is in HKEY_LOCAL_MACHINE (one entry for all users), or may be different if LoadFromFileName is in HKEY_CURRENT_USER (unique entry per user).
If the original Catalyst project file is not available (the network location is temporarily unreachable or the file has been moved, renamed, or deleted), Browsium Controller will load the previously cached copy of the project file and operate using that configuration until the Controller is restarted and a new project file is available.
This capability makes Catalyst extremely robust and able to remain fully functional regardless of what happens to the project file after it has been loaded and Browsium Client processes are running.
How Catalyst Handles Project File Polling
Section titled “How Catalyst Handles Project File Polling”Some customers deploy Catalyst in a staged rollout to their enterprise user base, which requires updating project files as redirection rules are required. To ensure client systems obtain the updated project file, Browsium Controller includes a Catalyst configuration polling mechanism to check for modified versions of the project file. When Browsium Controller identifies a different Catalyst project file in the target location defined in the LoadFromFileName registry value, by comparing the MD5 hash of the cached file against the target file, the target file is retrieved and cached locally. If the hash matches the current cached file, the target project file is not retrieved.
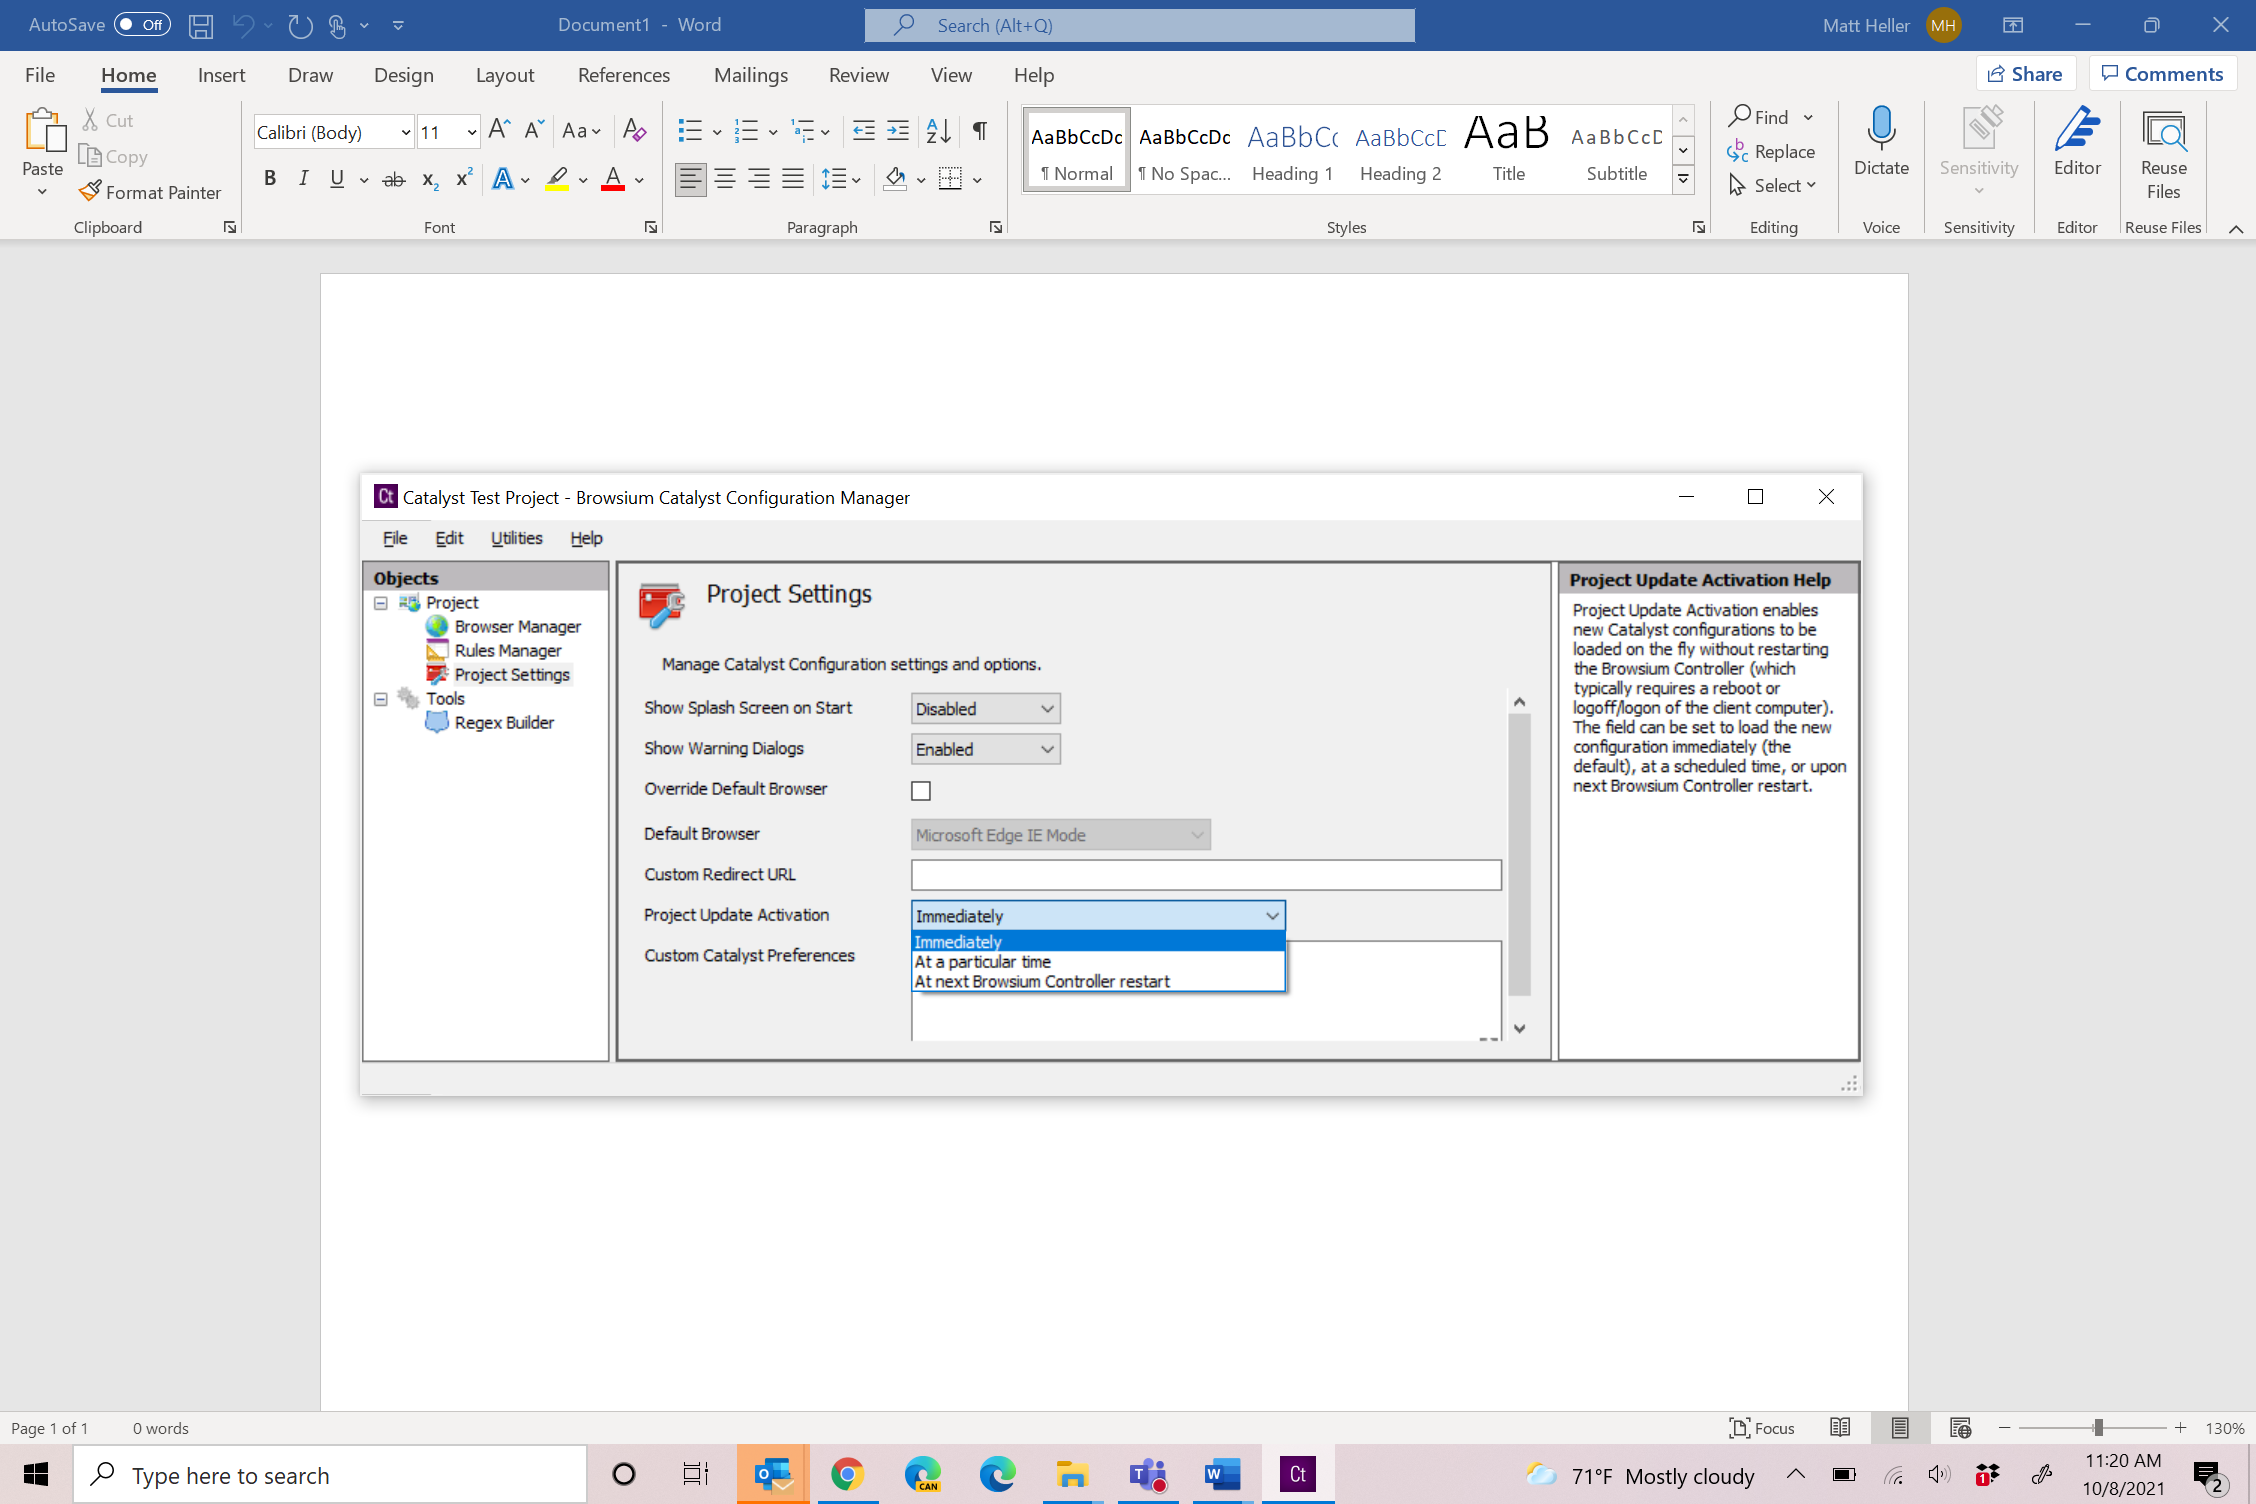
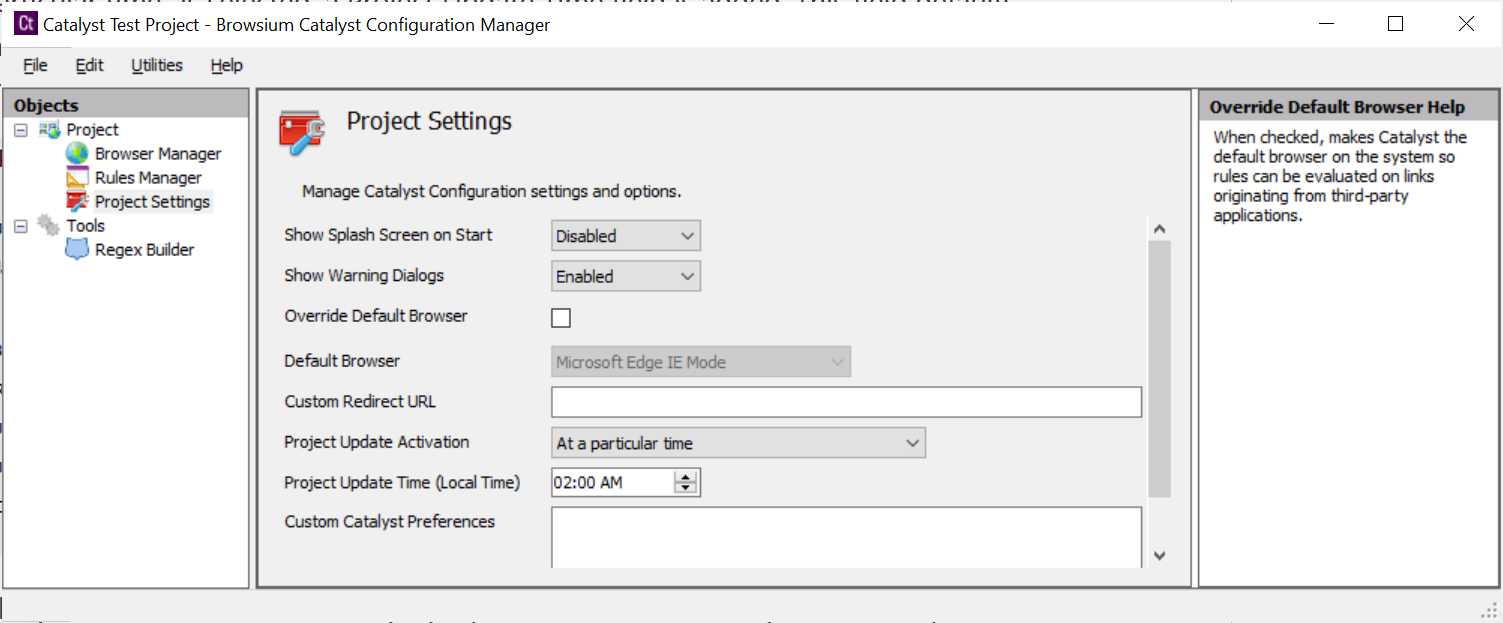
To ease deployment in large enterprises, Catalyst enables new configurations to be loaded on the fly without restarting the Browsium Controller (which typically requires a reboot or logoff/logon of the client computer). This functionality is governed by Project Update Activation in Project Settings. The default is set to load the new configuration immediately.
 {width=“4.920293088363954in” height=“2.039608486439195in”}
To achieve enterprise-level scale, the polling mechanism uses a random interval to discover configuration updates, as noted at the end of this section. It can therefore take up to an hour for Project Update Activation to change the in-memory configuration that Catalyst is actively using even when set to ‘Immediately’.
This setting can be changed to activate the new project at a scheduled time or upon next Browsium Controller restart.
 {width=“4.160668197725284in” height=“2.1464206036745406in”}
When “At a particular time” is selected, a Project Update Time field is added. This field defaults to 2am but can be changed to any time value. It uses the client’s system clock so that 2am is 2am for every user, regardless of time zone.
 {width=“3.9837270341207347in” height=“2.069935476815398in”}
The client polling mechanism checks the target project file location at a regular time sequence interval, using a randomly generated seed time point. The randomly generated seed value helps ensure large scale deployments do not simultaneously try to retrieve the project file, avoiding a denial of service or network traffic storm issues.
Browsium Controller simply compares the computed MD5 hash of two files and uses the target file if the two signatures are different. No effort is made to determine which file is newer (either by time/date stamp or content analysis) so administrators must ensure updates to the target file location are done carefully to avoid clients regressing to an older project file configuration by mistake.
Managing Browsium Client Logging Settings
Section titled “Managing Browsium Client Logging Settings”In a default installation, Browsium Client logs Warning level information which will provide basic information about the Catalyst configuration and any important errors that may occur on client systems, including errors from Proton and Catalyst if configured on the client.
Browsium Client can be configured to record more detailed logging information to troubleshoot problems or validate Catalyst configuration settings on the local system. Browsium Client logging is written to the standard Windows event log under an application-level source named Browsium. The Logging Level setting determines the amount and type of data collected in the Windows event log. This table summarizes the various levels and data collected:
Value Level Description
1 Error Writes Error entries
2 Warning Writes Warn and Error entries (Default)
4 Info Writes Info, Warn and Error entries
Section titled “4 Info Writes Info, Warn and Error entries”To adjust the level of logging, a registry value must be configured on the target system. Once the logging value is created, the Browsium Controller must be restarted to recognize the specified logging value.
Browsium Controller looks in the Windows registry for the presence of the logging setting at HKEY_CURRENT_USER\Software\Browsium\Client. The value is a REG_DWORD type, with value name “LogLevel”. The data in that value can be 1, 2 or 4 (see chart above).
 {width=“5.838845144356956in” height=“1.0124409448818898in”}
If no LogLevel registry value is present in the defined registry location (the default Browsium Client state), or any invalid values are found at that location, Browsium Client will revert to using the default Level 2 — Warning.