Catalyst Configuration Manager Overview
Catalyst Configuration Manager enables you to create and manage rules that define the websites you want to open using a browser designated by Catalyst. This section looks at the various elements of Catalyst Configuration Manager. Configuration Manager is designed with the look and feel of an MMC snap-in, with three main functional areas:
Objects Pane (Left) — Tree view enabling access to the Browser Manager, Rules Manager, and Project Settings for a given project
Content Pane (Center) — Main data and content window
Actions Pane (Right) — Contextual links and descriptions for common tasks and steps
 {width=“6.01875in” height=“1.7954483814523186in”}
Some data entry fields will display an  {width=“0.22916666666666666in” height=“0.23958333333333334in”} icon in the lower right hand corner of the text entry field. Clicking this link on any screen will open the extended and powerful text editor. The text editor is provided for easily working with complex text fields, as well as offering syntactical highlighting for easy and readable visual layout. When done editing using the text editor, simply click the OK or Cancel buttons to save (or discard) changes made.
The Actions Pane contains regularly used and context related common functions. The Add, Edit, Delete, Copy, Cut, Paste items appear in the Actions Pane based on the specific task being completed. The behavior of these items is the same in all scenarios. Some interfaces may not support items such as Copy and Paste, and will not be displayed.
See the Project Node, Browser Manager Node, Rules Manager Node, and Project Settings Node sections for a detailed description of each Objects Pane Node.
Menu Bar
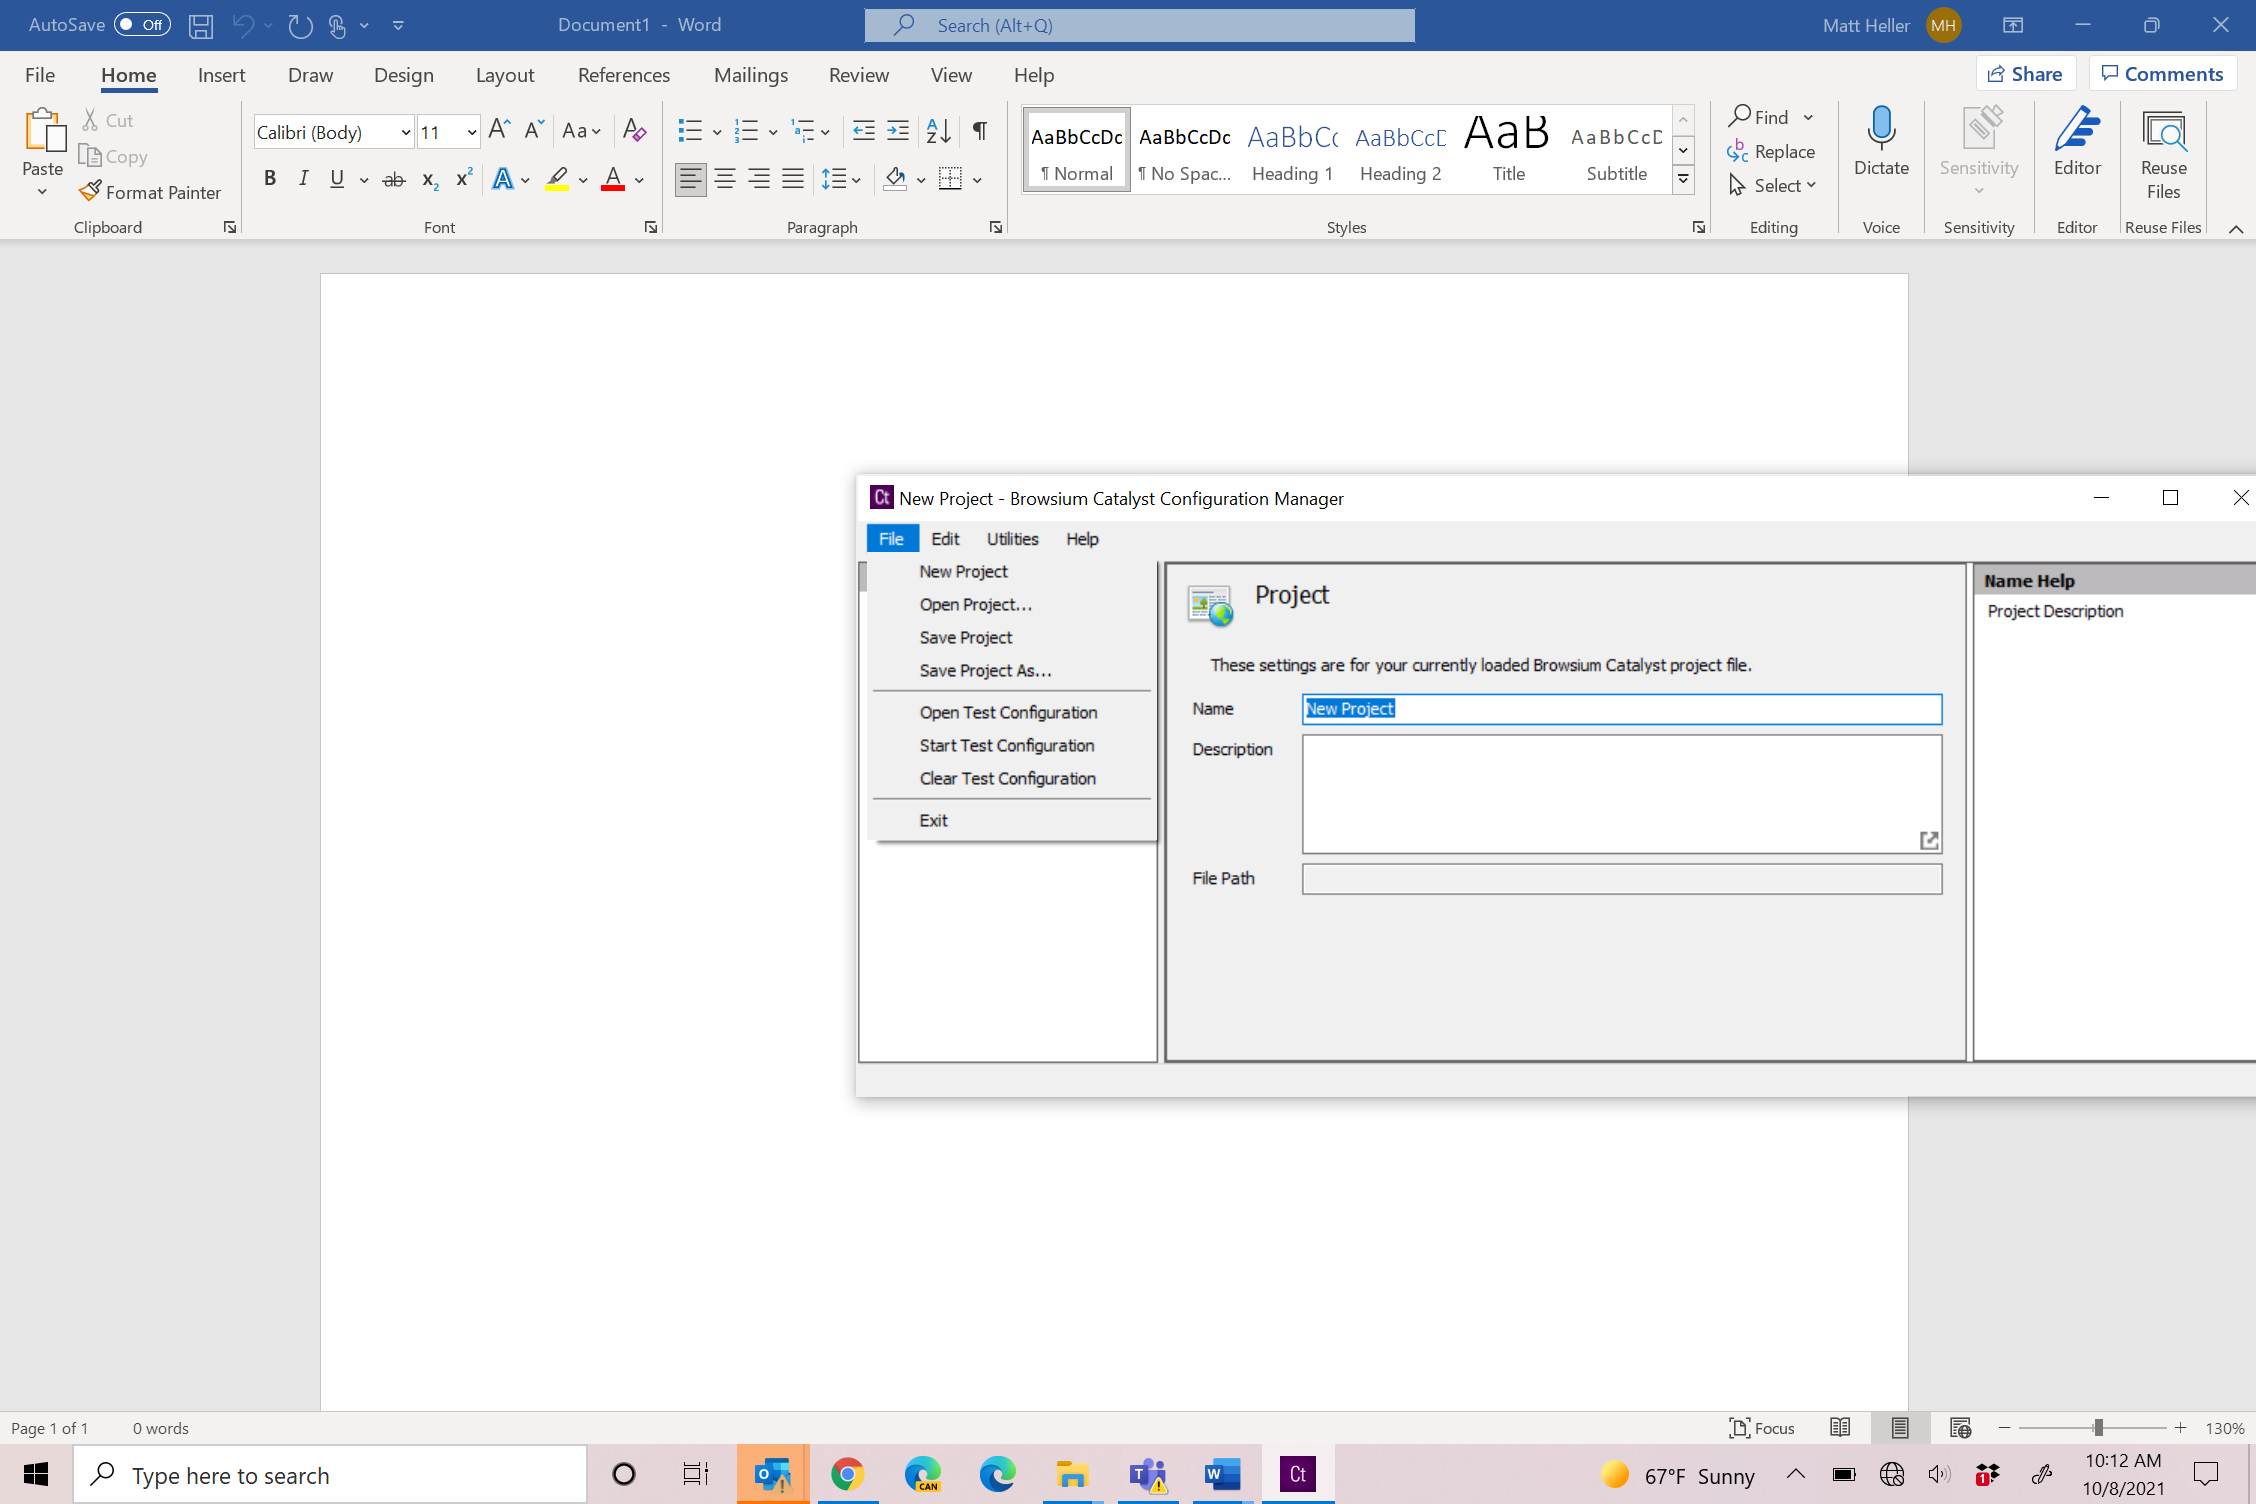
Section titled “Menu Bar”Catalyst Configuration Manager Menu Bar provides access to key functions related to creating, editing, and testing Catalyst projects.
 {width=“1.5115890201224846in” height=“1.8328772965879265in”}
[]{#_The_Projects_Node .anchor}To aid in configuration testing and tuning, Catalyst Configuration Manager allows project developers to automatically apply project file pointers directly in the system registry and start or restart Browsium Controller to process the new configuration. This is performed via Start Test Configuration from the File menu, which writes the file pointer to the LoadFromFileName registry value in HKEY_LOCAL_MACHINE\SOFTWARE\(Wow6432Node)\Browsium\Catalyst before starting or restarting Browsium Controller.
This option reduces delays and overhead of manually editing the registry or deploying registry changes via Group Policy. Open Test Configuration opens the project file found in LoadFromFileName (if Start Test Configuration had been run prior). Clear Test Configuration clears LoadFromFileName in the registry and stops Browsium Controller.
Start Test Configuration automatically saves the current project before writing the LoadFromFileName registry value and restarting the Controller. If the project has not been saved prior, you will be prompted to save the file to a new location before continuing.
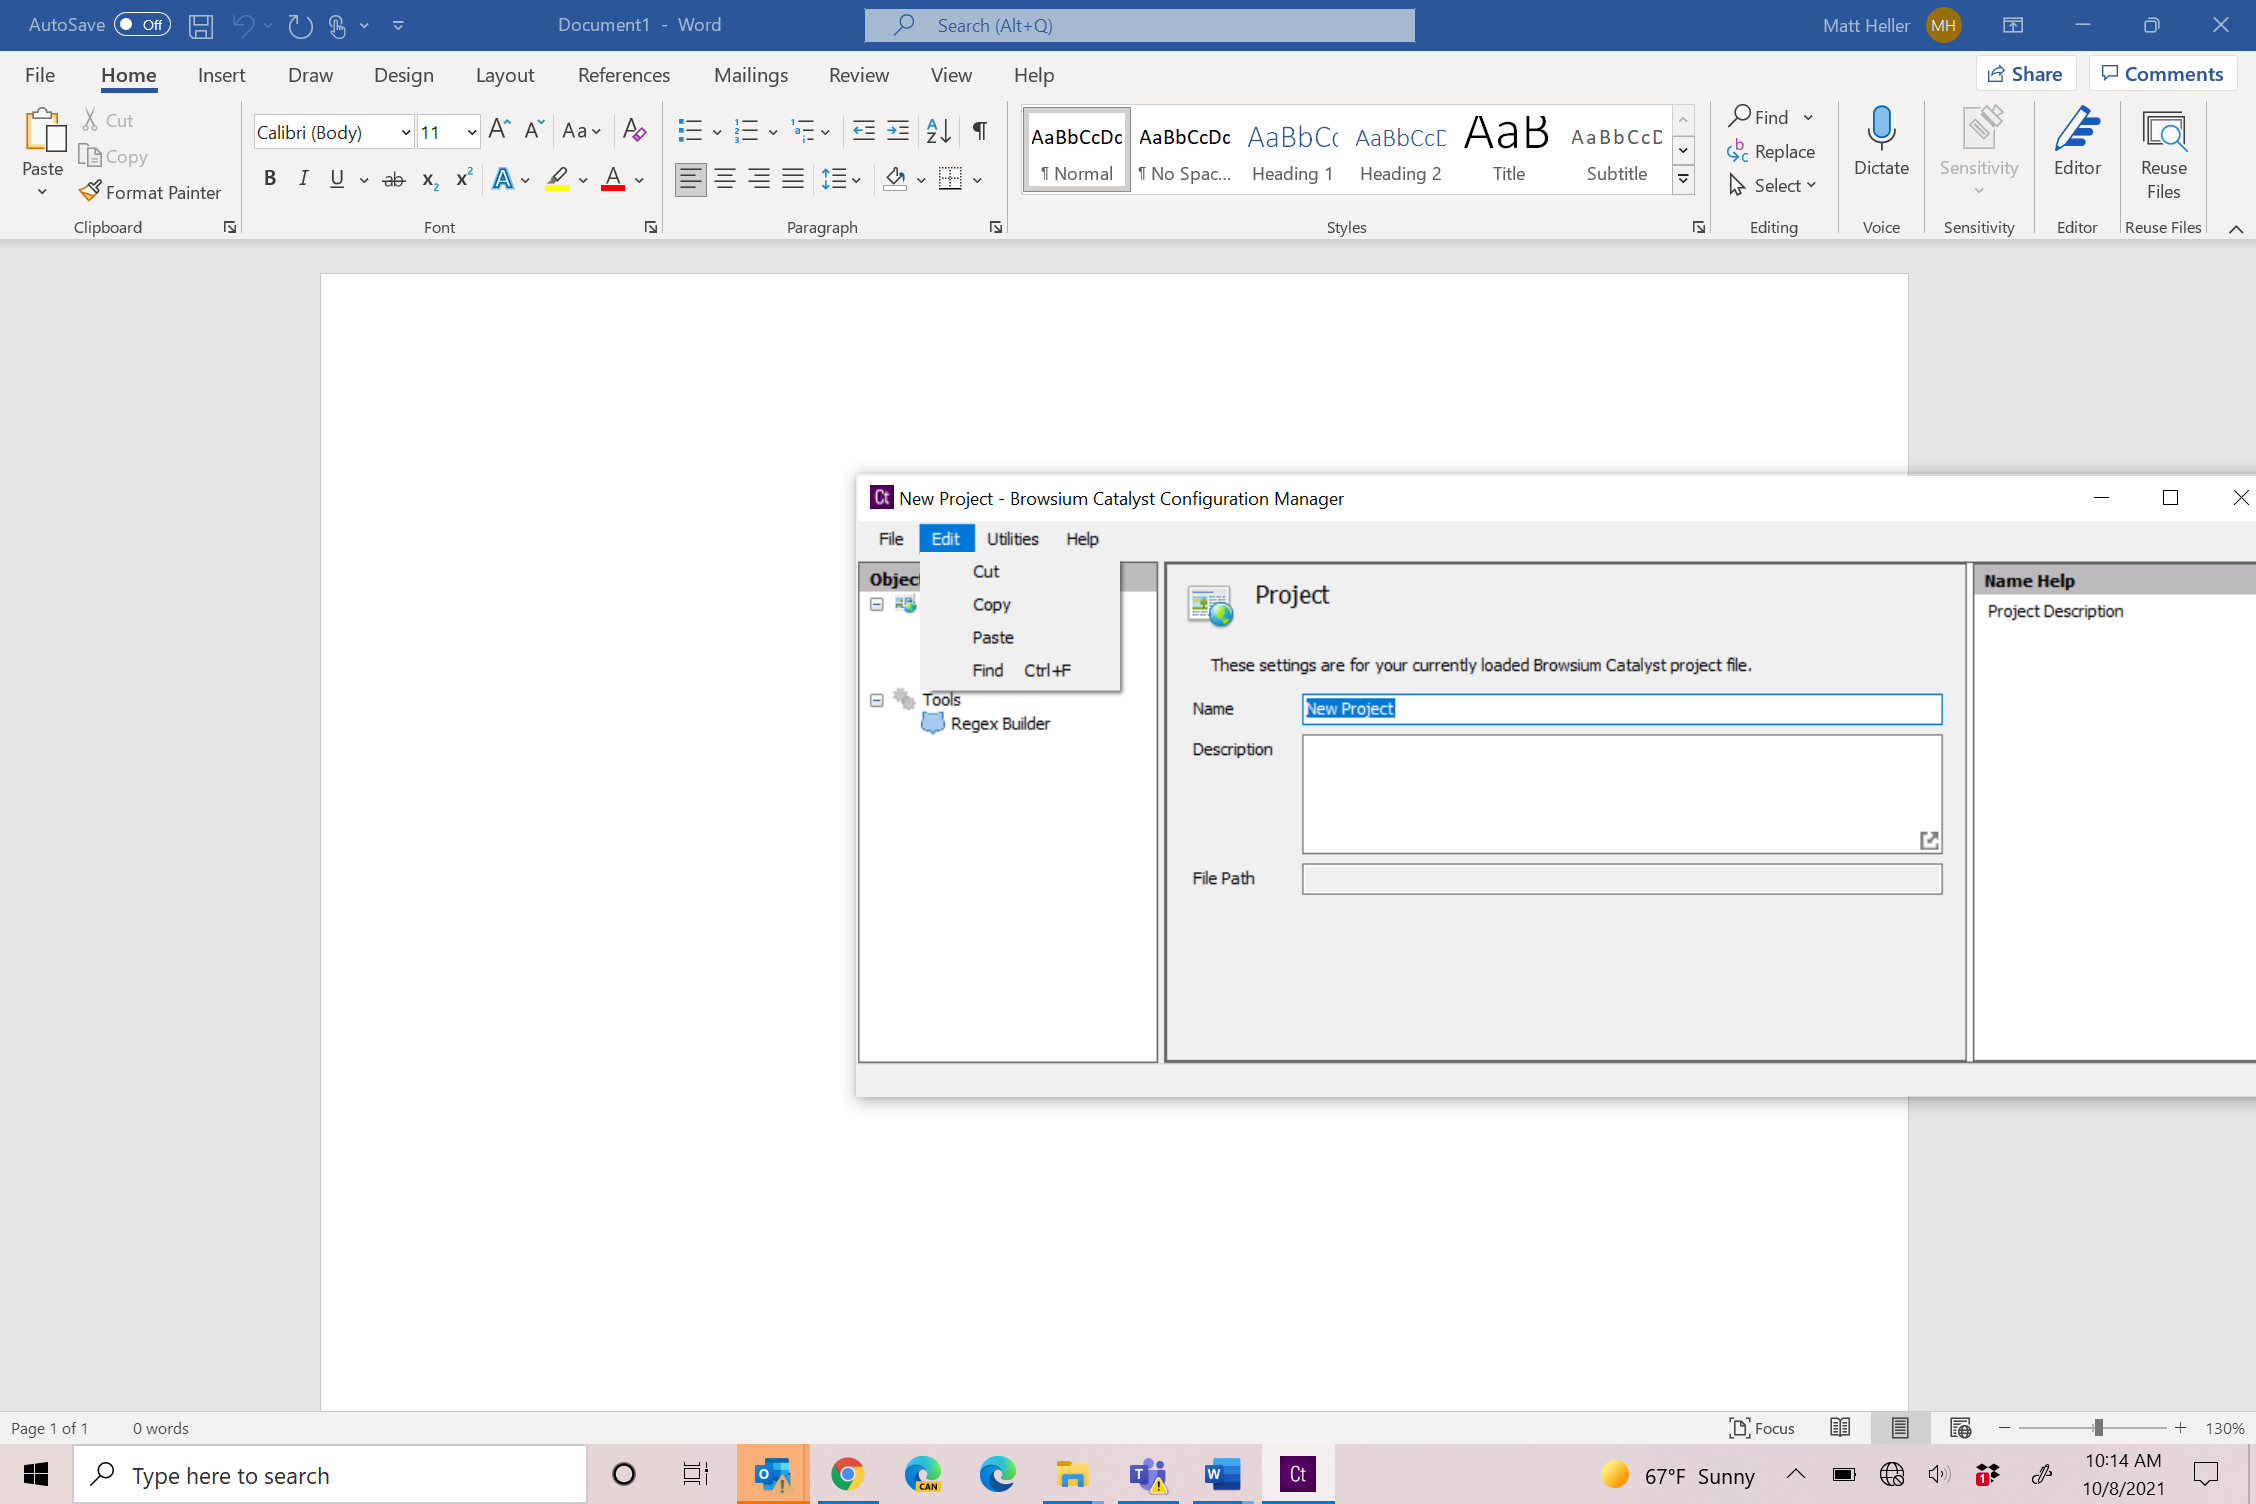
The Edit menu provides Cut, Copy, and Paste functions to assist in project editing and moving rules between projects. These functions are also available in the Actions pane for the Rules Manager for easy access. The Edit menu also has a Find function (available from the menu or via
Control-F) which searches for specific strings inside the project.
 {width=“1.381923665791776in” height=“1.057965879265092in”}
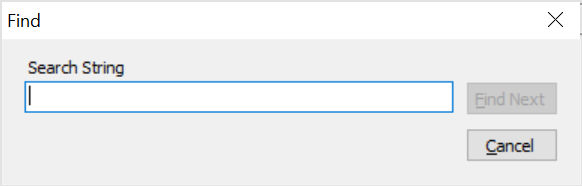
The Find function will search all text in the Project Node, excluding the Project Node itself, starting with the current location of the cursor, and continue looping through the project continuously as you select Find Next.
 {width=“2.566373578302712in” height=“0.8201815398075241in”}
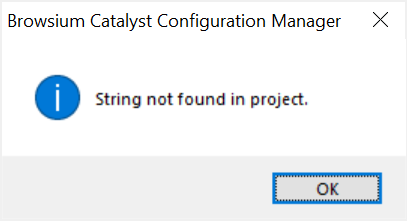
If the string is not found anywhere in the project, you will receive a ‘string not found’ error.
 {width=“2.241195319335083in” height=“1.2169630358705161in”}
The Find function does not highlight the matched strings in the project file. It simply brings the appropriate manager node or page into focus.
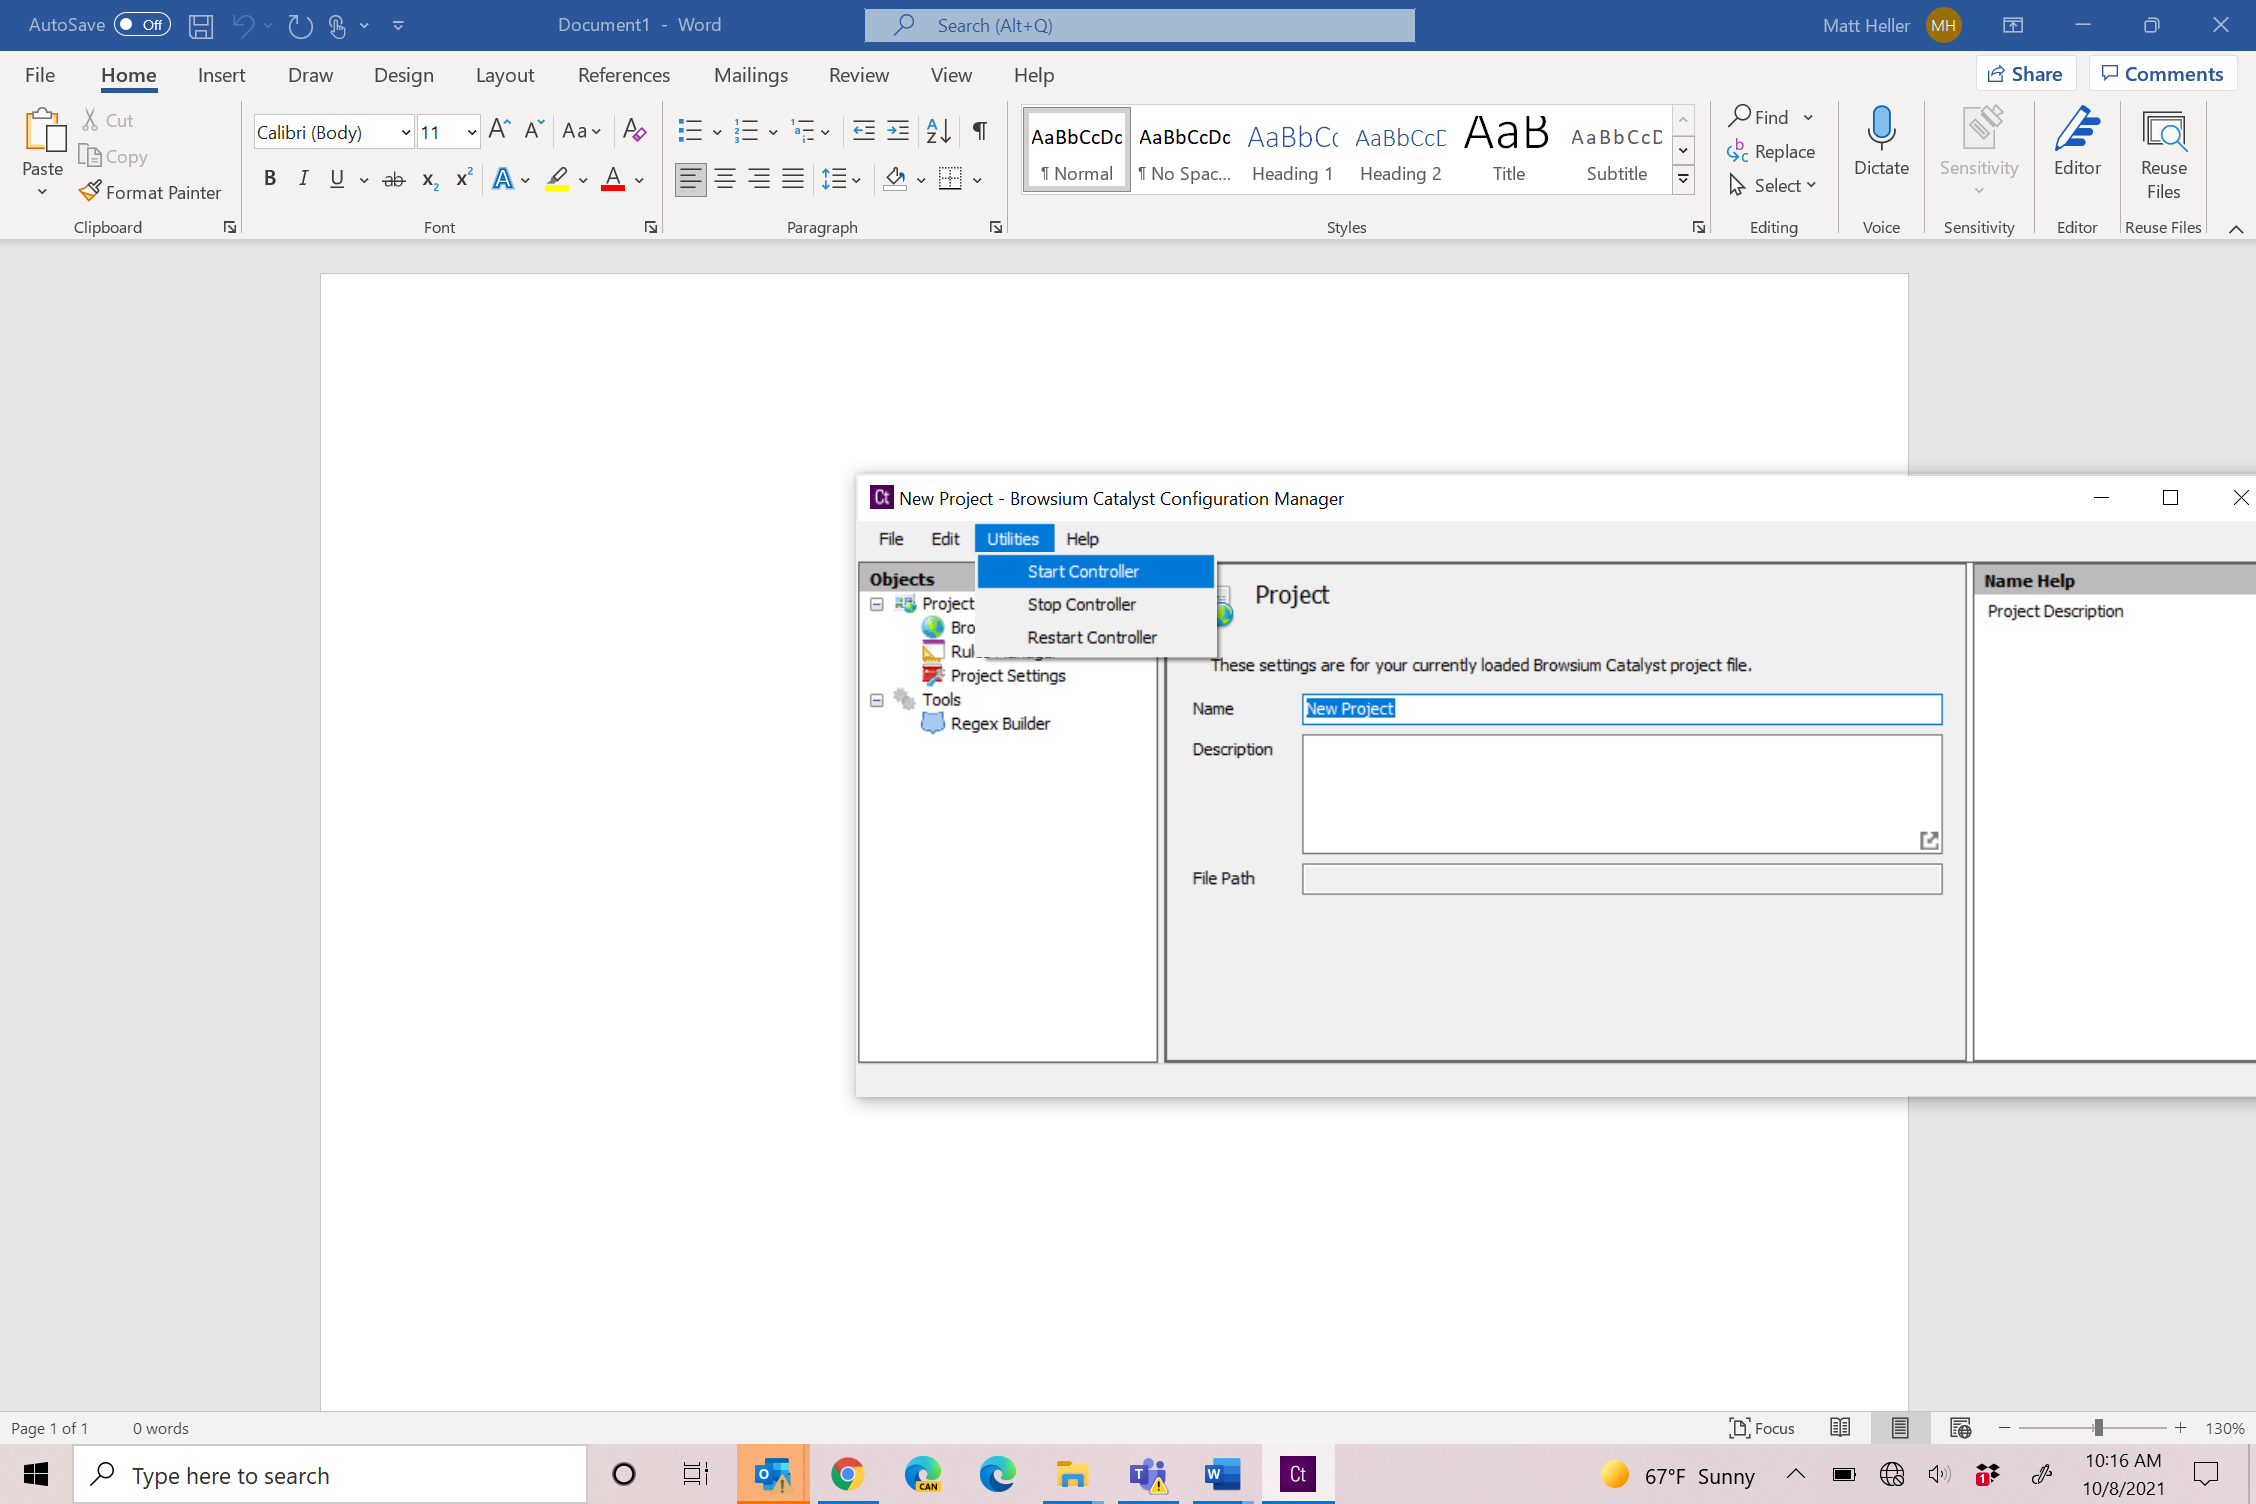
You can use the Utilities menu to manage Browsium Controller (BrowsiumController.exe) process. You may need to Start/Stop/Restart Browsium Controller to load new configurations or reproduce troubleshooting steps.
 {width=“2.918082895888014in” height=“1.1526498250218722in”}
Project Node
Section titled “Project Node”The Project node displays the configuration file currently loaded in Catalyst Configuration Manager. An individual project file (.CAX file extension) contains all of the configuration information needed for a given set of browsers and rules. Catalyst Configuration Manager is designed to load one project per instance. Loading multiple projects can be done by opening each project in another Catalyst Configuration Manager instance. Browsers and rules can be copied and pasted between projects.
 {width=“1.3949289151356081in” height=“1.2679636920384951in”}
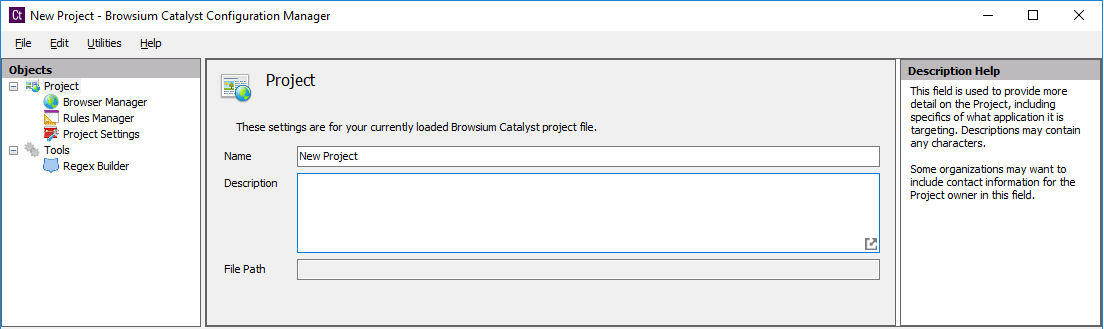
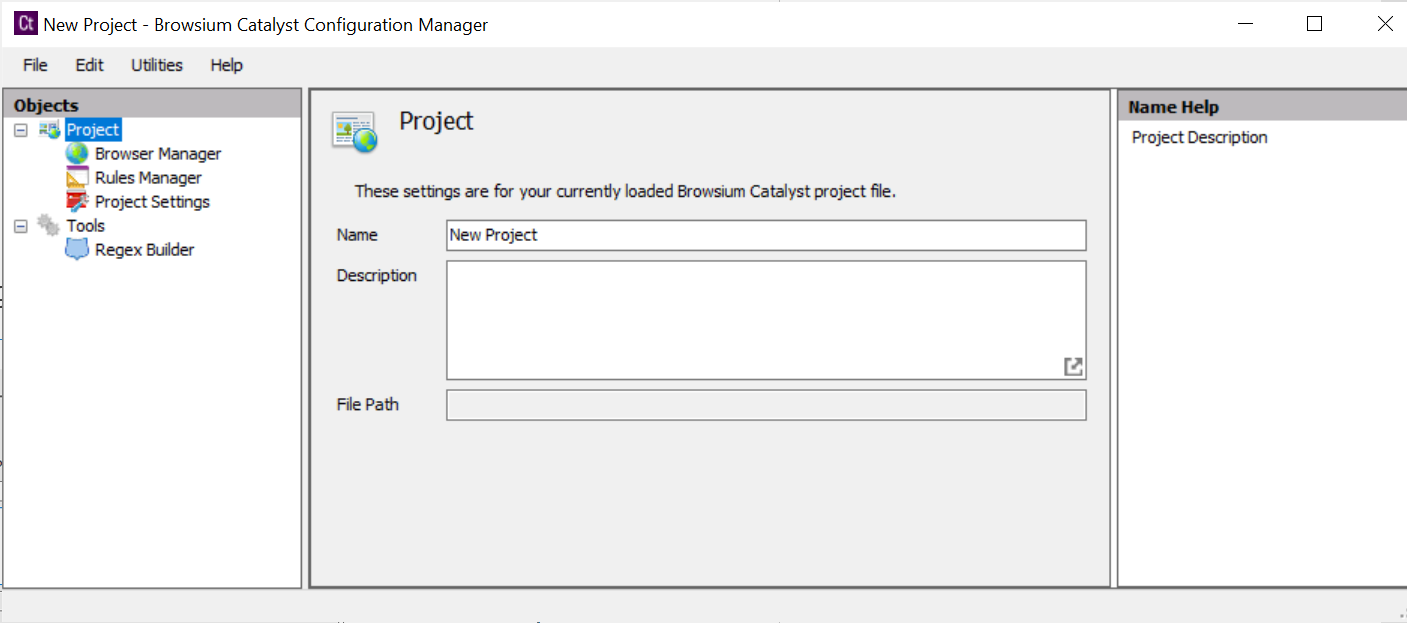
Loading a project (or creating a new project) brings up the Project details in the Content Pane.
{width=“5.729166666666667in” height=“1.7090627734033246in”}
Project details (Name and Description) can be edited on this screen. Projects are assigned a default name and a blank description and should be edited to reflect information and labeling relevant to your organization. The project’s File Path is blank until you save the project file. This field cannot be edited but will be updated automatically if the project is saved to a new location.
Browser Manager Node
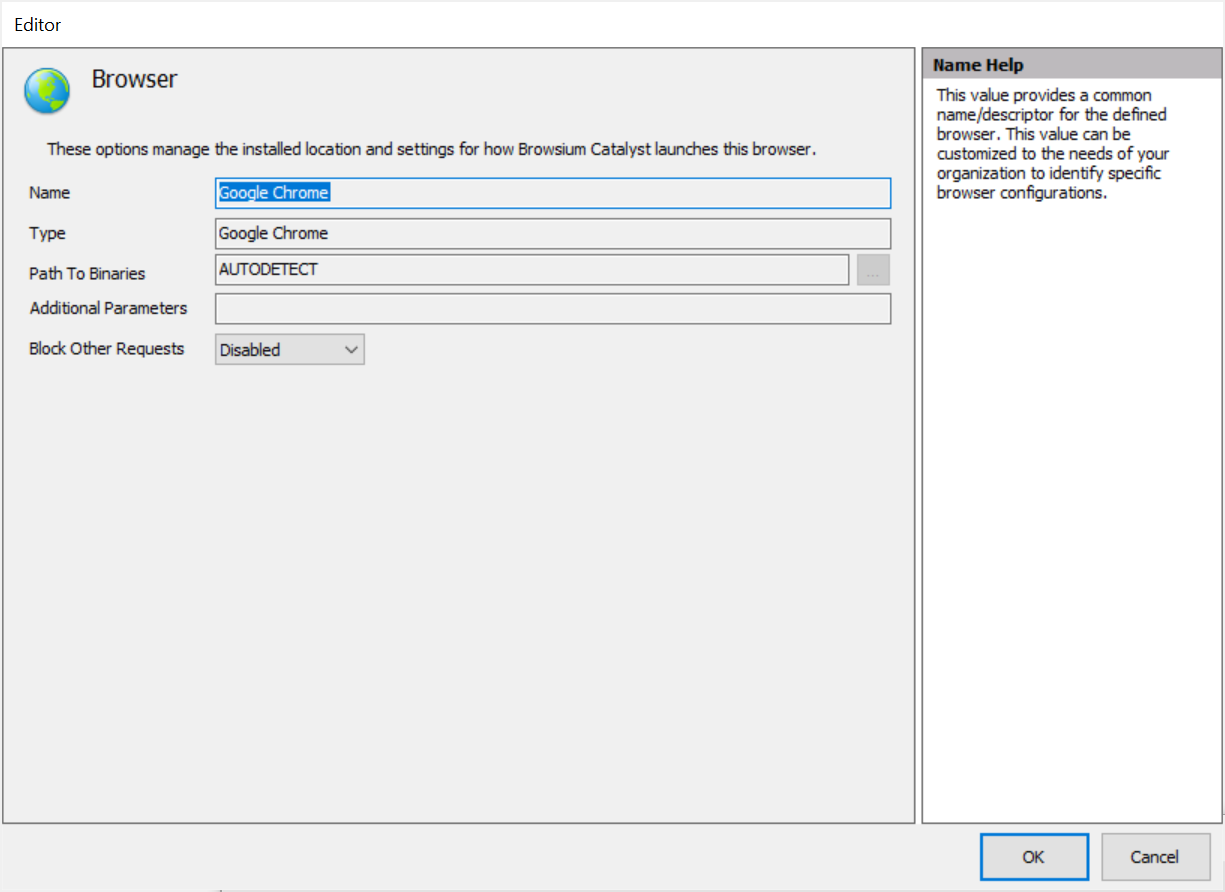
Section titled “Browser Manager Node”The Browser Manager contains the list of defined browsers for a given system. Catalyst supports six preset browser definitions — Google Chrome, Microsoft Edge (Legacy, Chromium, and Edge IE Mode), Microsoft Internet Explorer, and Mozilla Firefox— by default. Catalyst Configuration Manager will attempt to automatically determine the installation path for each installed browser. If a required browser is not present or not installed on the machine where the Browsium Client is running and a rule requires the given browser, that rule is skipped and may result in a misconfiguration or unexpected behavior.
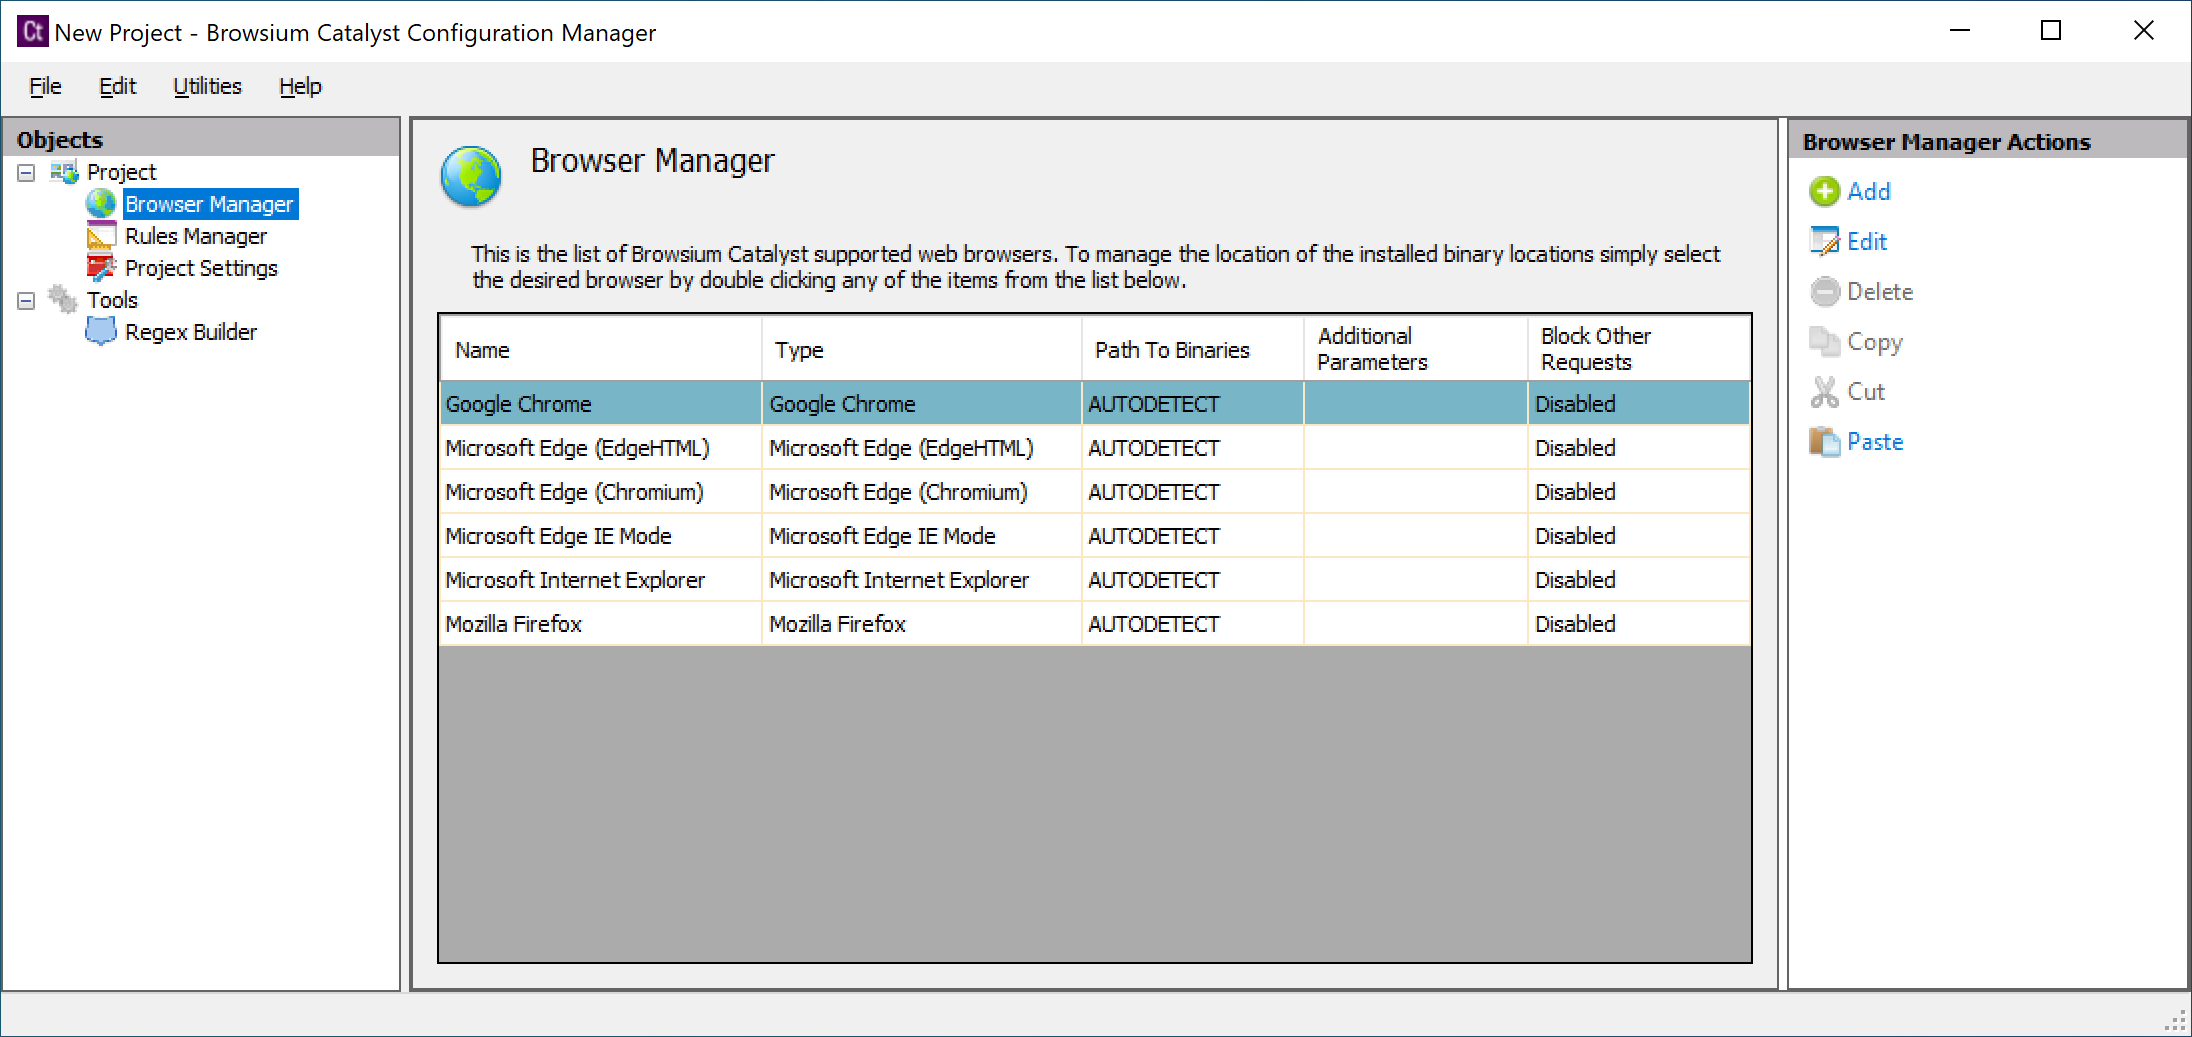 {width=“5.836146106736658in” height=“1.8735990813648293in”}
Selecting a browser and then selecting Edit from the Browser Manager Actions pane will bring up the Browser Editor. For the preset browsers (Chrome, Microsoft Edge, Internet Explorer, and Firefox), you will see four read-only fields and one field (Block Other Requests) which can be toggled between Disabled and Enabled. Custom browsers allow editing of all fields.
 {width=“4.196324365704287in” height=“3.0557852143482065in”}
Browser Name — This is the name of the browser. Browser names are ready-only for the preset browsers, but can be modified to reflect naming relevant to your organization for custom browsers.
Browser Type — The Browser Type value is used by Catalyst to identify which type of browser is defined by the setup. This value is required to support multiple browser instances and variations. Setting the Browser Type incorrectly may cause unexpected behaviors.
Path to Binaries — This is the path location containing the application binaries. Catalyst needs to have the accurate location of the binaries to properly load the defined browser when rule conditions are met. Errors in the path location will cause Catalyst to fail to properly load a browser or web content. Paths to preset browsers are always automatically detected. Use of the system variable %ProgramFiles% will ensure that the path to a custom browser works properly on both 32-bit and 64-bit Windows systems. See the example in section 3.3.1.
The Path to Binaries field must not contain quotes, even if the path includes spaces. Catalyst will properly handle the spaces to locate to browser executable.
Additional Parameters — In addition to launching a desired browser, Catalyst can open the browser using additional parameters specified here. Ensure any additional parameters are correct for the specific browser as incorrect items may cause the browser to stop loading.
Additional Parameters are often used when creating a custom browser for Google Chrome to launch Chrome in Application Mode (with no address bar or menus). Use the syntax —app=${url} to launch Chrome in Application Mode.
Block Other Requests — By default, Catalyst is designed to only intervene in content loading and redirection when explicitly defined by a rule. Setting this option will prevent the user from loading any content in the specified browser unless the content matches a rule.
Use caution when setting Block Other Requests to Enable, as users may become confused when the browser redirects any address entered that does match rules targeted for that browser.
[]{#_Add_a_Custom .anchor}
Add a Custom Browser
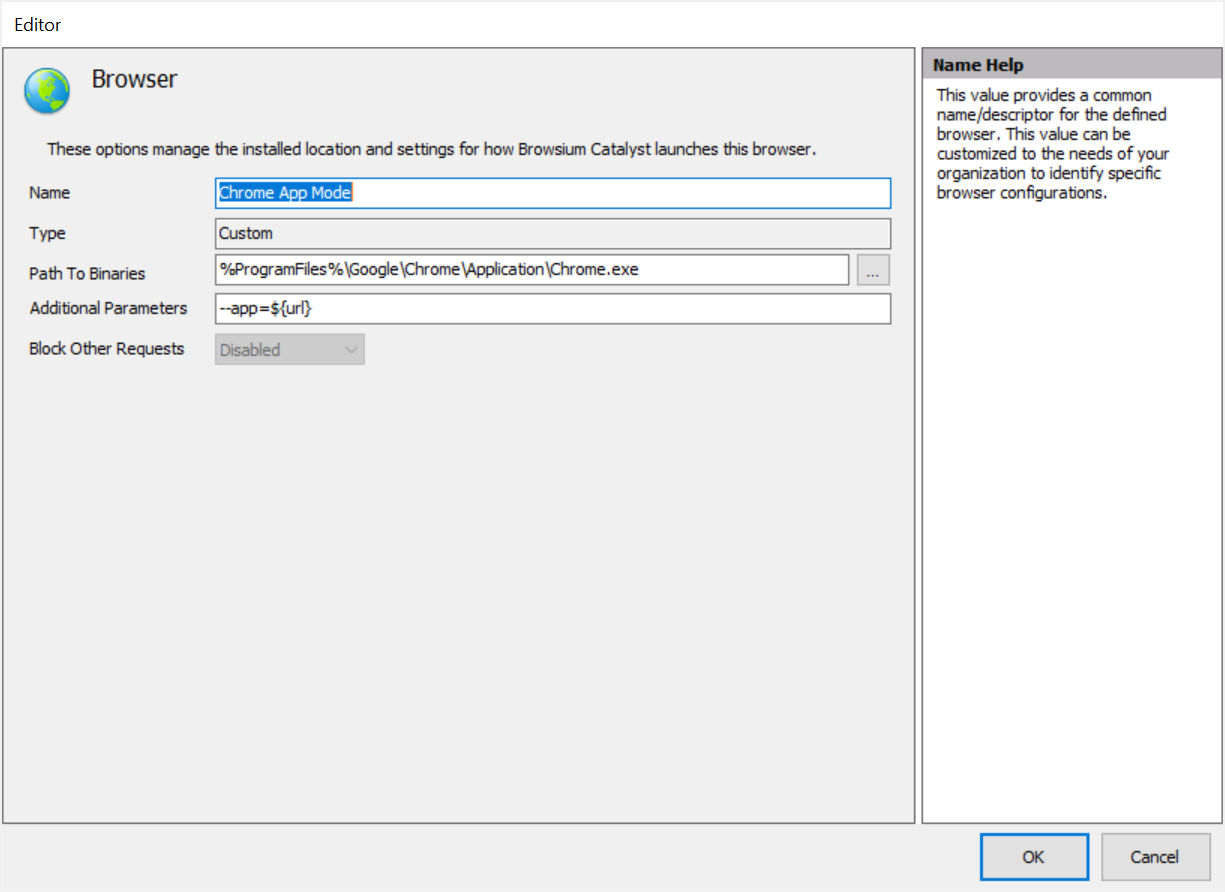
Section titled “Add a Custom Browser”Selecting Add from the Browser Manager Actions pane enables the addition of a custom browser. Custom browsers are typically Target Browsers only, meaning that they can be the destination browser for a rule, but cannot process rules themselves because they don’t have a Catalyst browser extension. Examples include Opera and Safari, which would be set as Type = Custom.
However, a custom browser can be created of type Google Chrome and be capable of processing rules. This is typically done to launch Chrome with special parameters, such as Application Mode or Kiosk Mode.
The following example configures a custom browser named Chrome App Mode, launching Chrome in Application Mode. Although the Type is still Custom, Catalyst recognizes Google Chrome as the binary and allows rules to be processed.
 {width=“5.2319553805774275in” height=“3.809937664041995in”}
Rules Manager Node
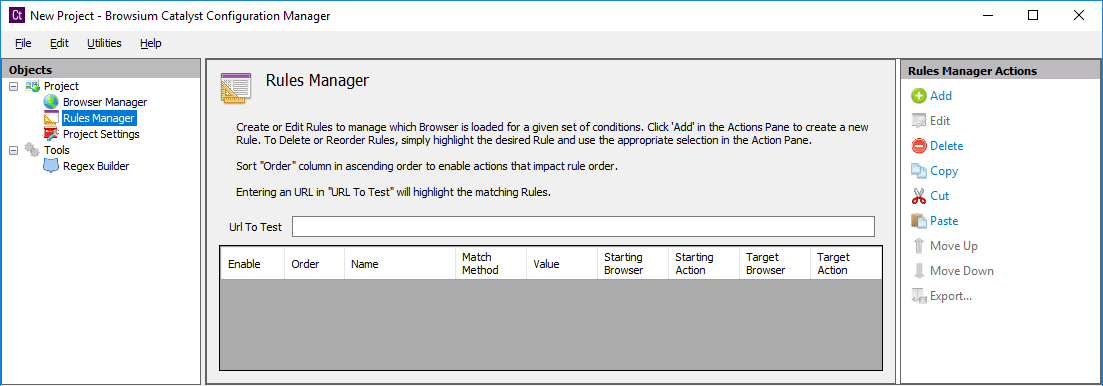
Section titled “Rules Manager Node”The Rules Manager is the main interface for creating, editing and managing evaluation criteria which Catalyst uses to determine which browser opens each web application. This section contains details on the various elements of this interface.
 {width=“5.729166666666667in” height=“2.004342738407699in”}
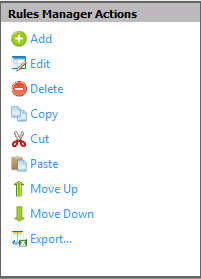
The Rules Manager shows the hierarchical rules list that Catalyst uses to determine what (if any) action to take when a web address is entered. The Url To Test box allows administrators an easy way to enter a given Url and see which Rule will be triggered by the value. The heading for each column in this window refers to the specific rule element for a given rule. The Rules Manager Actions pane will display the available options for managing rules.
 {width=“1.7754615048118985in” height=“2.464445538057743in”}
Add — To create a new rule, click the Add link in the Actions Pane to bring up the Rule Editor window. By default, the rule will be added at the bottom of the list in Rules Manager. If you first select a rule in Rules Manager, the new rule will be added immediately below the selected rule. See the description of the Move Rule Up/Move Rule Down feature for more information on rule order. The Rule Editor section provides details on the options and values in the Rule Editor window. See the How to Create a Rule Section for details on creating rules.
Edit Rule — URLs and rule definitions can be complex, and complexity may lead to typographical errors. If you make a mistake or need to revise a rule, simply double click the line to edit (or highlight the line and click the Edit Rule link in the Actions Pane) to make the necessary changes.
Delete Rule — To delete a rule, select it from the Rules Manager Window, then click the Delete Rule link in the Actions Pane. To disable a rule, rather than remove it, uncheck the Enable checkbox.
Copy — To copy a rule, select the item from the Rules Manager Window and click Copy in the Actions Pane.
Cut — To cut a rule (which copies the item to the clipboard rather than delete it entirely), select the item from the Rules Manager Window and click Cut in the Actions Pane.
Paste — The Paste item in the Actions Pane can be used to paste items from the clipboard to the currently loaded, active project. For example, you can Copy/Paste items within a single project or Copy from one project and Paste into another.
Move Rule Up/Move Rule Down — Rules are evaluated in the order they are stored, so the sequence of rules can be critical to the proper functionality of your web applications in Catalyst. By default, rules are ordered in the sequence they are added. You can override this default by selecting a rule in Rules Manager prior to adding a new one. The new rule will be added immediately below the selected rule. To manually adjust the order of a rule, simply highlight the rule and use the Move Up and Move Down actions to move it to the proper placement.
Export — Saves the complete list of rules to a CSV file, with the following fields: Enable, Name, Match Method, Value, Starting Browser, Starting Action, Target Browser, Target Action. This file can be used to share information about the Catalyst rules with other members of the IT team. Note that Catalyst has no rules import function, so modifications to this CSV file cannot be programmatically applied to your Catalyst project file.
[]{#_Rule_Editor .anchor}
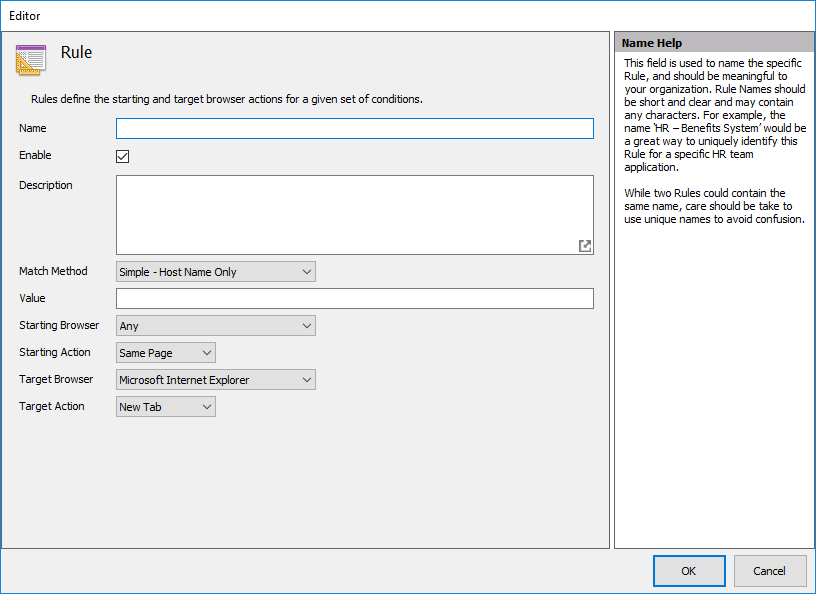
Rule Editor
Section titled “Rule Editor”The Rule Editor window is used for creating new rules or editing existing rules.
 {width=“4.271891951006125in” height=“3.1166666666666667in”}
Name - You can name a rule using any characters without restriction or character count limit. Rule names are for your use and identification only, and have no impact on functionality. Browsium recommends using rule names that clearly describe what the rule is used for, so it can be easily identified in the Rules Manager display.
Enable (checkbox) - All rules are enabled by default when created. Some rules may contain complex parameters or complex paths and it may be more practical to simply disable a rule rather than remove it if the rule is not needed or to test ordering behaviors, etc. To disable a rule, click the checkbox to remove the check or click the checkbox next to the rule name in the Rules Manager.
Description - Many organizations will have multiple staff members working with rule creation and Catalyst configurations. To reduce confusion when working with multiple team members, the description field can be used to provide notes or even detailed explanations of the purpose for the given rule. Some organizations also require the owner of the rule to be identified in the description to streamline internal communications when a problem or question arises with a given rule.
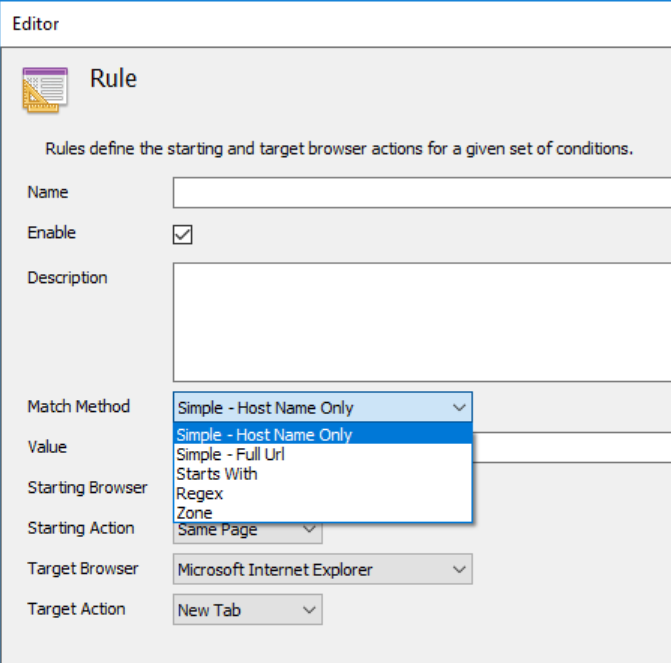
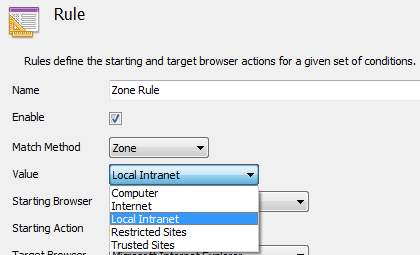
Match Method — Most rules require a simple string match of the URL to trigger Catalyst to direct the navigation to the chosen browser. Some complex URL configurations require advanced pattern matching techniques, so Catalyst provides the ability to match based on regular expressions (RegEx) if needed. You may also use Zone as the match method so that rules are triggered based on the Internet Explorer Zone of the target web application.
 {width=“2.921519028871391in” height=“2.886560586176728in”}
Rules can be set to trigger based on following types of pattern matching.
Simple — Host Name Only (default): Performs case-insensitive, substring matches on the Fully Qualified Domain Name (FQDN). E.g., will match “example” in http://www.example.com.
Simple — Full Url: Performs case-insensitive, substring matches on the entire Url including subpath AND query string.
Starts With: Performs case-insensitive, ‘starts with’ string matches. If provided, the protocols must exactly match. (e.g., http://www.example.com will not match https://www.example.com)
RegEx: Performs complex matching using regular expressions. Be careful to escape special characters such as periods.
Zone: Matches URLs that are in specified zones.
**
Value — This field contains the string or integer to conditionally match for a Catalyst rule to be triggered. If Match Method is set to Zone, the Value field will change to a dropdown menu containing Computer, Internet, Local Intranet, Restricted Sites, and Trusted Sites.
 {width=“3.043721566054243in” height=“1.8479746281714786in”}
Starting Browser — This field determines which browser will evaluate the rule. The default is Any, meaning all browsers running the Browsium Client extension will evaluate the rule. A specific Starting Browser can be chosen so that Catalyst will evaluate the rule in that specific browser.
 {width=“3.2749387576552933in” height=“1.3228915135608048in”}
Starting Action — This field defines the Starting Browser navigation behavior. Same Page instructs the Starting Browser to cancel the desired navigation and remain on the current page, while opening the new URL in the Target Browser. Redirect navigates the Starting Browser to a redirection page (which can be customized by Catalyst admins), informing users as to why their navigation action opened in a different browser. Close Tab closes the Starting Browser tab (or entire browser if only one tab is open) as it navigates the Target Browser to the desired URL.
Target Browser — This field defines desired browser that will load the web page when the rule is triggered by the navigation action performed by the end user. When Target Browser is set to ‘None’, the navigation action will be aborted, effectively blocking end user access to that URL. When Target Browser is set to ‘Any’, the matching URL will be allowed in every browser, even those that have ‘Block Other Requests’ enabled.
Target Action — This field defines the Target Browser navigation behavior. New Tab opens the page in a new tab. New Window opens the page in a new window. New Session opens the page in the specified browser using a new user session.
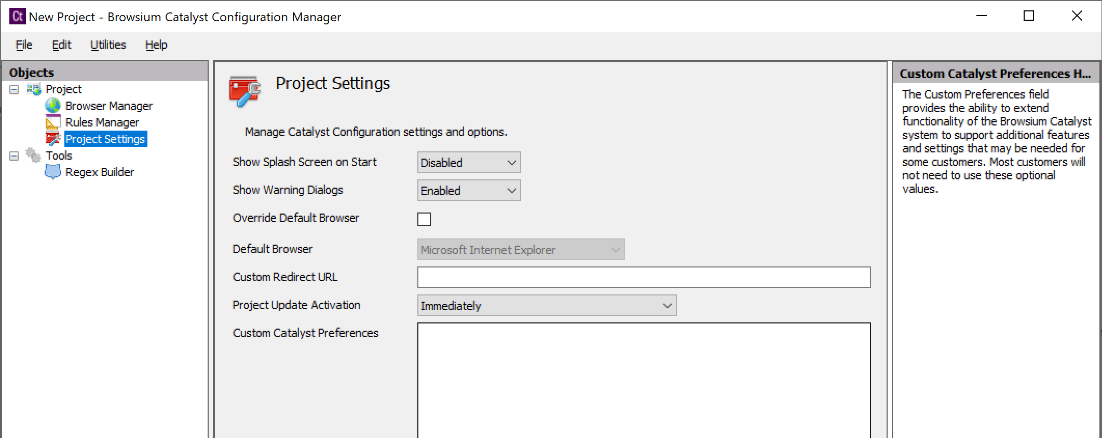
Project Settings Node
Section titled “Project Settings Node”The Project Settings Node gives you the ability to edit global settings for Catalyst configurations. These settings encompass features such as the Splash Screen behavior, Default Browser behavior and choice, and the location of custom redirection messages.
 {width=“4.991427165354331in” height=“1.9869564741907262in”}
Show Splash Screen on Start — By default, Catalyst disables showing the splash screen (Catalyst graphic with the product name and version number) on client systems when the Controller is started. This option can be enabled during project configuration. The splash screen is only displayed at startup (usually set to user login) so users should not regularly see this display.
Show Warning Dialogs - This sets whether or not Catalyst displays certain warning dialogs when a test configuration is started. This setting only displays a dialog on starting a test configuration when using the manager — deployed clients will never show warning dialogs regardless of the value for this setting.
Override Default — Defines whether Catalyst should override the default browser setting on the system, making Catalyst the default handler of HTTP and HTTPS traffic. It is checked by default, and must be checked for Catalyst to seamlessly handle navigation from desktop shortcuts and links in emails. However, if it is unchecked, Catalyst rules will still be honored as long as the Browsium Client extension is running in the default browser.
Default Browser — Allows an administrator to define the default browser (as defined by Catalyst) to be used for desktop shortcuts and links in emails when no rule exists. This setting also defines the default Target Browser for new rules.
Custom Redirect URL — Enables administrators to specify the URL for a custom page displayed when a rule includes Starting Action = Redirect.
Project Update Activation — Project Update Activation enables new Catalyst configurations to be loaded on the fly without restarting Browsium Controller (which typically requires a reboot or logoff/logon of the client computer). The field can be set to load the new configuration immediately (the default), at a scheduled time, or upon next Browsium Controller restart.
Custom Catalyst Preferences — Provides the ability to extend Catalyst functionality to support additional features and settings that may be needed for certain environments. Most customers will not need to use these optional values.
Custom Catalyst Preference Description
Catalyst.IEAddonDetectRedirects = true When this flag is set to “true”, Internet Explorer will detect 30x redirection (typically a 302 redirect) and evaluates rules on the redirected URL. By default, 30x redirected URLs are ignored.
Catalyst.IEAddonNoZoneHopRecovery = true There are two different “Same page” starting action behaviors implemented in the Browsium Client Internet Explorer extension when navigating between zones. Default behavior is to detect a zone hop and navigate back to the last page in the history of the starting browser. However, this functionality is unreliable in some environments where Internet Explorer’s travel log API is incorrectly providing incomplete travel log information. For such cases an alternate zone hop behavior was implemented that leaves Internet Explorer at “about:blank” page after a zone hop. This alternate behavior can be invoked by setting this flag to “true”.
Section titled “Catalyst.IEAddonNoZoneHopRecovery = true There are two different “Same page” starting action behaviors implemented in the Browsium Client Internet Explorer extension when navigating between zones. Default behavior is to detect a zone hop and navigate back to the last page in the history of the starting browser. However, this functionality is unreliable in some environments where Internet Explorer’s travel log API is incorrectly providing incomplete travel log information. For such cases an alternate zone hop behavior was implemented that leaves Internet Explorer at “about:blank” page after a zone hop. This alternate behavior can be invoked by setting this flag to “true”.”Regex Node
Section titled “Regex Node”The Regex (Regular Expression) Builder is for administrators to create and validate complex Regular Expressions that can be used in the rules evaluation criteria.
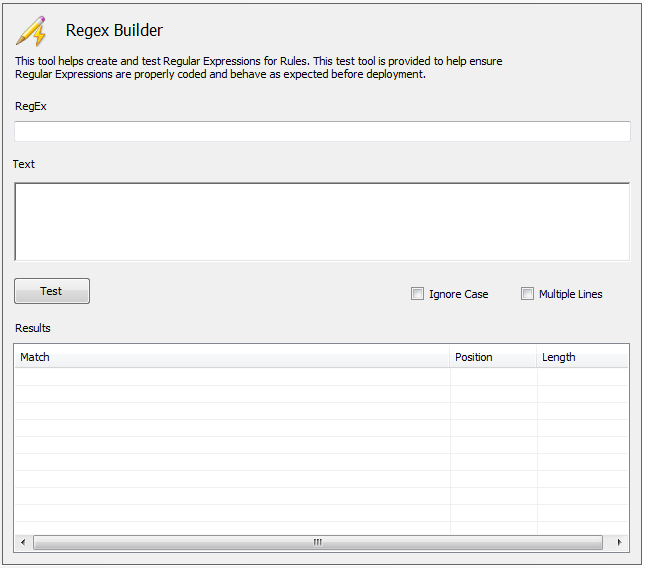 {width=“3.808675634295713in” height=“3.3541557305336833in”}
The Regex Builder provides a simple integrated tool for writing and testing Regular Expressions before using them as rules evaluation criteria to help avoid errors in pattern matching.
For more information on the Regex Builder, including a step by step example, please read the ‘Using regular expressions in Ion rules’ document in the Knowledge Base section of http://support.browsium.com.
More information on building and testing Regular Expressions can be found online, including regexhero.net or regexpal.com.
 {width=“1.222069116360455in” height=“1.222069116360455in”}
Section Four
Configuration Tutorial
In this section, you will learn:
- How to create and test a Catalyst project